Bitnami Sealed Secrets: How To Use In Kubernetes GitOps

Bitnami Sealed Secrets: How To Use In Kubernetes GitOps
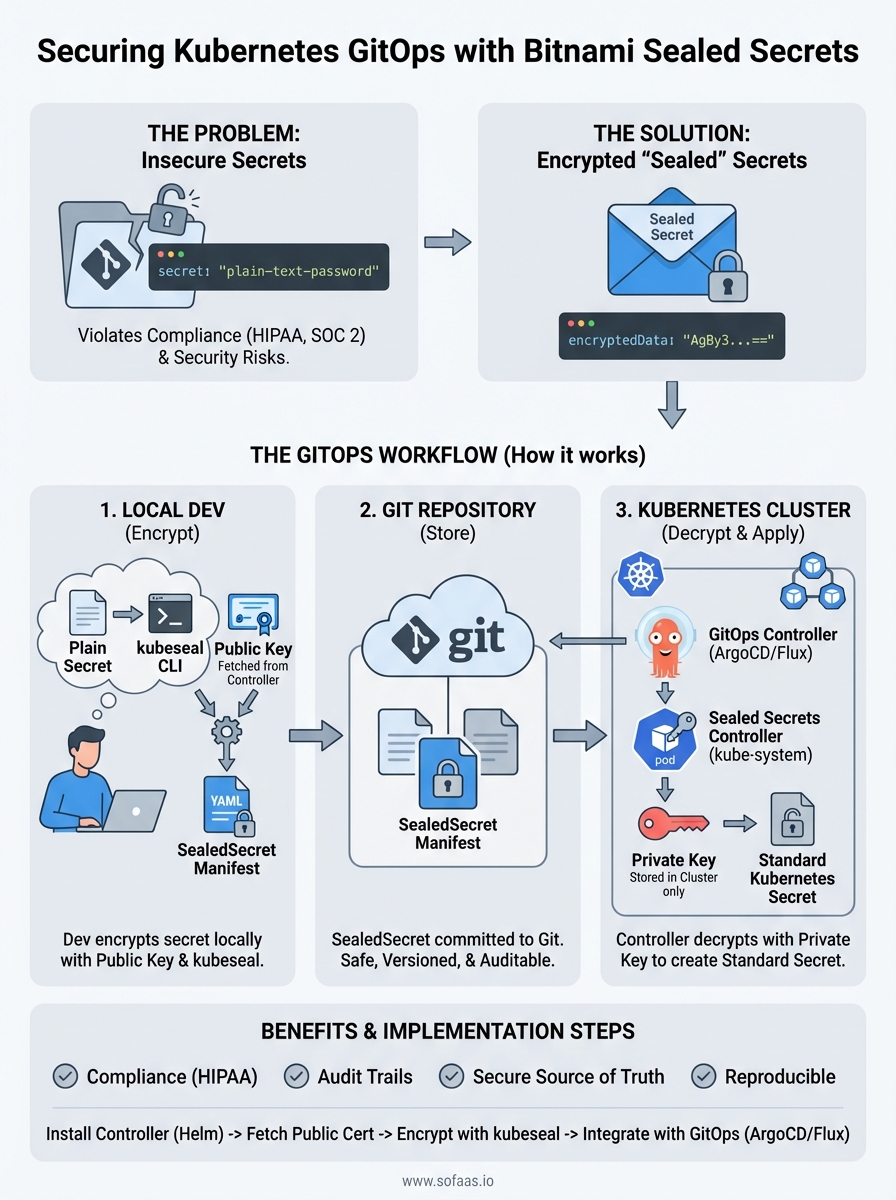
Storing Kubernetes secrets directly in Git repositories is a security nightmare, especially when you're building healthcare applications that handle sensitive patient data. Plain-text secrets in version control violate compliance requirements and create attack vectors that no security audit will overlook. Bitnami Sealed Secrets solves this problem by letting you encrypt secrets so they can safely live in your Git repos alongside your application code.
For teams practicing GitOps, this creates a powerful workflow: your entire infrastructure configuration, including secrets, becomes version-controlled, auditable, and reproducible. At SoFaaS, where we build HIPAA-compliant infrastructure for healthcare data integration, secure secrets management isn't optional, it's foundational to how we maintain SOC 2 Type II compliance and protect patient information flowing between EHR systems.
This guide walks you through implementing Sealed Secrets in your Kubernetes cluster. You'll learn how to install the controller, encrypt secrets using kubeseal, and integrate encrypted secrets into your GitOps pipeline. Whether you're deploying healthcare applications or any workload requiring strict security controls, you'll have a working secrets management solution by the end.
What Bitnami Sealed Secrets solves in GitOps
GitOps requires storing your entire infrastructure configuration in Git, but standard Kubernetes secrets create an impossible dilemma. You can either commit unencrypted secrets to your repository (which violates security policies and compliance requirements) or manage secrets outside your GitOps pipeline (which defeats the purpose of having a single source of truth). Healthcare organizations building on platforms like SoFaaS face even stricter constraints, where exposed API keys or database credentials could trigger HIPAA violations and regulatory fines.
The traditional secrets problem in GitOps
Your GitOps workflow breaks down the moment you need to deploy applications that require sensitive configuration data like database passwords, OAuth tokens, or encryption keys. Standard Kubernetes secrets are only base64-encoded, which provides zero actual security. Anyone with read access to your repository can decode these values instantly, making them effectively plain text.
Most teams resort to storing secrets in external systems like HashiCorp Vault or AWS Secrets Manager, then reference them in their Kubernetes manifests. This approach introduces operational complexity and creates a split between your infrastructure code and the secrets it depends on. Your deployments now require coordination across multiple systems, breaking the declarative simplicity that makes GitOps powerful.
GitOps workflows fail when secrets management forces you to maintain configuration across multiple disconnected systems.
How encryption changes the workflow
Bitnami Sealed Secrets uses asymmetric cryptography to let you encrypt secrets with a public key before committing them to Git. The sealed secret controller running in your cluster holds the private key and automatically decrypts these resources into standard Kubernetes secrets when you apply them. Your Git repository becomes the single source of truth again, because encrypted secrets are safe to store alongside your application manifests.

This solves the GitOps dilemma completely. You can now review secret changes in pull requests, track who modified which credentials through Git history, and roll back problematic deployments by reverting commits. Your entire infrastructure state lives in version control without compromising security or compliance requirements.
Step 1. Install the Sealed Secrets controller
Your Kubernetes cluster needs the Sealed Secrets controller running before you can encrypt or decrypt any secrets. This controller acts as the cryptographic engine that generates the key pair and performs the actual decryption of sealed secrets into standard Kubernetes secrets. You'll deploy it once per cluster, typically in the kube-system namespace, where it operates as a cluster-wide service available to all your applications.
Using Helm to deploy the controller
Helm provides the fastest installation method for the Bitnami Sealed Secrets controller. You'll add the Sealed Secrets Helm repository, update your local cache, and install the chart with a single release name. This approach gives you configuration flexibility and makes future upgrades straightforward through standard Helm operations.
helm repo add sealed-secrets https://bitnami-labs.github.io/sealed-secrets
helm repo update
helm install sealed-secrets-controller sealed-secrets/sealed-secrets \
  --namespace kube-system
Installing the controller through Helm ensures you get the latest stable release with proper resource configurations.
Verifying the installation
Check that your controller pod reaches running status within a few minutes of installation. The controller needs to generate its encryption key pair during startup, which happens automatically on first boot. You'll see a single pod running in the kube-system namespace if everything deployed correctly.
kubectl get pods -n kube-system -l app.kubernetes.io/name=sealed-secrets
kubectl logs -n kube-system -l app.kubernetes.io/name=sealed-secrets
Your controller is ready when the logs show successful key generation and the pod status reports healthy.
Step 2. Fetch the public cert and set up kubeseal
Your cluster now has the controller running, but you need the kubeseal CLI tool on your local machine to encrypt secrets before committing them to Git. The controller generates a unique public certificate that kubeseal uses to encrypt your sensitive data, ensuring only that specific cluster can decrypt it. You'll extract this certificate once and reference it in your encryption workflow, creating a secure boundary between your development environment and production secrets.
Installing the kubeseal CLI
Download and install the kubeseal binary for your operating system from the official releases. Linux and macOS users can install through package managers or directly download the binary, while Windows users should grab the executable and add it to their system PATH. This command-line tool handles all encryption operations locally, so your plain-text secrets never leave your machine.
# macOS with Homebrew
brew install kubeseal

# Linux direct download
wget https://github.com/bitnami-labs/sealed-secrets/releases/download/v0.24.0/kubeseal-0.24.0-linux-amd64.tar.gz
tar xfz kubeseal-0.24.0-linux-amd64.tar.gz
sudo install -m 755 kubeseal /usr/local/bin/kubeseal
Extracting the public certificate
Fetch the public encryption certificate from your controller and save it to a local file that kubeseal will reference during encryption. This certificate contains only the public key, making it safe to share across your team or even commit to your repository. Your bitnami sealed secrets controller holds the corresponding private key securely within the cluster, where it remains inaccessible to external systems.
kubeseal --fetch-cert --controller-name=sealed-secrets-controller \
  --controller-namespace=kube-system > pub-sealed-secrets.pem
The public certificate enables encryption on any machine while keeping decryption restricted to your Kubernetes cluster.
Step 3. Create, scope, and apply SealedSecrets
You're ready to encrypt your first secret now that kubeseal and the public certificate are configured. This step transforms your plain-text Kubernetes secrets into encrypted SealedSecrets that you can safely commit to Git. You'll create a standard secret, pipe it through kubeseal for encryption, and apply the resulting encrypted manifest to your cluster where the controller automatically decrypts it.
Creating your first SealedSecret
Start by creating a standard Kubernetes secret locally, then encrypt it using kubeseal with the public certificate you extracted earlier. The encryption process reads your secret definition and outputs a SealedSecret custom resource that contains the encrypted data. Your original secret values remain secure because kubeseal performs the encryption locally before any data leaves your machine.

kubectl create secret generic database-credentials \
  --from-literal=username=postgres \
  --from-literal=password=super-secret-password \
  --dry-run=client -o yaml | \
kubeseal --cert=pub-sealed-secrets.pem \
  --format=yaml > sealed-database-credentials.yaml
The dry-run flag ensures your plain-text secret never reaches the cluster before encryption.
Scoping your secrets
Bitnami sealed secrets support three scope levels that control where your encrypted secrets can be decrypted: strict, namespace-wide, and cluster-wide. The default strict scope binds your secret to both a specific namespace and name, providing the strongest security by preventing secret reuse across different contexts. You set the scope through the scope annotation during encryption.
kubeseal --cert=pub-sealed-secrets.pem \
  --scope=namespace-wide \
  --format=yaml < secret.yaml > sealed-secret.yaml
Deploying to your cluster
Apply your encrypted SealedSecret manifest directly to your cluster using kubectl, just like any other Kubernetes resource. The controller detects the new SealedSecret, decrypts it using the private key, and creates a standard Kubernetes secret that your applications can reference. You can now commit the sealed-database-credentials.yaml file to your Git repository without security concerns.
kubectl apply -f sealed-database-credentials.yaml
kubectl get secret database-credentials -o yaml
Step 4. Run Sealed Secrets with ArgoCD or Flux
Your GitOps workflow requires automatic synchronization between your Git repository and cluster state, which means your ArgoCD or Flux controllers need to handle SealedSecrets just like any other Kubernetes resource. Both GitOps tools recognize SealedSecrets as custom resources and apply them directly to your cluster, where the bitnami sealed secrets controller decrypts them into usable secrets. You don't need special configuration or plugins because the decryption happens server-side through the controller you already installed.
Deploying with ArgoCD
ArgoCD automatically detects and syncs SealedSecret manifests from your Git repository without additional setup. You commit your encrypted sealed secrets alongside your deployment manifests, and ArgoCD applies them during synchronization. The controller handles decryption transparently, creating standard Kubernetes secrets that your application pods can mount.
apiVersion: argoproj.io/v1alpha1
kind: Application
metadata:
  name: my-app
spec:
  source:
    repoURL: https://github.com/your-org/your-repo
    path: manifests
  destination:
    namespace: production
ArgoCD treats SealedSecrets as standard Kubernetes resources, requiring zero additional configuration for encrypted secrets management.
Deploying with Flux
Flux reads your Git repository and applies all manifests it discovers, including SealedSecrets, through its Kustomize or Helm controllers. Your encrypted secrets live in the same directory structure as your other manifests, and Flux syncs them automatically. The sealed secrets controller decrypts them immediately upon application, making your secrets available before your application pods start.
apiVersion: kustomize.toolkit.fluxcd.io/v1beta2
kind: Kustomization
metadata:
  name: production
spec:
  path: ./clusters/production
  sourceRef:
    kind: GitRepository
    name: flux-system
Wrap up and next steps
You now have a complete bitnami sealed secrets implementation running in your Kubernetes cluster with GitOps integration. Your encrypted secrets live safely in version control alongside your application manifests, giving you full audit trails while maintaining security and compliance requirements. This setup scales from development environments to production clusters handling sensitive healthcare data.
Your next step is testing the complete workflow by creating a new secret, encrypting it with kubeseal, committing the sealed manifest to Git, and watching your GitOps controller automatically sync it to your cluster. Build confidence by rotating existing credentials through this process before migrating production secrets.
Healthcare teams building FHIR integrations need enterprise-grade infrastructure that handles compliance by default. If you're developing SMART on FHIR applications that require HIPAA-compliant secrets management built into the platform, launch your Smart on FHIR app with SoFaaS and get SOC 2 Type II infrastructure without the setup overhead.
The Future of Patient Logistics
Exploring the future of all things related to patient logistics, technology and how AI is going to re-shape the way we deliver care.
Thank you! Your submission has been received!
Oops! Something went wrong while submitting the form.