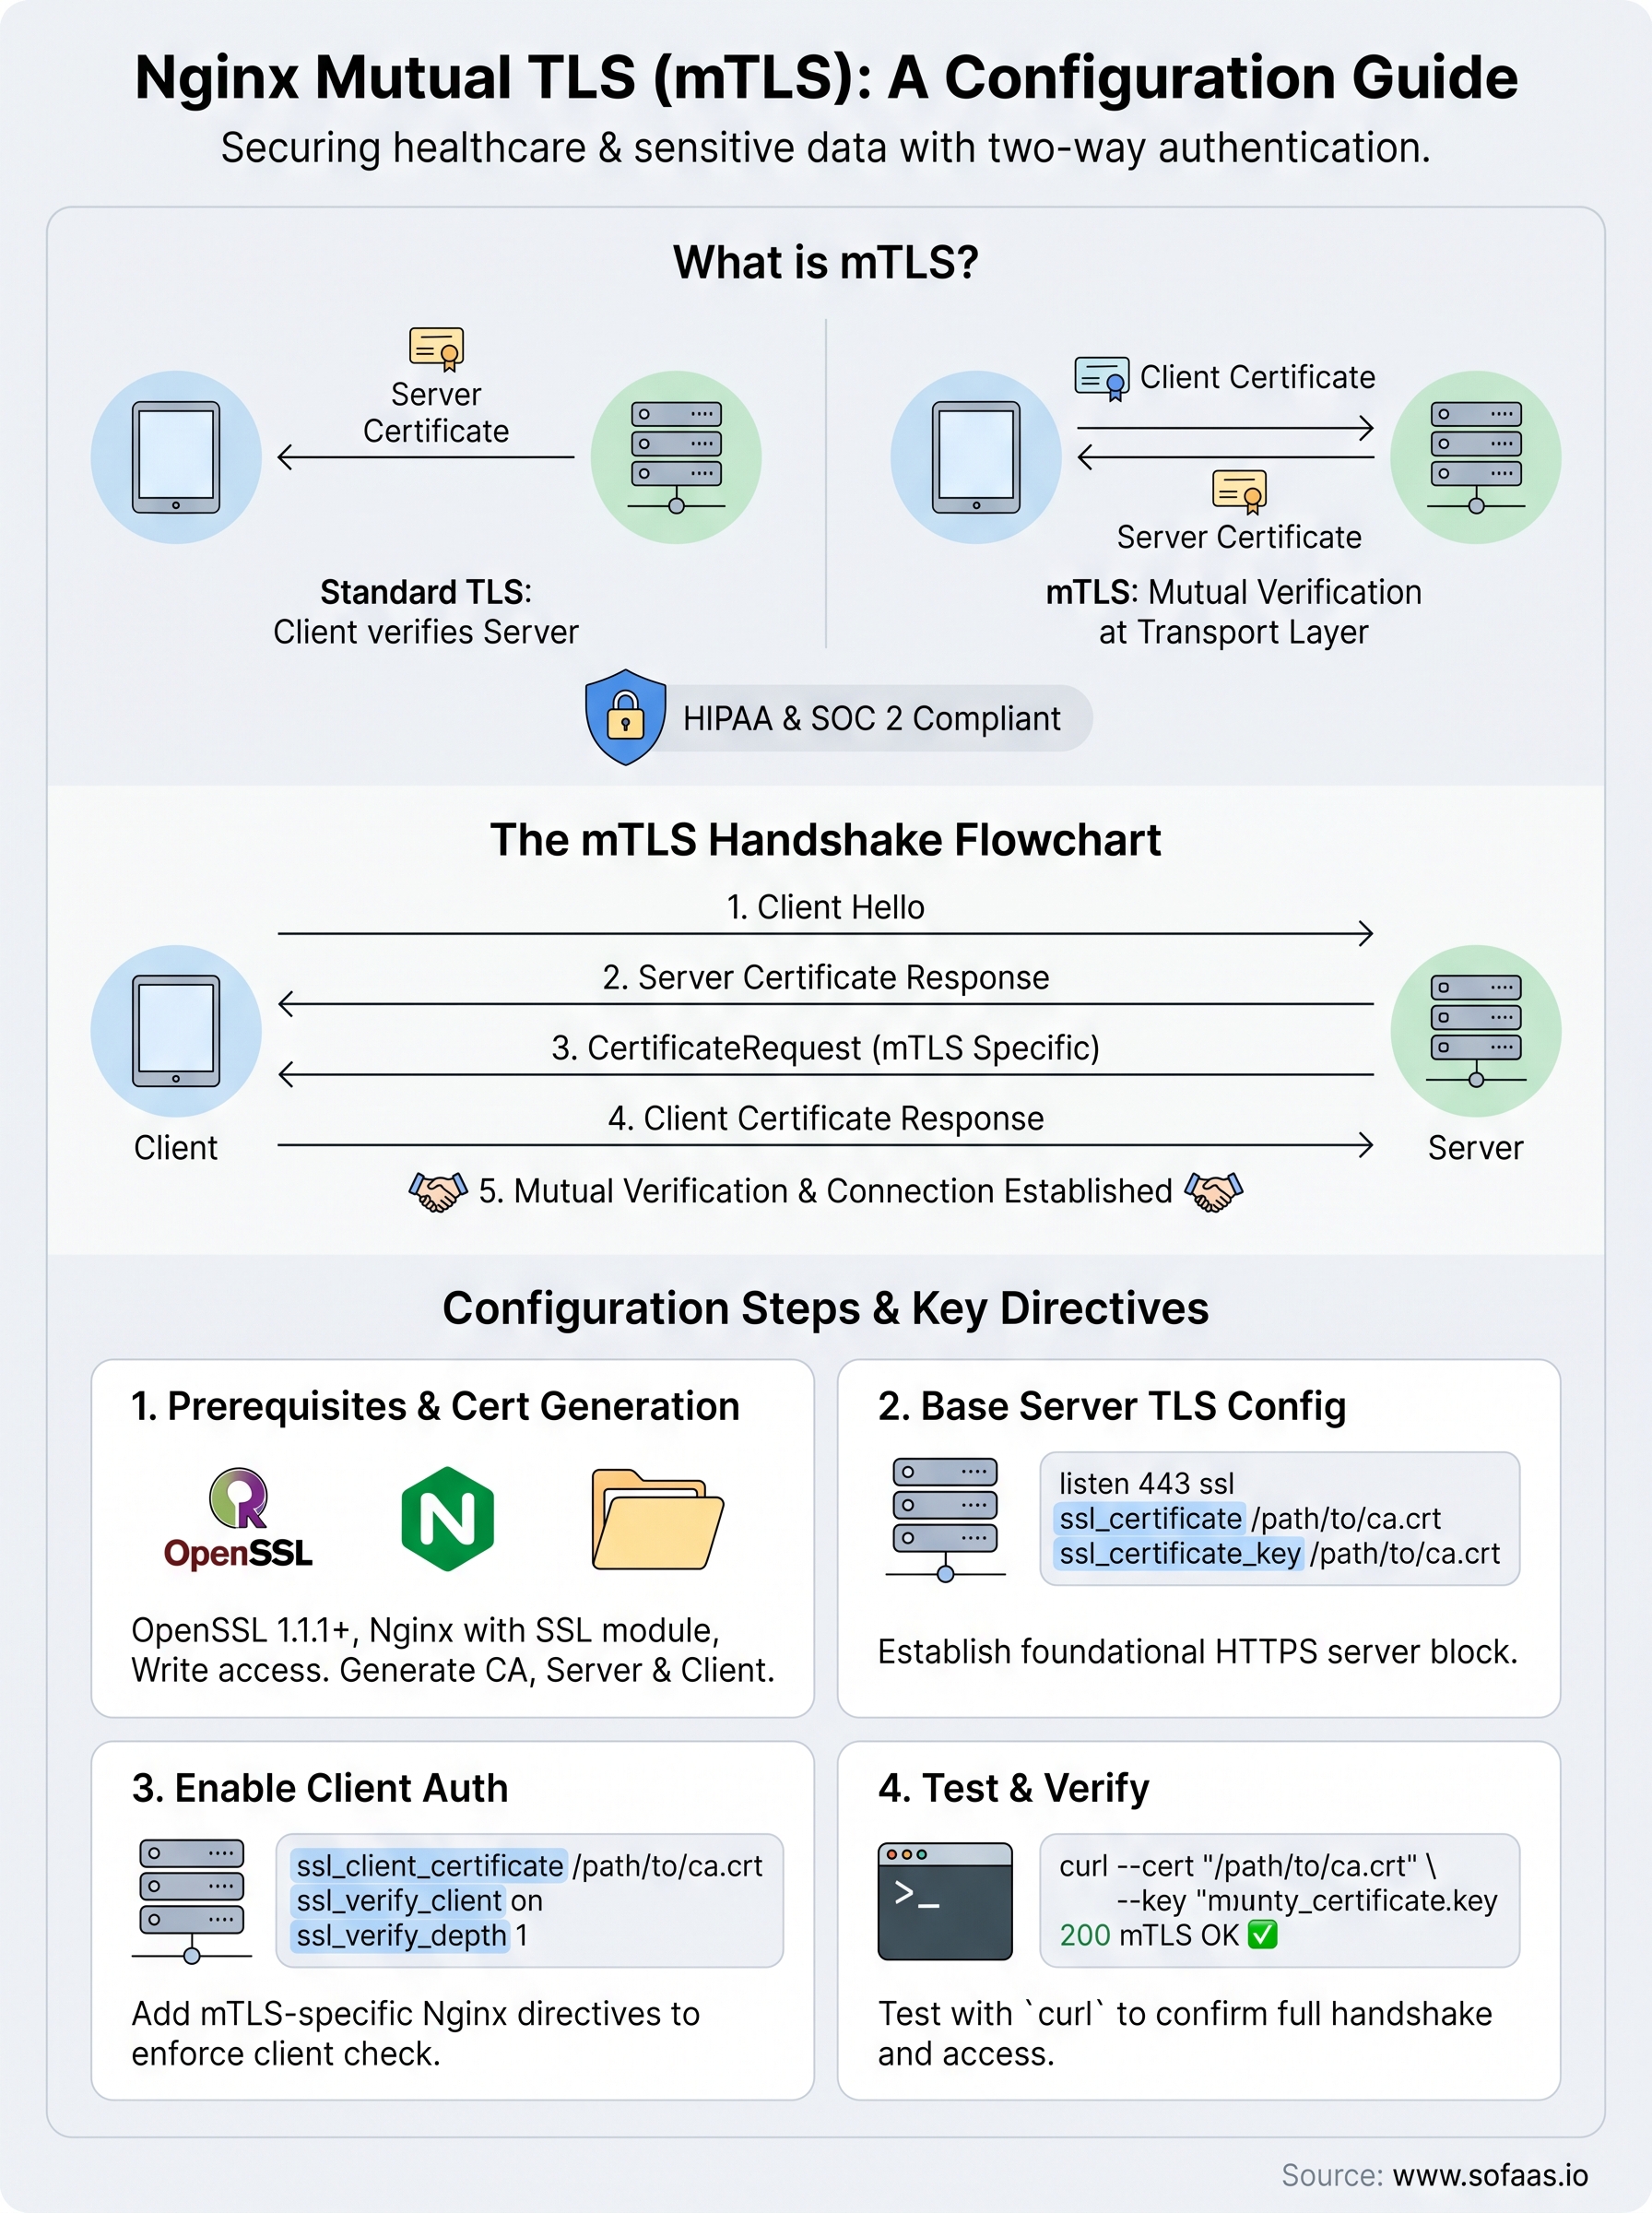
Nginx Mutual TLS: Step-By-Step mTLS Configuration Guide

Standard TLS gets you halfway there, the client verifies the server, but the server has no idea who's connecting. Nginx mutual TLS (mTLS) closes that gap by requiring both sides to present and validate certificates before any data moves. It's authentication at the transport layer, and for systems handling sensitive data, especially in healthcare, it's often non-negotiable.
At SoFaaS, we build managed infrastructure for healthcare application integration, where HIPAA compliance and SOC 2 Type II security aren't optional. mTLS is one of the foundational mechanisms we rely on to ensure that only authorized services communicate with EHR-connected endpoints. We've configured it across enough production environments to know where teams get stuck.
This guide walks you through implementing mTLS in Nginx from scratch. You'll generate a Certificate Authority, create client and server certificates, configure the relevant Nginx directives like ssl_verify_client, and test the full handshake end to end. Whether you're securing internal microservices or locking down an API gateway, you'll have a working mTLS setup by the end.
What Nginx mTLS is and what you need first
Nginx mutual TLS extends standard TLS by adding a second authentication step. In a normal TLS connection, the server presents its certificate, the client verifies it, and the connection proceeds. With mTLS, the server also demands a certificate from the client and rejects the connection if that certificate isn't present or doesn't chain back to a trusted Certificate Authority. This makes it fundamentally different from API keys or bearer tokens because verification happens at the transport layer, before any application code runs.
mTLS is not a replacement for application-level authorization; it's a prerequisite that proves the connecting party is who it claims to be before the conversation even starts.
How the mTLS handshake works
Understanding the handshake sequence helps you diagnose failures faster and configure Nginx directives correctly. During a TLS 1.3 handshake, the server sends its certificate and the client validates it against a known CA. When mTLS is active, Nginx sends a CertificateRequest message during that same handshake. The client responds with its own certificate, Nginx checks it against the CA bundle you specify in ssl_client_certificate, and only then does the connection succeed.
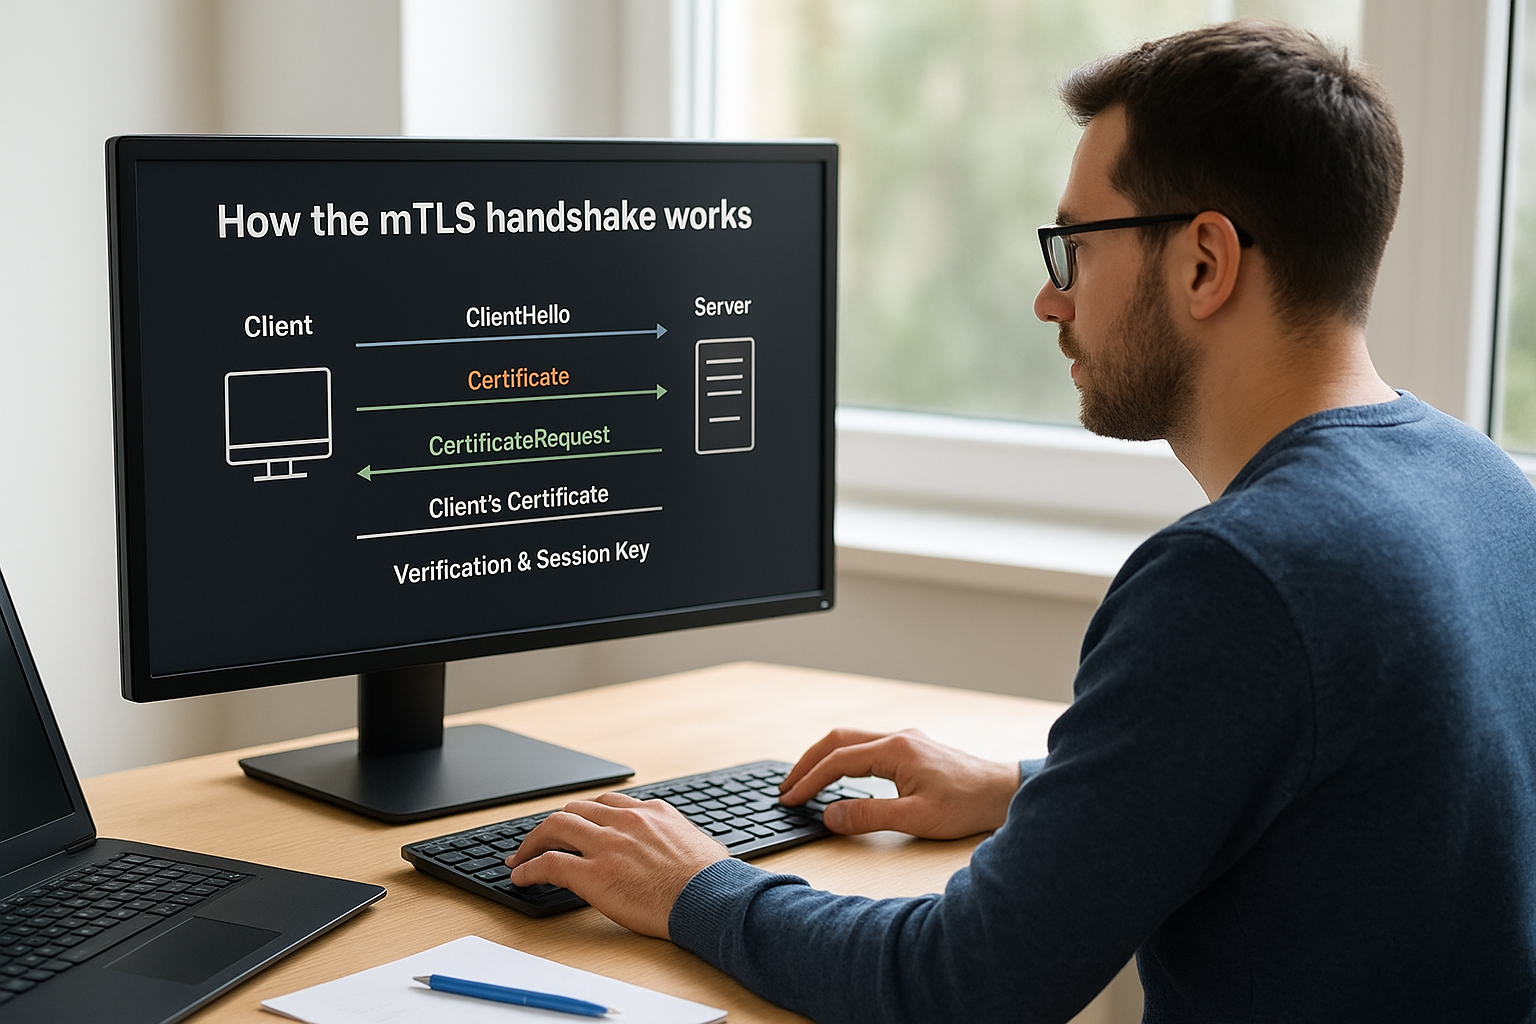
The handshake steps in order:
- Client sends
ClientHello - Server responds with its own certificate
- Server sends
CertificateRequest(the mTLS-specific step) - Client sends its certificate
- Both sides verify, derive session keys, and finish the handshake
- Application data flows over the authenticated, encrypted channel
What you need before you start
Before you configure nginx mutual tls, make sure your environment has the required tools and files ready. Trying to skip ahead without them leads to errors mid-configuration that are hard to trace back to their root cause.
Your machine needs OpenSSL version 1.1.1 or later to generate certificates. You also need an Nginx build compiled with --with-http_ssl_module, which most package manager installs include by default. Check this by running nginx -V and scanning the output for that flag. Finally, you need write access to your Nginx configuration directory, typically /etc/nginx/, and a plan for distributing client certificates to the services or users that will connect.
Here's a quick reference checklist before you proceed:
| Requirement | How to verify |
|---|---|
| OpenSSL 1.1.1+ | openssl version |
| Nginx with SSL module | nginx -V 2>&1 | grep ssl |
Access to /etc/nginx/ |
ls /etc/nginx/nginx.conf |
| Dedicated cert directory | Create /etc/nginx/certs/ if absent |
Step 1. Choose a certificate trust model
Before you generate a single certificate, you need to decide how trust is structured across your system. The trust model determines which Certificate Authority Nginx will accept client certificates from, and changing it later requires reissuing certificates for every client. Getting this decision right up front saves significant rework down the line.
Single private CA
The single private CA model is the right starting point for most teams. You create one root CA, sign your server certificate from it, and issue all client certificates from that same CA. Nginx then trusts any client certificate that chains back to your root CA. This model is straightforward to manage and works well when you control all the services connecting to your endpoints.
If your client list grows over time, the single private CA model scales cleanly as long as you maintain secure storage for the CA private key.
Compromising your CA private key invalidates your entire trust chain, so treat it with the same care as a production secret. Store it offline or in a secrets manager, and use an intermediate CA to sign day-to-day certificates while the root stays air-gapped.
Intermediate CA model
The intermediate CA model adds one layer between your root CA and the certificates you actually use. Your root CA signs only the intermediate CA certificate, and the intermediate CA signs all server and client certificates. Nginx trusts the chain as long as you provide the full certificate bundle (intermediate + root) in ssl_client_certificate.
This model is the better choice when:
- You have multiple teams or services issuing their own client certificates
- You want to revoke an entire group of clients by revoking the intermediate CA
- Your organization requires separation between the root CA and operational certificate issuance
For most nginx mutual tls configurations in internal environments, the single private CA is the practical choice. Reserve the intermediate model for situations where you genuinely need delegation or group-level revocation.
Step 2. Generate a CA, server cert, and client certs
With your trust model chosen, you can now generate the actual certificate files. All three commands below use OpenSSL directly in your terminal, so work in a dedicated directory like /etc/nginx/certs/ and set restrictive permissions on any private key file you create.
Generate the root CA
Start by creating the CA key and self-signed certificate. These two files form the trust anchor for your entire nginx mutual tls setup.
# Generate the CA private key
openssl genrsa -out ca.key 4096

# Create the self-signed CA certificate (valid 3650 days)
openssl req -new -x509 -days 3650 -key ca.key \
  -out ca.crt \
  -subj "/C=US/ST=State/O=YourOrg/CN=Internal-CA"
Keep
ca.keyoffline or in a secrets manager. Anyone with this file can issue certificates your Nginx instance will trust.
After this step, you should have ca.key and ca.crt in your working directory. The ca.crt file is the trust anchor you'll reference in your Nginx configuration later.
Create the server certificate
Your server certificate proves to clients that they're talking to the right endpoint. Generate a key, create a signing request, then sign it with your CA.
openssl genrsa -out server.key 2048

openssl req -new -key server.key -out server.csr \
  -subj "/C=US/ST=State/O=YourOrg/CN=your-domain.com"

openssl x509 -req -days 365 -in server.csr \
  -CA ca.crt -CAkey ca.key -CAcreateserial \
  -out server.crt
Issue client certificates
Each service or user connecting to your endpoint needs its own unique client certificate signed by the same CA.
openssl genrsa -out client.key 2048

openssl req -new -key client.key -out client.csr \
  -subj "/C=US/ST=State/O=YourOrg/CN=client-service-name"

openssl x509 -req -days 365 -in client.csr \
  -CA ca.crt -CAkey ca.key -CAcreateserial \
  -out client.crt
Repeat this block for every distinct client that needs access, substituting a unique CN value each time so you can identify connections in your logs.
Step 3. Configure Nginx for HTTPS server TLS
Before you layer on client certificate verification, you need a solid HTTPS foundation in your Nginx server block. This step covers the standard server TLS configuration that you'll extend in the next step to complete your nginx mutual tls setup. Getting this base layer right first makes troubleshooting much easier because you can isolate server TLS issues from client auth issues.
Write the base server block
Open your site configuration file, typically located at /etc/nginx/sites-available/your-site.conf, and add the following server block. This gives you working HTTPS before you touch any client certificate directives.
server {
    listen 443 ssl;
    server_name your-domain.com;

    # Server certificate and key
    ssl_certificate     /etc/nginx/certs/server.crt;
    ssl_certificate_key /etc/nginx/certs/server.key;

    # Restrict to TLS 1.2 and 1.3 only
    ssl_protocols TLSv1.2 TLSv1.3;

    # Strong cipher suite
    ssl_ciphers HIGH:!aNULL:!MD5;
    ssl_prefer_server_ciphers on;

    # Session settings
    ssl_session_cache shared:SSL:10m;
    ssl_session_timeout 10m;

    location / {
        return 200 "TLS OK\n";
    }
}
Test this configuration with
nginx -tand reload withsystemctl reload nginxbefore moving on. A clean test here confirms your certificates loaded correctly.
Verify the connection works
Once you reload Nginx, verify the server TLS handshake before adding client certificate requirements. Run the following command from a machine that can reach your server:
curl -v --cacert /etc/nginx/certs/ca.crt https://your-domain.com
You should see a 200 response without any certificate errors. If curl reports a handshake failure, check that ssl_certificate points to server.crt and ssl_certificate_key points to server.key, and confirm both files have read permissions for the Nginx worker process. Fix any errors here before proceeding to Step 4.
Step 4. Turn on client cert auth in Nginx
With your HTTPS server block working, you're ready to activate the client certificate requirement. This is where nginx mutual tls becomes complete. You'll add three directives to your existing server block: ssl_client_certificate, ssl_verify_client, and optionally ssl_verify_depth. Each one controls a distinct part of how Nginx evaluates the certificate your client presents during the handshake.
Add the ssl_verify_client directive
Open the same server block you built in Step 3 and add the client auth directives inside it. Your updated configuration should look like this:
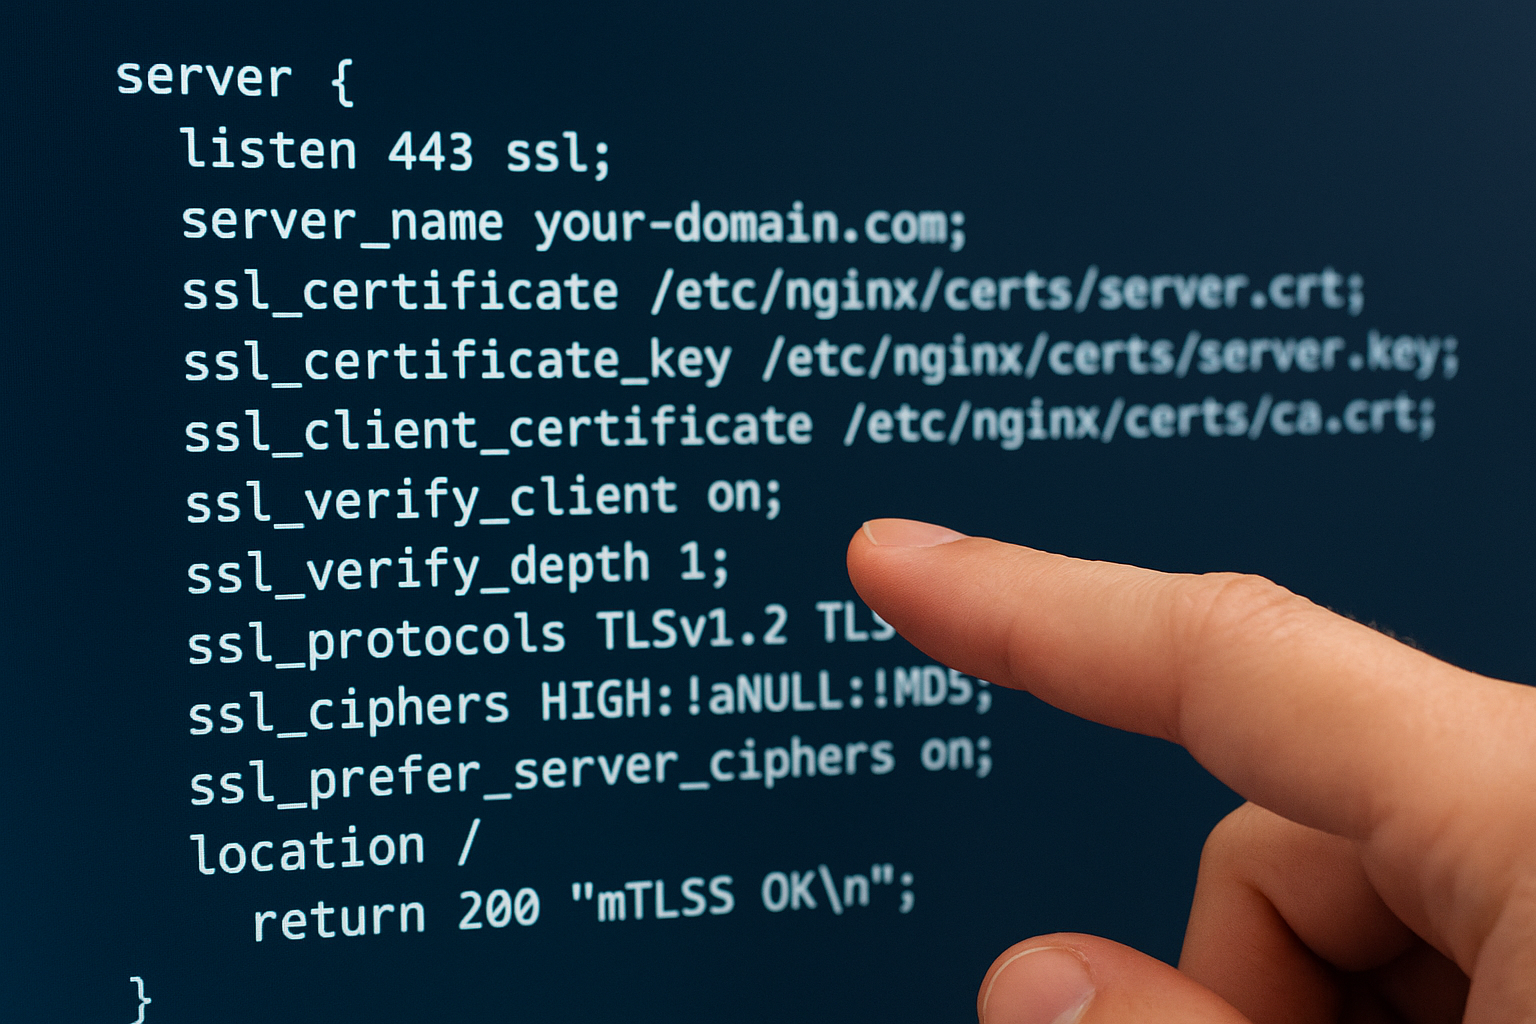
server {
    listen 443 ssl;
    server_name your-domain.com;

    ssl_certificate     /etc/nginx/certs/server.crt;
    ssl_certificate_key /etc/nginx/certs/server.key;

    # Trust anchor for client certificates
    ssl_client_certificate /etc/nginx/certs/ca.crt;

    # Require a valid client cert on every connection
    ssl_verify_client on;

    # How deep to follow the cert chain (1 = direct CA signature)
    ssl_verify_depth 1;

    ssl_protocols TLSv1.2 TLSv1.3;
    ssl_ciphers HIGH:!aNULL:!MD5;
    ssl_prefer_server_ciphers on;

    location / {
        return 200 "mTLS OK\n";
    }
}
Setting ssl_verify_client to on causes Nginx to reject any connection that doesn't present a valid certificate. If you need some endpoints to remain open while others require client certs, set ssl_verify_client to optional at the server level and then enforce it per-location using the $ssl_client_verify variable.
Use
ssl_verify_depth 2if you issued client certificates from an intermediate CA rather than directly from your root CA.
Test the full mTLS handshake
After reloading Nginx, run the following command to confirm both sides of the handshake succeed:
curl -v \
  --cacert /etc/nginx/certs/ca.crt \
  --cert /etc/nginx/certs/client.crt \
  --key /etc/nginx/certs/client.key \
  https://your-domain.com
A successful response returns your 200 mTLS OK message. To confirm Nginx rejects unauthorized clients, run the same command without --cert and --key. Nginx should return a 400 No required SSL certificate was sent error, which confirms your client auth enforcement is working correctly.
Wrap-up and next steps
You now have a working nginx mutual tls configuration with a private CA, signed server and client certificates, and verified handshake behavior on both sides. The key directives to remember are ssl_client_certificate, which sets your trust anchor, and ssl_verify_client, which enforces client authentication on every incoming connection.
From here, certificate lifecycle management becomes your next priority. Set calendar reminders before your certificates expire, rotate client certs when team members or services change, and store your CA private key somewhere secure and offline. You can also extend this setup by logging the $ssl_client_s_dn variable to track which client certificate authenticated each request, giving you a clean audit trail.
If your work involves healthcare application integration and you need secure, compliant connectivity to EHR systems without building that infrastructure yourself, explore SoFaaS managed SMART on FHIR integration to see how a fully managed platform handles that complexity for you.
The Future of Patient Logistics
Exploring the future of all things related to patient logistics, technology and how AI is going to re-shape the way we deliver care.
Thank you! Your submission has been received!
Oops! Something went wrong while submitting the form.