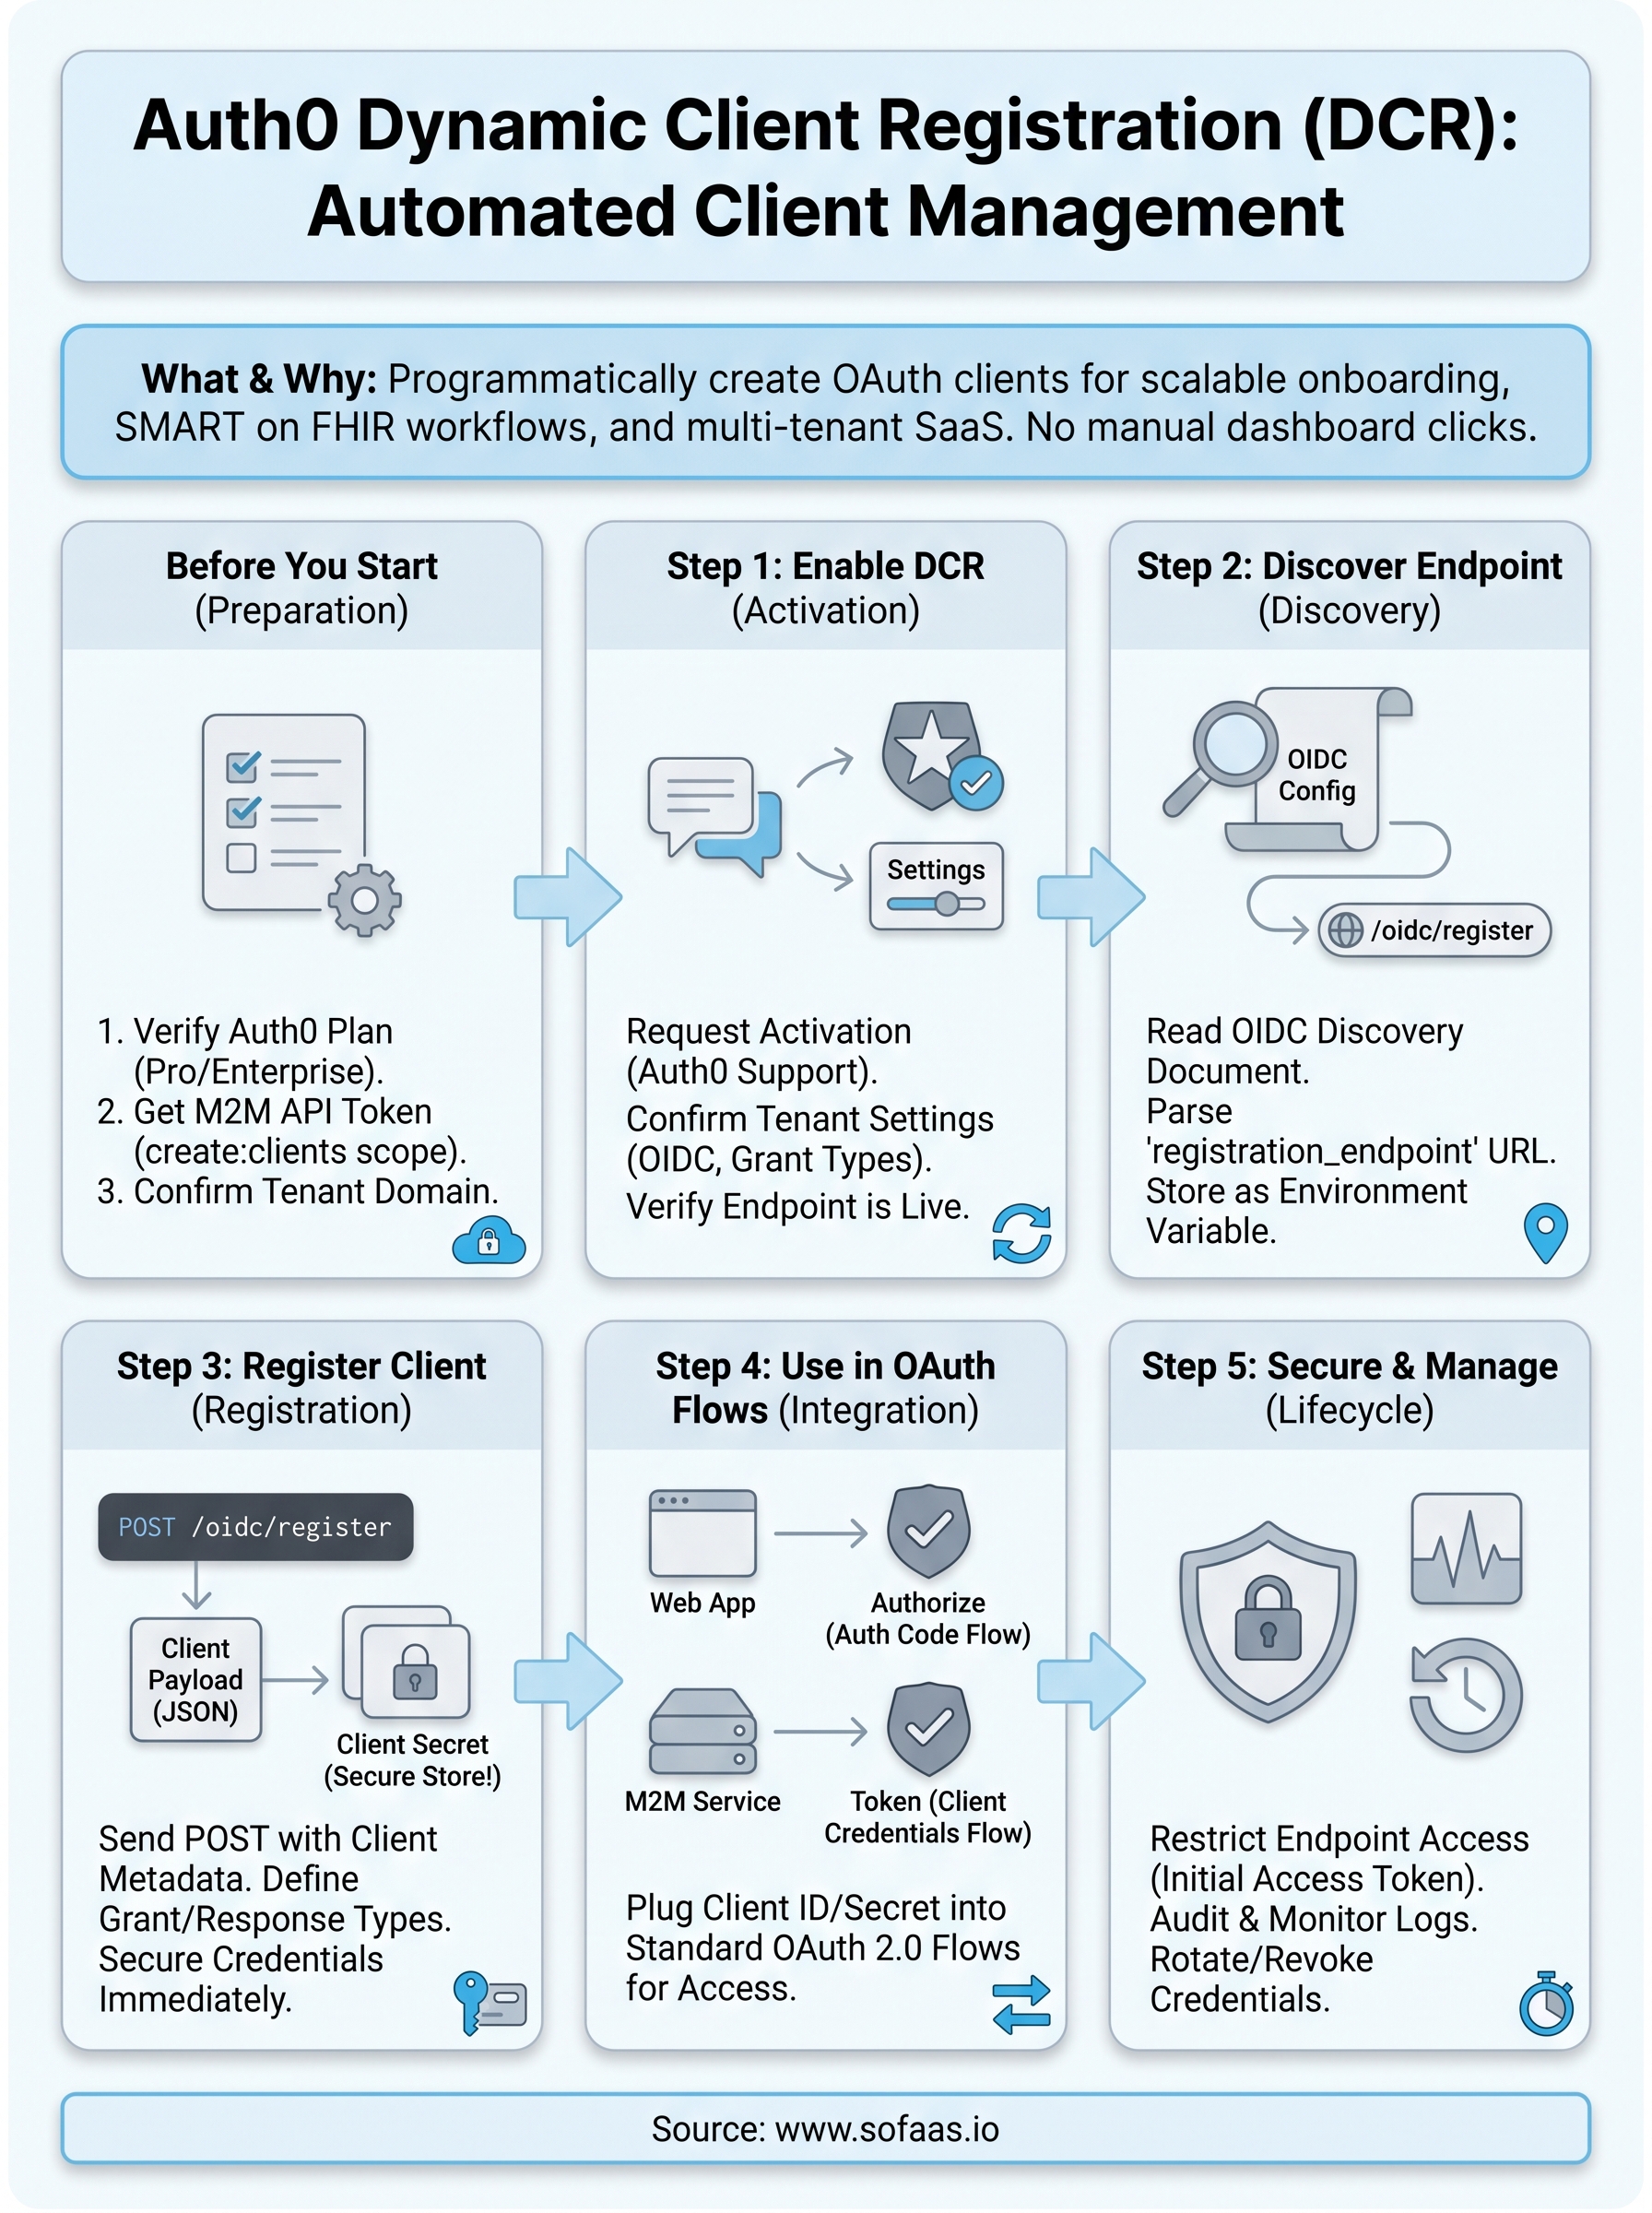
Auth0 Dynamic Client Registration: Enable And Use DCR API

Registering OAuth clients manually works fine when you have a handful of applications. But once you're scaling across multiple environments, tenants, or healthcare systems, that manual process becomes a bottleneck. Auth0 Dynamic Client Registration (DCR) solves this by letting you programmatically create and manage client applications through an API, no dashboard clicking required.
DCR is especially relevant if you're building in healthcare. SMART on FHIR workflows depend on OAuth 2.0 client registration with authorization servers, and doing that at scale means automation isn't optional, it's a requirement. At SoFaaS™, we deal with this exact challenge daily: our managed platform handles OAuth and authorization flows for healthcare apps connecting to EHRs like Epic and Cerner, so we understand firsthand how critical reliable client registration is to integration pipelines.
This guide walks you through enabling and using Auth0's Dynamic Client Registration API from start to finish. You'll learn how to activate DCR in your Auth0 tenant, configure the right settings, register clients programmatically, and manage those registrations over time. Whether you're automating onboarding for multi-tenant SaaS applications or streamlining OAuth client provisioning for healthcare integrations, the steps here give you a concrete, repeatable process to follow.
What Auth0 DCR is and when to use it
Dynamic Client Registration is an OAuth 2.0 protocol extension defined in RFC 7591 that lets applications register themselves as OAuth clients without a human manually configuring them in a dashboard. Instead of navigating to the Auth0 Management Console and filling out forms, you send a POST request to a registration endpoint, and Auth0 returns a new client ID and, optionally, a client secret. That client can then participate in standard OAuth flows immediately.
DCR matters most when client registration is a repeating operation in your architecture, not a one-time setup task.
How the DCR protocol works in Auth0
Auth0 implements DCR through its OpenID Connect Discovery document, which exposes the registration URL at /.well-known/openid-configuration. When you fetch that discovery document, you'll find a registration_endpoint field pointing to /oidc/register. You send a JSON payload describing the new client, and Auth0 returns a Client Information Response containing the client_id, client_secret (if applicable), and the full metadata of the registered application.

The registration request follows the OIDC Client Metadata specification, so fields like client_name, redirect_uris, grant_types, response_types, and token_endpoint_auth_method are all standard. Auth0 extends this with its own properties, but the core structure stays spec-compliant. That means clients registered through Auth0 can work across any OIDC-compliant authorization server with minimal changes to your registration logic.
When to use Auth0 dynamic client registration
Not every project needs DCR. If you're managing fewer than ten OAuth clients that rarely change, the Auth0 dashboard works fine. DCR becomes valuable when the volume, velocity, or automation requirements of client registration exceed what manual tooling can handle efficiently.
Here are the concrete scenarios where auth0 dynamic client registration pays off directly:
- Multi-tenant SaaS platforms where each tenant needs an isolated OAuth client provisioned at signup
- Healthcare integrations using SMART on FHIR, where third-party apps must register as clients with an EHR's authorization server programmatically
- CI/CD pipelines that spin up ephemeral test environments and need a fresh client per deployment
- Partner onboarding workflows that register external applications automatically after contract execution
- IoT or device fleets where individual devices authenticate as separate OAuth clients
When DCR is not the right fit
DCR adds operational complexity that isn't always justified. If your integration pattern is static, meaning the same handful of clients connect to the same APIs indefinitely, manual registration through the Auth0 dashboard or infrastructure-as-code tools like Terraform gives you better visibility and auditability with less moving infrastructure to maintain.
Your Auth0 subscription tier also matters here. Not all Auth0 plans expose the registration endpoint by default, and some require specific feature flags or enterprise-level configurations to activate. Checking that before you design your architecture saves significant engineering time. The next sections cover exactly what you need to verify and configure before writing a single line of registration code.
Before you start
Before diving into auth0 dynamic client registration configuration, you need to confirm your environment meets specific requirements. Skipping this check leads to failed API calls and hours of unnecessary debugging. Take five minutes now to verify each item below before touching any configuration settings.
Auth0 plan and feature requirements
Auth0 gates DCR behind specific plan tiers. Free and Developer plans do not expose the /oidc/register endpoint by default. You need at minimum an Auth0 Professional or Enterprise plan, or you must contact Auth0 support to request the feature enabled on your tenant. Confirm your plan in the Auth0 dashboard under Tenant Settings before writing any registration code.
If DCR is not active on your tenant, every POST to /oidc/register returns a 403 with no useful error message, so verify this before anything else.
Your tenant also needs OpenID Connect active. Check by visiting https://YOUR_DOMAIN/.well-known/openid-configuration and looking for the registration_endpoint field in the JSON response. If that field is absent, DCR is not yet enabled on your tenant and you need to resolve that before proceeding to Step 1.
Credentials and permissions you need
To enable and test DCR, you need API credentials with Management API access. Specifically, you need a token scoped to create:clients and read:clients to interact with Auth0 programmatically. You generate this token from an existing Machine-to-Machine application in your Auth0 dashboard that has the Management API authorized and the correct scopes granted.
Here is a full summary of what to have ready before you move forward:
| Requirement | Details |
|---|---|
| Auth0 plan | Professional or Enterprise (or DCR enabled by support request) |
| Discovery document | registration_endpoint must appear in the OIDC config JSON |
| M2M application | Existing app authorized against the Management API |
| API token scopes | create:clients, read:clients, update:clients, delete:clients |
| HTTP client | curl, Postman, or any tool that sends authenticated JSON requests |
Your tenant domain and environment setup
You also need your Auth0 tenant domain accessible. It follows the format your-tenant.us.auth0.com and appears in the top-left corner of every Auth0 dashboard page. All API calls in the steps ahead use this domain as the base URL, so export it as an environment variable now to keep commands clean and consistent across your terminal sessions.
export AUTH0_DOMAIN="your-tenant.us.auth0.com"
export AUTH0_MGMT_TOKEN="your_management_api_token"
Storing these values upfront means you can copy and run every code snippet in this guide without substituting values manually each time.
Step 1. Enable DCR in your Auth0 tenant
Enabling auth0 dynamic client registration requires a specific sequence of actions, and the order matters. Auth0 does not expose the /oidc/register endpoint automatically, even on paid plans. You need to request activation, confirm your tenant settings reflect the change, and then verify the endpoint responds correctly before building anything on top of it.
Request DCR activation from Auth0
Your first action is contacting Auth0 support directly through the Auth0 dashboard. Navigate to the Help section, open a support ticket, and explicitly request that DCR be enabled on your tenant. Include your tenant domain and region in the request to avoid back-and-forth delays. Auth0 typically processes these requests within one to two business days, though Enterprise customers often see faster turnaround through their account team.
Do not attempt to work around this step by calling the registration endpoint before activation. You will receive a 403 response with no diagnostic information, which wastes time and creates confusion.
When submitting your support request, be specific about your use case. Mentioning that you need programmatic client registration for automated workflows helps the support team categorize and escalate the request correctly. If your organization has an Auth0 Enterprise agreement, contact your assigned account executive directly as they can often enable features through internal provisioning tools faster than standard support tickets.
Confirm tenant-level settings after activation
Once Auth0 confirms activation, you need to verify that your tenant settings align with DCR requirements. Log into the Auth0 dashboard, navigate to Settings, and check the following fields under the Advanced tab:

| Setting | Required value |
|---|---|
| OIDC Discovery | Enabled |
| Grant Types | At minimum: authorization_code, client_credentials |
| Token Endpoint Auth Methods | client_secret_post or private_key_jwt allowed |
Update any settings that do not match the required values before proceeding. Mismatched grant type configurations cause registration requests to succeed at the API level but fail when you attempt to use the resulting client in actual OAuth flows, which is a harder problem to diagnose later.
Verify the registration endpoint is live
With activation confirmed and settings updated, run a quick check against your OIDC discovery document to confirm the registration endpoint appears:
curl -s "https://$AUTH0_DOMAIN/.well-known/openid-configuration" | grep registration_endpoint
You should see output like:
"registration_endpoint": "https://your-tenant.us.auth0.com/oidc/register"
If that field appears, DCR is active and your tenant is ready for the next step.
Step 2. Discover the DCR endpoint
Before you register any client, you need to locate the exact registration URL that Auth0 exposes for your tenant. Auth0 publishes this through the standard OpenID Connect Discovery document, which means you do not hardcode the endpoint URL in your application. You fetch it dynamically every time, which keeps your integration spec-compliant and resilient to infrastructure changes.
Read the OIDC discovery document
Every Auth0 tenant serves a discovery document at a predictable path. This document contains all the URLs, grant types, and capabilities your tenant supports, including the registration endpoint you need for auth0 dynamic client registration. Run the following command to retrieve the document for your tenant:
curl -s "https://$AUTH0_DOMAIN/.well-known/openid-configuration"
The response is a JSON object with dozens of fields describing your tenant's authorization server capabilities. The full document is long, but you only need one field right now. Pipe the output through a JSON parser to isolate it cleanly.
Parse the registration_endpoint field
Once you have the discovery document, extract the registration_endpoint value directly so you can store it as an environment variable for use in subsequent steps.
export DCR_ENDPOINT=$(curl -s "https://$AUTH0_DOMAIN/.well-known/openid-configuration" \
  | python3 -c "import sys, json; print(json.load(sys.stdin)['registration_endpoint'])")

echo $DCR_ENDPOINT
Your terminal should print a URL in this format:
https://your-tenant.us.auth0.com/oidc/register
Export this value as an environment variable immediately rather than copying it manually, since even a single character error in the endpoint URL produces a confusing 404 response during registration.
Storing the endpoint URL as $DCR_ENDPOINT means every registration command you run in Step 3 stays clean and reusable across different environments or tenant configurations without modifying the commands themselves.
Handle missing or unexpected responses
If the registration_endpoint field does not appear in the discovery document, the activation from Step 1 is either still pending or did not complete successfully. Do not proceed to registration in that state. Contact Auth0 support again with the full JSON output of your discovery document as evidence, and reference your original support ticket number to speed up resolution.
You may also see the field present but pointing to an unexpected domain or path. This can happen with custom domain configurations. In that case, verify your custom domain settings in the Auth0 dashboard under Branding and confirm that the domain matches the one you are sending requests to.
Step 3. Register a client with POST /oidc/register
With your DCR endpoint confirmed and stored as $DCR_ENDPOINT, you're ready to register your first client programmatically. This step is where auth0 dynamic client registration becomes tangible: you send a single POST request, and Auth0 creates a fully configured OAuth client and returns its credentials immediately.
Build the registration request payload
Your registration request body is a JSON object containing the client metadata Auth0 needs to create the application. At minimum, you need client_name, redirect_uris, grant_types, response_types, and token_endpoint_auth_method. Additional fields like application_type and logo_uri are optional but improve client organization at scale.
Here is a baseline payload for a confidential web application using the authorization code grant:
{
  "client_name": "my-healthcare-app",
  "redirect_uris": ["https://app.example.com/callback"],
  "grant_types": ["authorization_code", "refresh_token"],
  "response_types": ["code"],
  "token_endpoint_auth_method": "client_secret_post",
  "application_type": "web"
}
For machine-to-machine clients that use the client credentials grant instead, swap grant_types to ["client_credentials"], set response_types to ["token"], and remove redirect_uris since those flows do not involve browser redirects.
Send the request and parse the response
Once your payload is ready, submit it using curl or any HTTP client that supports JSON request bodies. The registration endpoint does not require a bearer token for standard DCR flows, though Auth0 can be configured to require one for protected registration scenarios.

curl -s -X POST "$DCR_ENDPOINT" \
  -H "Content-Type: application/json" \
  -d '{
    "client_name": "my-healthcare-app",
    "redirect_uris": ["https://app.example.com/callback"],
    "grant_types": ["authorization_code", "refresh_token"],
    "response_types": ["code"],
    "token_endpoint_auth_method": "client_secret_post",
    "application_type": "web"
  }'
A successful response returns HTTP 201 with a JSON body containing client_id, client_secret, and the full metadata of the newly registered client. Store the client_id and client_secret values securely and immediately, since Auth0 does not expose the client_secret again after this initial response.
Treat the client_secret returned in this response exactly like a database password: write it to your secrets manager before doing anything else.
Handle registration errors
Failed registrations return HTTP 400 with an error and error_description field in the response body. Common causes include unsupported grant_types values that conflict with your tenant's allowed grant type configuration from Step 1, or redirect_uris that do not match the expected format. Read the error_description field directly rather than guessing, since it identifies the specific invalid parameter by name.
Step 4. Use the new client in OAuth flows
Once Auth0 Dynamic Client Registration returns your client_id and client_secret, your new client is immediately usable. No additional provisioning steps are required on the Auth0 side. The credentials you received in Step 3 plug directly into standard OAuth 2.0 authorization flows, so you can start making authenticated requests right away.
Authorization code flow with the registered client
The authorization code flow is the right choice for web applications where a user authenticates through a browser and your server exchanges an authorization code for tokens. Use the client_id and redirect_uri values from the registration response to build the initial authorization URL you send users to.
https://$AUTH0_DOMAIN/authorize?
  response_type=code&
  client_id=YOUR_CLIENT_ID&
  redirect_uri=https://app.example.com/callback&
  scope=openid profile email&
  state=RANDOM_STATE_VALUE
After the user authenticates, Auth0 redirects to your redirect_uri with a code parameter. Your server then exchanges that code for access tokens and refresh tokens by posting to the token endpoint:
curl -s -X POST "https://$AUTH0_DOMAIN/oauth/token" \
  -H "Content-Type: application/x-www-form-urlencoded" \
  -d "grant_type=authorization_code" \
  -d "client_id=YOUR_CLIENT_ID" \
  -d "client_secret=YOUR_CLIENT_SECRET" \
  -d "code=AUTHORIZATION_CODE" \
  -d "redirect_uri=https://app.example.com/callback"
Never expose your client_secret in browser-side code; it belongs exclusively on your server handling the token exchange.
Client credentials flow for M2M clients
Machine-to-machine clients registered with grant_types: ["client_credentials"] skip the browser entirely. Your service authenticates directly to Auth0 using its client_id and client_secret, then receives an access token it can use to call protected APIs on its own behalf. This pattern is common in automated healthcare data pipelines where no human is present during the OAuth flow.
Send the following request to receive a token immediately after registration:
curl -s -X POST "https://$AUTH0_DOMAIN/oauth/token" \
  -H "Content-Type: application/json" \
  -d '{
    "grant_type": "client_credentials",
    "client_id": "YOUR_CLIENT_ID",
    "client_secret": "YOUR_CLIENT_SECRET",
    "audience": "https://your-api-identifier"
  }'
Auth0 returns a access_token with the expiry time in the expires_in field. Cache this token and reuse it until it expires rather than requesting a new one on every API call. Unnecessary token requests add latency and can trigger rate limiting on high-volume tenants.
Step 5. Secure, monitor, and manage client lifecycles
Registering clients programmatically is only half the work. Leaving those clients unmonitored after creation creates security exposure that grows proportionally with the number of clients you register. Every client you create through auth0 dynamic client registration needs a lifecycle strategy: access controls on registration, active monitoring, and a clear process for rotating or revoking credentials when needed.
Restrict who can call the registration endpoint
By default, Auth0 allows unauthenticated requests to the /oidc/register endpoint, which means anyone who knows your tenant domain can attempt to register a client. You should configure protected dynamic client registration so that only authorized callers can create new clients. Auth0 supports this through an initial access token, which is a bearer token you issue to trusted callers before they hit the registration endpoint.
Leaving the registration endpoint open without an initial access token is the equivalent of leaving your user management API publicly accessible without authentication.
Add the Authorization: Bearer <initial_access_token> header to every registration request made by your automation systems, and rotate those tokens on the same schedule you use for other service credentials.
Audit and monitor registered clients
Auth0 logs every client registration event in its tenant log stream, accessible under Monitoring in the dashboard. You should pipe these logs to your existing SIEM or log aggregation system using Auth0's log streaming feature to get real-time visibility into when new clients appear. Filter specifically for the sapi (success API operation) log type with the resource type client to isolate registration events from unrelated noise.
Track these metrics across all dynamically registered clients:
| Metric | What to watch for |
|---|---|
| Registration volume | Sudden spikes may indicate unauthorized registrations |
| Token request failures | Repeated failures suggest credential misuse or misconfiguration |
| Inactive clients | Clients with no token requests in 30+ days are candidates for removal |
| Redirect URI changes | Unexpected updates could indicate tampering |
Rotate and revoke client credentials
When a client credential is compromised or a tenant offboards, you need to revoke access immediately using the Auth0 Management API. Send a DELETE request to remove the client entirely, or a PATCH request to cycle the client_secret without disrupting the client's other configuration settings.
# Revoke a client entirely
curl -s -X DELETE "https://$AUTH0_DOMAIN/api/v2/clients/YOUR_CLIENT_ID" \
  -H "Authorization: Bearer $AUTH0_MGMT_TOKEN"

# Rotate only the client secret
curl -s -X POST "https://$AUTH0_DOMAIN/api/v2/clients/YOUR_CLIENT_ID/rotate-secret" \
  -H "Authorization: Bearer $AUTH0_MGMT_TOKEN"
Build both of these operations into your offboarding and incident response runbooks so your team can execute them in under two minutes when a security event requires it.
Next steps
You now have a complete picture of auth0 dynamic client registration: how to activate it on your tenant, locate the endpoint, register clients via the API, plug those clients into OAuth flows, and keep them secure over time. The process is repeatable and scriptable, which means you can embed it directly into your onboarding or CI/CD pipelines without manual intervention at each step.
Your immediate next action is verifying that DCR is available on your current Auth0 plan, then working through Steps 1 through 5 in sequence using the code snippets in this guide. Each step builds on the previous one, so skipping ahead creates gaps that surface as hard-to-diagnose errors later.
If your use case involves healthcare data integration and SMART on FHIR OAuth flows at scale, explore SoFaaS for managed SMART on FHIR integration to handle the authorization complexity without building and maintaining the infrastructure yourself.
The Future of Patient Logistics
Exploring the future of all things related to patient logistics, technology and how AI is going to re-shape the way we deliver care.
Thank you! Your submission has been received!
Oops! Something went wrong while submitting the form.