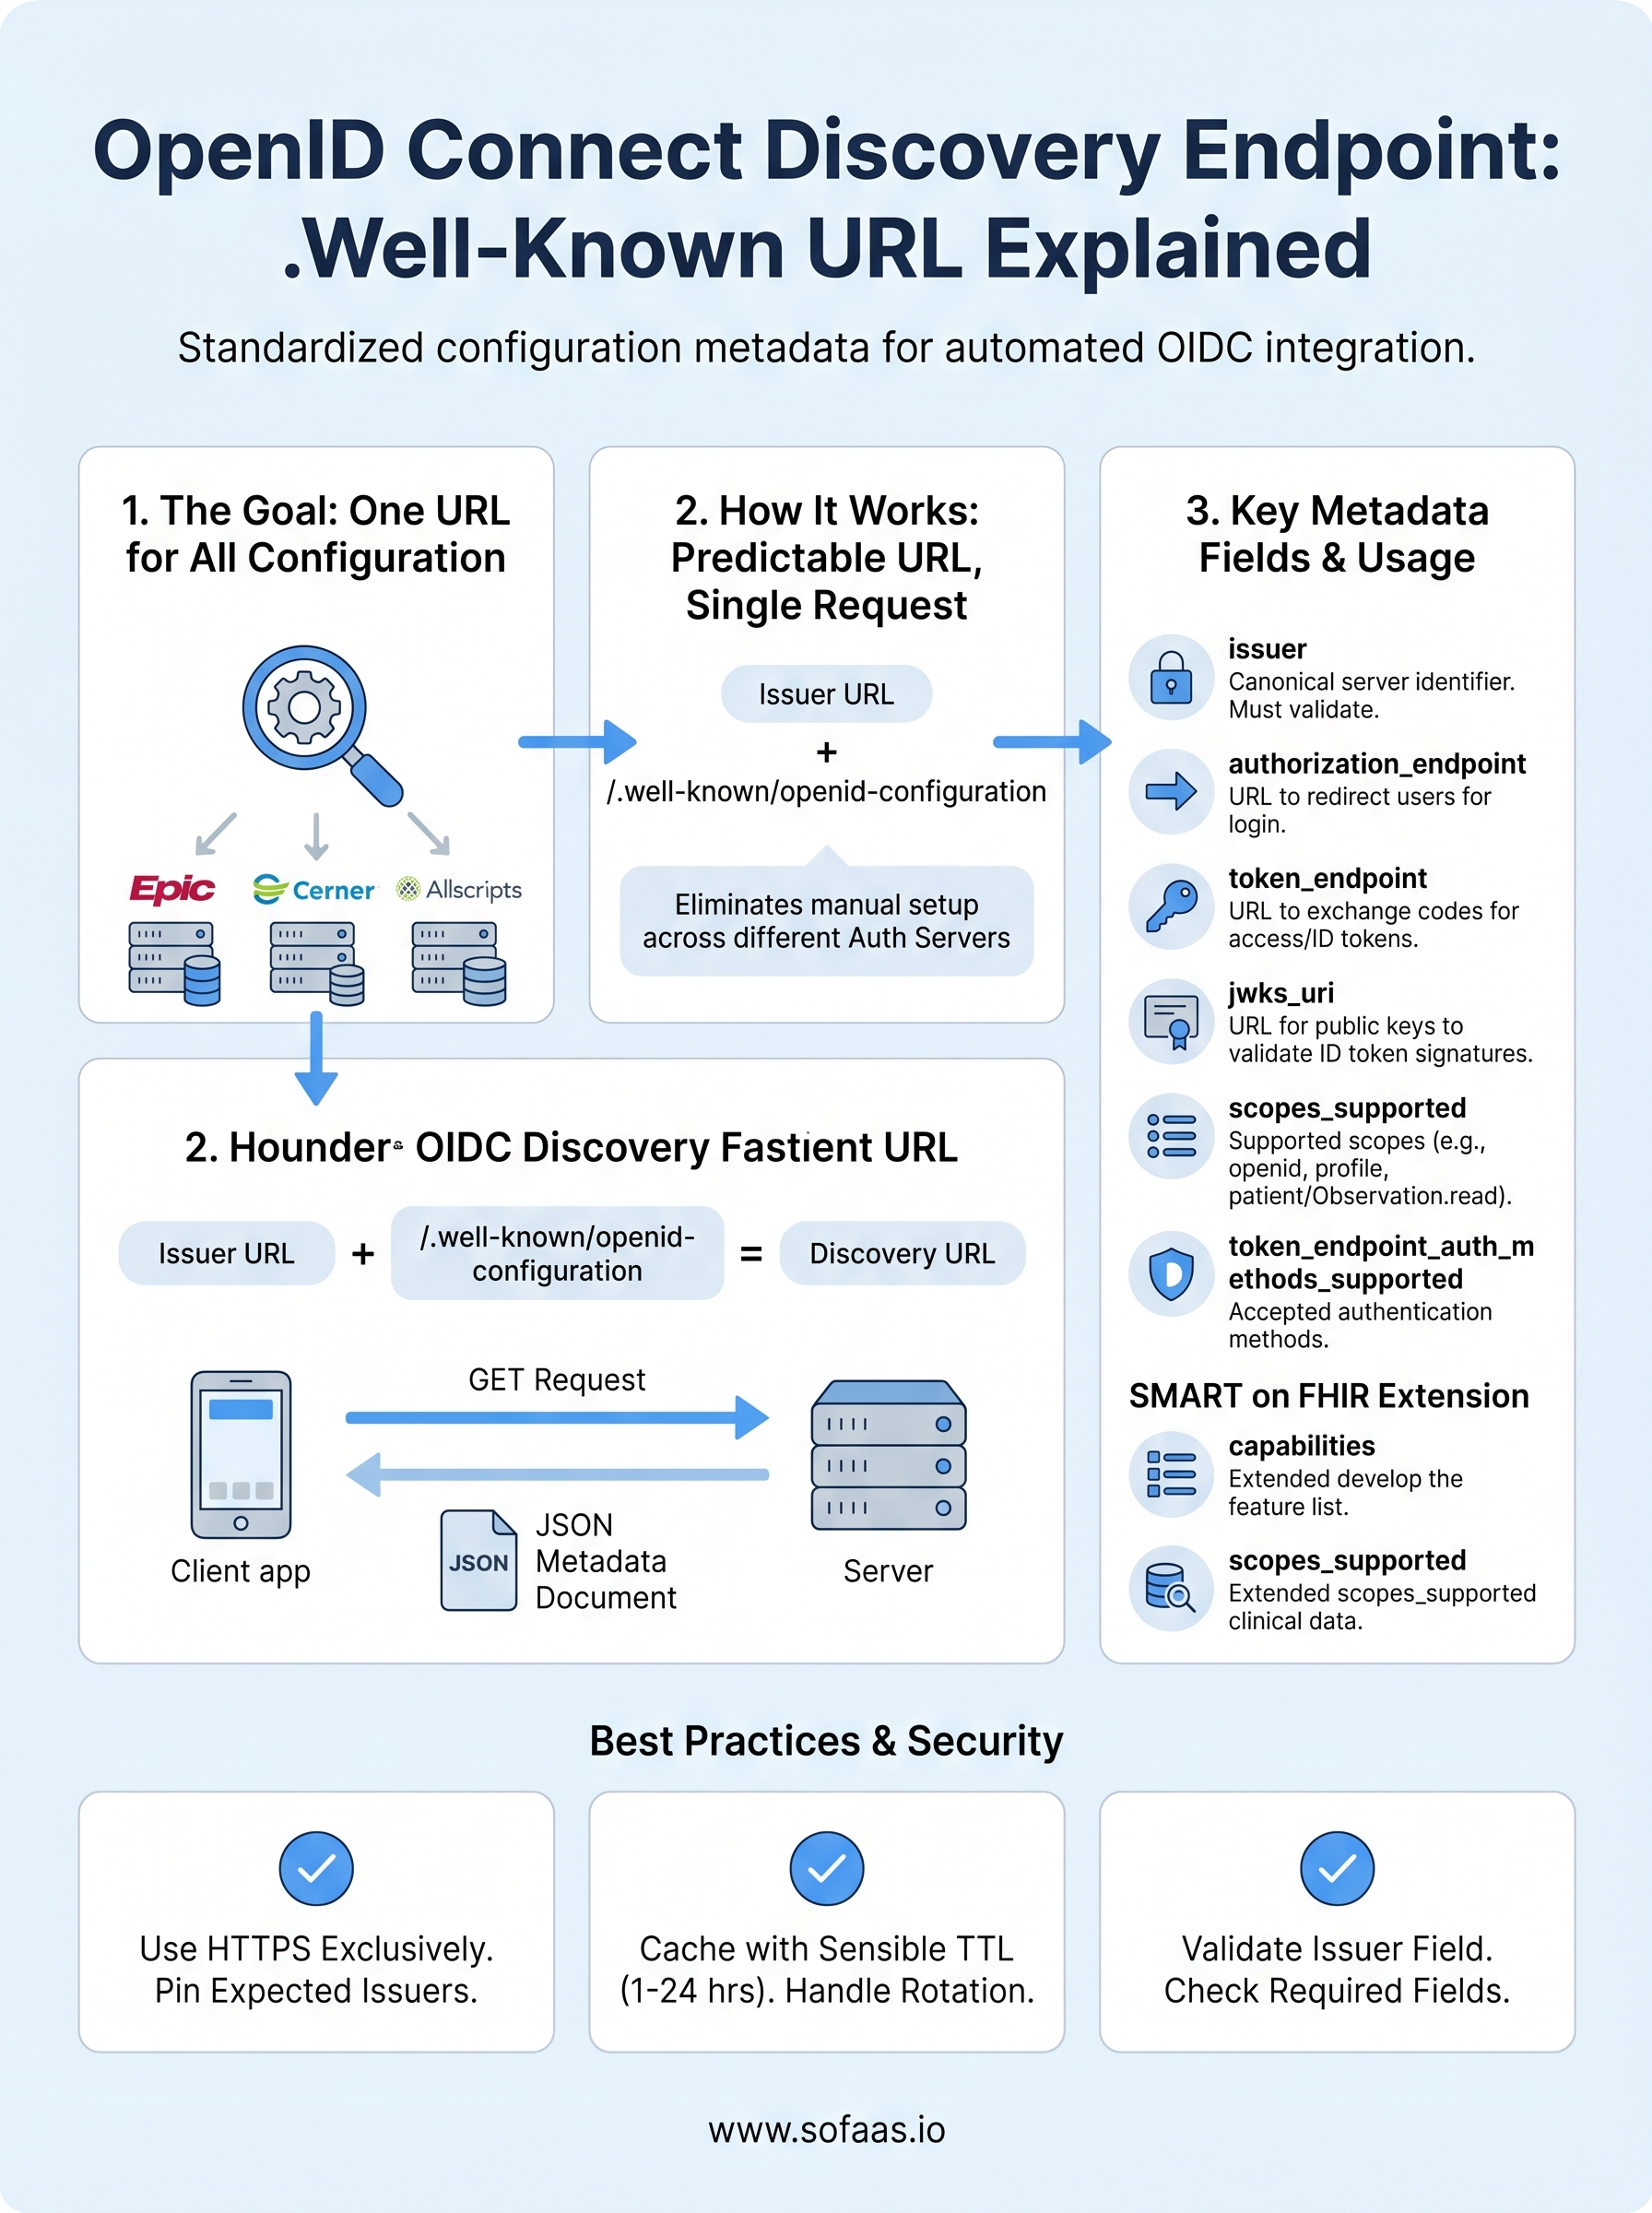
OpenID Connect Discovery Endpoint: .Well-Known URL Explained

Every SMART on FHIR application that connects to an EHR needs to know where to authenticate, how to request tokens, and which scopes are supported, before a single API call is made. The OpenID Connect discovery endpoint is the mechanism that makes this possible. It's a standardized URL that exposes a machine-readable JSON document containing all the metadata a client needs to configure itself automatically against an authorization server.
If you've ever manually wired up OAuth 2.0 flows for an EHR integration, you know how tedious and error-prone that process gets, especially across multiple systems like Epic, Cerner, and Allscripts, each with their own authorization server configurations. The .well-known/openid-configuration endpoint exists to eliminate that guesswork. It publishes everything from token endpoints to supported signing algorithms in one predictable location.
At SoFaaS, we handle SMART on FHIR authorization management so healthcare developers don't have to parse these details themselves. But understanding how OIDC discovery works under the hood makes you a better builder, and gives you confidence in what's happening behind any managed integration layer.
This article breaks down the .well-known/openid-configuration URL structure, walks through the metadata fields it returns, and explains how developers use it to automate the configuration of OIDC-protected healthcare applications. Whether you're building a patient-facing app or a backend service that pulls clinical data, this is foundational knowledge worth having.
What the discovery endpoint is and what it returns
The OpenID Connect discovery endpoint is a standardized HTTP endpoint that every OIDC-compliant authorization server exposes at a predictable path, so any client application can retrieve configuration metadata without hardcoding anything. Instead of manually tracking down token endpoints, authorization endpoints, and JWKS URIs across different systems, you fetch one JSON document and get everything in one request.
This design means your application can adapt to different authorization servers automatically, which is critical when connecting to multiple EHR systems that each run their own identity infrastructure.
The JSON document it returns
When you make a GET request to the discovery endpoint, the server returns a JSON object called the OpenID Provider Metadata document. This document is defined in the OpenID Connect Discovery 1.0 specification and extended by RFC 8414 for OAuth 2.0 Authorization Server Metadata. Every compliant authorization server must include a specific set of required fields, and can optionally include additional fields to describe capabilities your client may need.
The response always comes back as application/json and is meant to be read by machines, not humans. Your client library or SDK typically fetches this document once, caches it, and uses the values internally to build every subsequent request in the authentication flow.
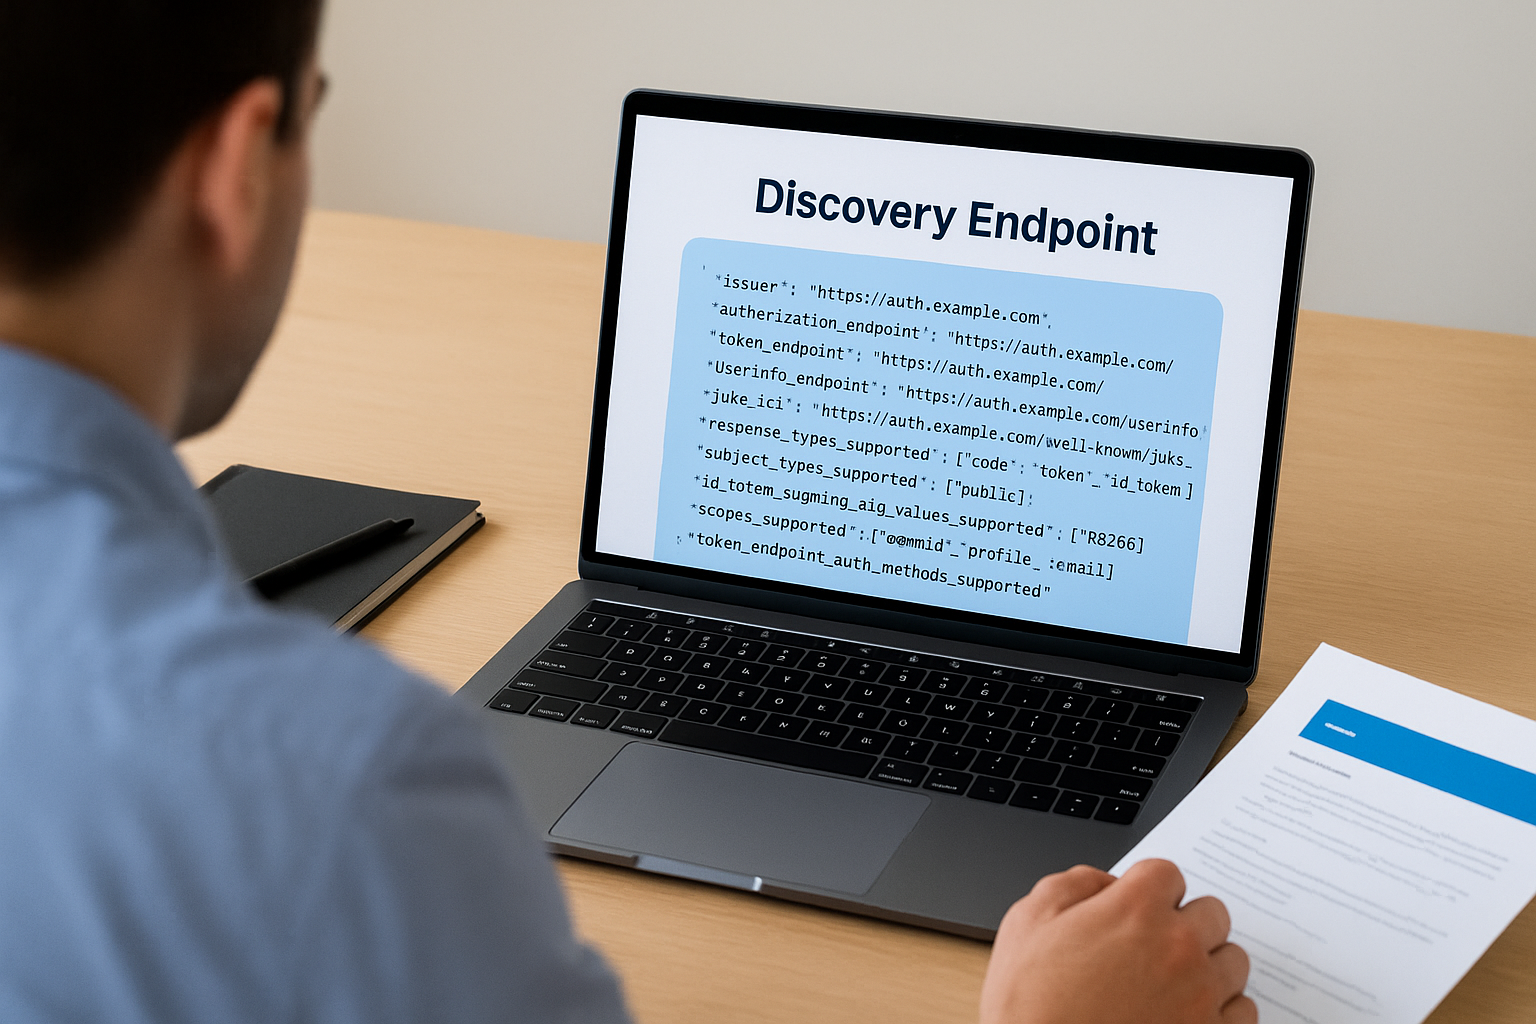
What a typical response looks like
Here is a simplified example of what the discovery document returns. Real authorization servers include more fields, but these represent the core structure:
{
  "issuer": "https://auth.example.com",
  "authorization_endpoint": "https://auth.example.com/authorize",
  "token_endpoint": "https://auth.example.com/token",
  "userinfo_endpoint": "https://auth.example.com/userinfo",
  "jwks_uri": "https://auth.example.com/.well-known/jwks.json",
  "response_types_supported": ["code", "token", "id_token"],
  "subject_types_supported": ["public"],
  "id_token_signing_alg_values_supported": ["RS256"],
  "scopes_supported": ["openid", "profile", "email"],
  "token_endpoint_auth_methods_supported": ["client_secret_basic", "private_key_jwt"]
}
Each field tells your client something specific about how to interact with the authorization server. The issuer field is the canonical identifier for the server itself, and your client must validate that it matches the URL you used to fetch the document. The jwks_uri field points to the server's public keys, which your client uses to validate the signatures on ID tokens. Without this document, you'd have to track down every one of these values manually and keep them updated whenever the server changes its configuration.
Why the standardized format matters
The entire value of the discovery mechanism comes from the fact that every compliant server uses the same JSON structure. Your client code doesn't need separate configuration logic for Epic's authorization server versus Cerner's. You point it at the discovery URL, parse the same document shape, and the flow works. This approach reduces integration complexity significantly, particularly when you're building applications that need to support multiple EHR systems or deploy across different healthcare organizations.
Authorization servers that skip proper OIDC discovery support force developers back into manual configuration, which means more room for error, more maintenance time, and harder debugging when endpoints change. Understanding exactly what this document contains, and how to validate it correctly, is the foundation for building any reliable OIDC-based integration.
How the .well-known URL gets built from issuer
The URL for the openid connect discovery endpoint follows a deterministic construction rule: you take the issuer identifier and append /.well-known/openid-configuration to it. This is defined in the OpenID Connect Discovery 1.0 specification, and every compliant authorization server must honor this path. Knowing the issuer URL means you always know where to find the discovery document without any guesswork or separate documentation lookup.

The construction rule
The issuer is the canonical base URL of the authorization server. To build the discovery URL, you concatenate the issuer with /.well-known/openid-configuration. If the issuer is https://auth.example.com, the resulting discovery URL is https://auth.example.com/.well-known/openid-configuration.
One important detail: trailing slashes matter. If the issuer is defined as https://auth.example.com/ with a trailing slash, a naive string concatenation produces https://auth.example.com//.well-known/openid-configuration, which is a malformed URL. Your client code should strip any trailing slash from the issuer value before appending the well-known path.
When the issuer includes a path component
Some authorization servers include a path segment in their issuer identifier. This is common with multi-tenant systems or EHR platforms that host separate authorization servers per organization. In those cases, the well-known URL is built by appending /.well-known/openid-configuration to the full issuer path, not just the domain.
For example, if the issuer is
https://auth.example.com/tenant/hospital-a, the discovery URL becomeshttps://auth.example.com/tenant/hospital-a/.well-known/openid-configuration, nothttps://auth.example.com/.well-known/openid-configuration.
This distinction matters in healthcare environments where Epic and Cerner both support multi-tenant deployments, meaning each hospital system can operate under its own issuer path. If your client uses the wrong base URL, it either gets a 404 response or retrieves the wrong configuration entirely, and your token validation will fail in ways that produce confusing, hard-to-trace errors in production.
Validating the issuer against the document
After fetching the discovery document, your client must confirm that the issuer field in the returned JSON matches the issuer URL you used to build the request. This validation step blocks a specific class of attack where a misconfigured or malicious server returns a discovery document containing a different issuer's metadata. The OpenID Connect Discovery specification requires this check explicitly, and skipping it introduces a security vulnerability that is straightforward for an attacker to exploit once they understand your integration's trust model.
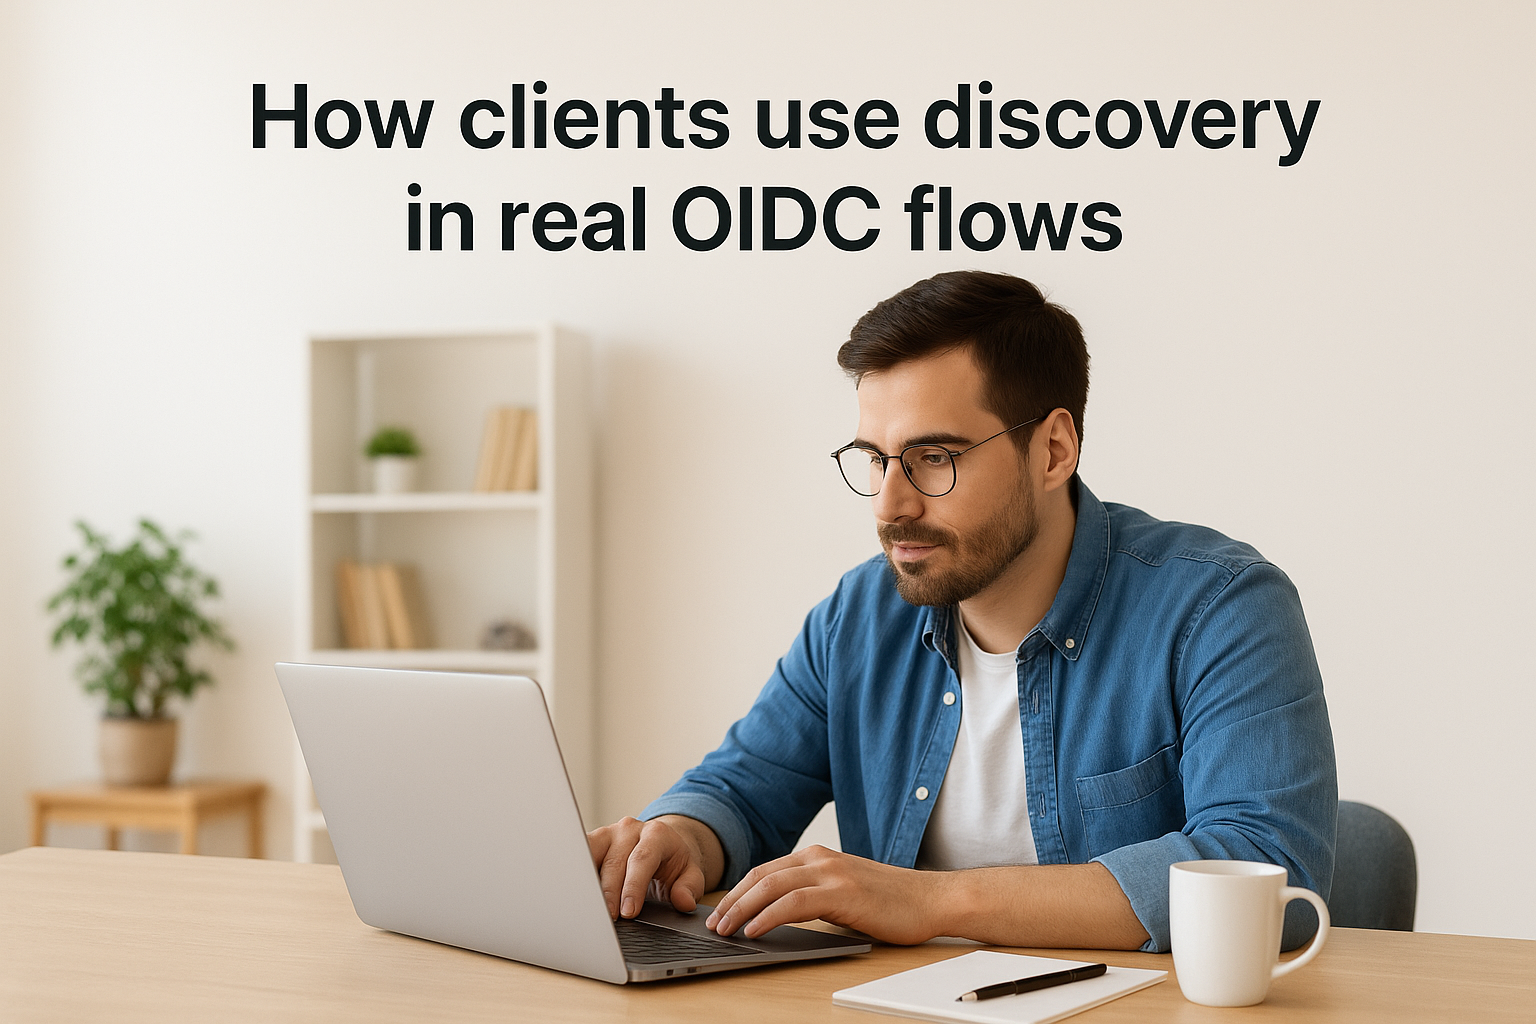
How clients use discovery in real OIDC flows
When a client application starts an OIDC flow, it doesn't begin by sending the user to an authorization page. It begins by fetching the discovery document and parsing the configuration data inside it. This sequence is deliberate: every subsequent step in the flow depends on values that only the discovery document provides, and attempting to hardcode those values creates brittle integrations that break the moment an authorization server updates its configuration.
Fetch and cache the discovery document first
Your client makes a single GET request to the .well-known/openid-configuration URL at startup or on first use. Most production-grade OIDC libraries handle this automatically. The response arrives as a JSON object, and your library stores it in memory or on disk so it doesn't make this request on every authentication attempt. Caching the document for a reasonable period, typically between one and twenty-four hours depending on your stability requirements, reduces unnecessary network calls while keeping your configuration reasonably fresh.
Never skip caching entirely. Fetching the openid connect discovery endpoint on every request adds latency to your authentication flow and risks rate limiting from the authorization server.
Build authorization and token requests from the document
Once you have the discovery document, your client reads the authorization_endpoint value and uses it to construct the URL where you redirect the user for login. After the user authenticates and your client receives the authorization code, it reads the token_endpoint value and sends the code exchange request there. At no point does your client need a hardcoded URL. Every endpoint reference comes directly from the discovery document, which means when Epic or Cerner updates their endpoint paths, your application adapts without a code change.
Validate ID tokens using the JWKS URI
After the token endpoint returns an ID token, your client must verify its signature before trusting any of its claims. The discovery document's jwks_uri field tells your client exactly where to retrieve the authorization server's public keys. Your client fetches those keys, matches the key identifier in the token's header, and runs the signature verification against the correct public key. This step is not optional. Skipping it means you're accepting tokens without confirming they came from the authorization server you intended to trust.
Key fields you must understand in the JSON
The discovery document contains both required and optional fields, but a specific set of them directly controls how your authentication flow behaves at every stage. Before you write a single line of integration code, you need to understand what these fields mean, what they point to, and how your client uses them to build and validate requests. Missing or misreading any of these values produces authentication failures that are genuinely difficult to trace back to their source.
issuer, authorization_endpoint, and token_endpoint
These three fields form the structural backbone of every OIDC flow. The issuer field is the canonical identifier for the authorization server, and it must exactly match the URL you used to fetch the openid connect discovery endpoint. If it doesn't match, your client must reject the document entirely and abort the flow rather than proceeding with configuration data you cannot trust.
Treat an
issuermismatch as a hard failure, not a warning. Accepting a mismatched issuer is a trust boundary violation that opens the door to token confusion attacks, particularly in multi-tenant healthcare environments.
The authorization_endpoint is the URL where your client sends users to authenticate, and it's the starting point for every authorization code flow. The token_endpoint is where your client exchanges the authorization code for access tokens and ID tokens after the user completes authentication. Both values must come from the discovery document directly, not from hardcoded configuration, so your application stays aligned with the server automatically when these URLs change.
jwks_uri and id_token_signing_alg_values_supported
Your client uses the jwks_uri field to retrieve the authorization server's public signing keys in JSON Web Key Set format. After your client receives an ID token from the token endpoint, it fetches those keys, matches the correct one using the kid claim in the token header, and verifies the token's cryptographic signature. Skipping this verification step means you're accepting tokens without confirming their origin, which removes a fundamental security control from your integration.
The id_token_signing_alg_values_supported field tells you which signing algorithms the server uses for ID tokens. In healthcare environments, RS256 is the practical standard. You should configure your client library to explicitly allowlist supported algorithms and reject tokens signed with weak or unexpected algorithms like none. If your library attempts verification against an algorithm it doesn't support, token validation fails with errors that look unrelated to algorithm configuration, so knowing this field upfront saves real debugging time.
Optional fields that matter in production
The OpenID Connect Discovery 1.0 specification marks certain fields as optional, but "optional" in the spec doesn't mean "unimportant in practice." Several of these fields directly affect how your application handles scopes, authentication methods, logout behavior, and token lifecycle management. Skipping them during integration setup tends to produce bugs that only surface under specific conditions, making them harder to diagnose once you're in production.
userinfo_endpoint and scopes_supported
The userinfo_endpoint field tells your client where to send a request for additional claims about the authenticated user beyond what the ID token contains. In healthcare applications, you may need patient demographic data or provider identity claims that don't fit neatly inside the ID token payload. Knowing this endpoint upfront means your client can request supplementary data without hardcoding a URL that could change without notice.
The scopes_supported field lists every scope the authorization server recognizes. Requesting a scope the server doesn't support causes the authorization request to fail or silently drop that scope, depending on server behavior. Checking this field before building your authorization request confirms you're only asking for scopes the server will actually grant, which prevents confusing partial-authorization scenarios in production workflows.
Reading
scopes_supportedfrom the openid connect discovery endpoint document is the only reliable way to confirm scope availability without making a live authorization attempt against the server.
token_endpoint_auth_methods_supported
The token_endpoint_auth_methods_supported field tells your client which authentication methods the token endpoint accepts when exchanging an authorization code for tokens. Common values include client_secret_basic, client_secret_post, and private_key_jwt. Healthcare authorization servers, particularly those implementing SMART on FHIR, often require private_key_jwt for backend service clients.
Sending the wrong authentication method to the token endpoint causes an immediate rejection. Checking this field during integration setup rather than at runtime means you configure your client once correctly instead of discovering the mismatch during a live token exchange that blocks real users.
end_session_endpoint and revocation_endpoint
The end_session_endpoint enables your application to initiate a proper logout sequence, clearing the session on the authorization server rather than only discarding the local token. Without it, users may remain authenticated on the server side even after your application clears its local state, creating a security gap that's invisible to the end user.
The revocation_endpoint gives your client a way to invalidate tokens explicitly, which is critical when a user logs out or when your application detects suspicious activity. Both endpoints contribute directly to your application's security posture in any production deployment that handles sensitive patient data.
Validate discovery data and avoid common bugs
Fetching the openid connect discovery endpoint document is only half the job. Before your client uses any value from that document, it needs to run a series of validation checks that confirm the data is trustworthy and complete. Skipping these checks is the most common source of authentication failures and security gaps in OIDC integrations, and the bugs they create are notoriously hard to trace because the errors appear elsewhere in the flow, not at the point where validation was skipped.
Check the issuer field before using any other value
Your client must compare the issuer value in the JSON document against the URL it used to construct the discovery request. These two strings must match exactly, including scheme, host, port, and path. If they differ by even a single character, your client must discard the entire document and abort the flow. This check is not a soft warning you can log and continue past.
An issuer mismatch means you retrieved configuration data from a server you did not intend to trust, and using that data exposes your integration to token confusion attacks that can be difficult to detect in production.
Handle missing or null fields defensively
The specification marks certain fields as required, but real-world authorization servers sometimes return malformed documents. Your client should explicitly check for the presence of each field it depends on before attempting to read the value. If jwks_uri, authorization_endpoint, or token_endpoint is absent or null, your client should throw a hard error rather than proceeding with a fallback or default value. Proceeding with missing endpoint data produces runtime failures during live authentication attempts that can block real users and generate misleading error logs.
Pay close attention to fields that contain arrays, such as response_types_supported and id_token_signing_alg_values_supported. Some servers return an empty array instead of omitting the field entirely, and your client needs to handle both cases. Treat an empty array the same as an absent field for any value your flow depends on, and surface that condition as a configuration error rather than silently allowing the flow to continue with no supported options selected. Building this defensive layer into your parsing logic at the start saves significant debugging time once your integration handles real patient data at scale.
Security, caching, and operational best practices
Running a reliable OIDC integration requires more than correct parsing. You need to handle transport security, document caching, and key rotation in ways that keep your application stable and your users protected. The decisions you make in these three areas determine whether your integration stays healthy under real production load or degrades silently over time.
Use HTTPS exclusively and pin expected issuers
Your client must only fetch the openid connect discovery endpoint over HTTPS. A plain HTTP request exposes the discovery document to interception, which means an attacker positioned between your client and the authorization server can substitute a fraudulent document containing endpoints they control. Never allow your client to fall back to HTTP, even in development environments, because habits built in development tend to survive into production configurations.
Maintain an explicit allowlist of trusted issuer URLs in your client configuration and reject any discovery document whose
issuerfield does not appear in that list, regardless of where the request originated.
Beyond transport, your client should store the expected issuer URL as a hard-coded configuration value and compare every fetched document against it before processing any field inside it. This two-layer check, HTTPS transport plus issuer allowlisting, closes the primary attack surface against discovery-based integrations.
Cache the discovery document with a sensible TTL
Fetching the discovery document on every request adds unnecessary latency and puts avoidable load on the authorization server. Your client should cache the document in memory after the first successful fetch and reuse it for subsequent requests. A time-to-live between one and six hours covers most production scenarios without exposing your client to stale data for too long.
Build your caching layer to handle both expiration and explicit invalidation. When a token validation fails because a key referenced in the token's header is absent from your cached JWKS, your client should immediately re-fetch the discovery document and the JWKS before retrying the validation once. Authorization servers rotate their signing keys periodically, and a single retry-after-refresh pattern handles key rotation cleanly without requiring a manual cache flush.
Monitor discovery fetch failures as a critical signal
Treat any failure to fetch or validate the discovery document as a high-priority operational alert, not a routine error to retry silently. If the endpoint becomes unreachable, every new authentication attempt in your application will fail. Tracking this failure mode in your monitoring system separately from general HTTP errors gives your team the signal they need to respond before users start reporting login failures.
How this shows up in SMART on FHIR apps
SMART on FHIR builds directly on top of OIDC, which means every concept covered in this article applies to healthcare application development, but with additional fields and stricter requirements layered on top. When your SMART on FHIR app connects to an EHR like Epic or Cerner, the openid connect discovery endpoint is still the first stop, and the EHR's authorization server publishes a discovery document at its .well-known/openid-configuration path just like any other OIDC provider. The difference is in what that document contains.
SMART on FHIR extends the discovery document
The SMART App Launch specification defines a set of additional fields that EHR authorization servers include in their discovery documents to communicate healthcare-specific capabilities. These fields sit alongside the standard OIDC fields and tell your client which SMART launch contexts the server supports, which clinical scopes it accepts, and whether it handles standalone or EHR-embedded launch flows.
Reading the full discovery document before writing any integration code is the fastest way to confirm which SMART capabilities a specific EHR authorization server actually supports, rather than relying on general documentation that may not reflect the deployed configuration.
The table below shows key SMART-specific fields you will encounter in EHR discovery documents alongside their standard OIDC counterparts:
| Field | Source | What it tells your client |
|---|---|---|
authorization_endpoint |
OIDC standard | Where to send users for login |
token_endpoint |
OIDC standard | Where to exchange codes for tokens |
jwks_uri |
OIDC standard | Where to fetch signing keys |
capabilities |
SMART extension | Which SMART launch features are supported |
scopes_supported |
OIDC + SMART | Which clinical and system scopes are available |
What EHR-specific discovery looks like in practice
In a real SMART on FHIR integration, your application reads the capabilities array from the discovery document to confirm whether the server supports features like launch-ehr, launch-standalone, client-confidential-asymmetric, or permission-patient. Attempting to use a capability that isn't listed in this array causes the authorization server to reject your request without a clear error message explaining why.
Your client also reads scopes_supported to verify that the clinical scopes your application needs, such as patient/Observation.read or system/Patient.read, are available before building the authorization request. Skipping this check leads to silent scope drops that produce incomplete data access without any obvious failure signal during the authorization flow itself.
Next steps for your OIDC integration
You now have a complete picture of how the openid connect discovery endpoint works, from URL construction to SMART on FHIR-specific extensions. The practical next step is applying this knowledge to a real integration. Start by fetching the discovery document from your target EHR's authorization server, validating the issuer field, and confirming that the scopes and capabilities your application needs are actually listed before writing any authentication code. That single habit prevents the majority of integration failures developers hit during initial setup.
Building this infrastructure from scratch still takes significant time, even when you understand OIDC deeply. SoFaaS handles the authorization layer, SMART on FHIR token management, and EHR-specific discovery configuration so your team can focus on the application logic that actually serves patients and providers. If you're ready to cut your integration timeline from months to days, launch your SMART on FHIR app with SoFaaS and connect to major EHRs without building the auth layer yourself.
The Future of Patient Logistics
Exploring the future of all things related to patient logistics, technology and how AI is going to re-shape the way we deliver care.
Thank you! Your submission has been received!
Oops! Something went wrong while submitting the form.