Azure AD B2C OpenID Connect: Web App Integration Tutorial

Authenticating users securely is one of the first problems you'll solve when building a healthcare web application. Azure AD B2C OpenID Connect gives you a standards-based way to handle sign-up, sign-in, and identity verification without rolling your own auth system from scratch. But getting the configuration right, especially user flows, token validation, and identity provider setup, requires careful attention to detail.
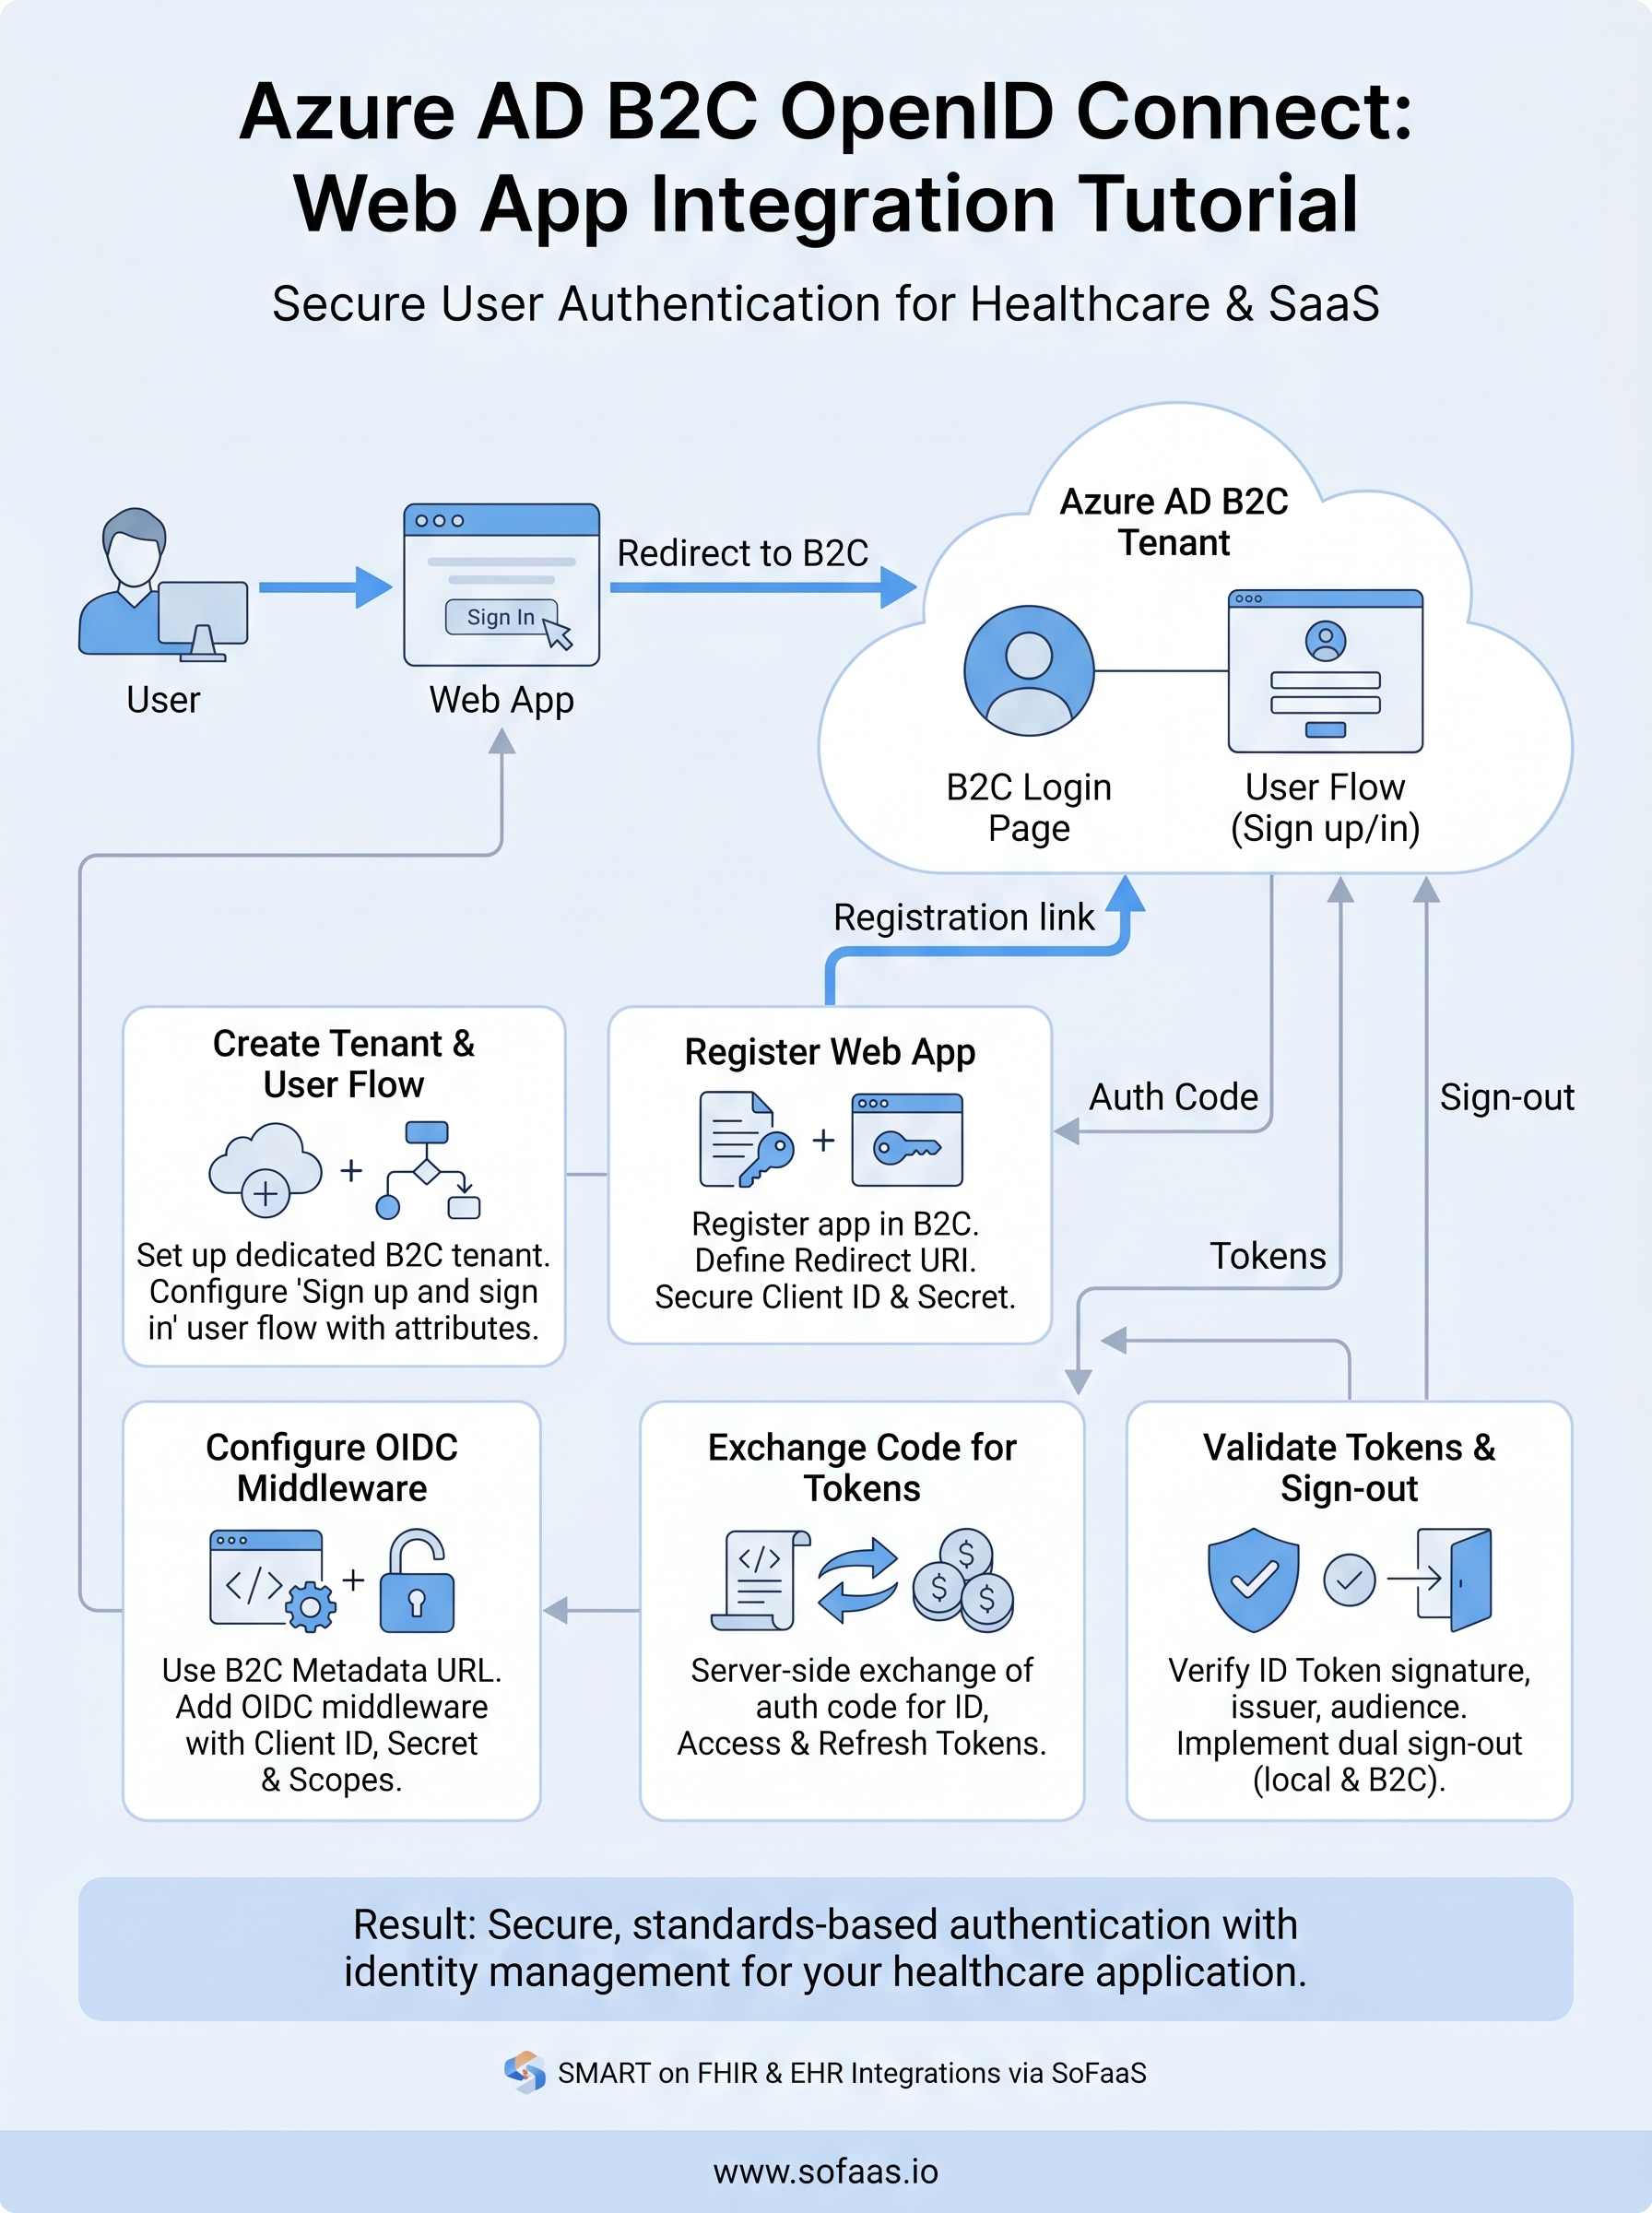
This tutorial walks you through the entire process of integrating OpenID Connect with Azure AD B2C in a web application. You'll learn how to configure user flows, register your app, handle authentication responses, and troubleshoot common issues that trip up developers during implementation. Each step includes practical guidance you can apply directly to your project, whether you're building a patient portal, a provider-facing tool, or a healthcare SaaS product.
At SoFaaS, we deal with authentication and authorization flows daily, our platform manages OAuth and consent workflows for SMART on FHIR integrations between healthcare apps and EHRs. That hands-on experience with identity protocols in healthcare environments shaped this guide. If you're building an application that needs both solid user authentication via Azure AD B2C and EHR connectivity, you'll find this a useful starting point for the auth side of your stack.
Let's get into the setup.
Understand B2C status and prerequisites
Before you write a single line of code, you need to understand what Azure AD B2C is doing under the hood and what you need in place to make the integration work. Azure AD B2C is a customer identity and access management service that sits separately from your regular Azure AD tenant. It handles user registration, sign-in, password reset, and profile editing through configurable policies called user flows or custom policies.
What Azure AD B2C OpenID Connect actually does
The Azure AD B2C OpenID Connect flow follows the standard authorization code flow, but with B2C-specific endpoints and policy parameters baked in. When a user hits your sign-in button, your app redirects them to a B2C-hosted login page. The user authenticates, B2C issues an authorization code, and your app exchanges that code for an ID token, an access token, and a refresh token. The ID token contains user claims like name, email, and object ID that you use to identify the user within your application.
B2C uses policy-specific endpoints, meaning every user flow generates its own OpenID Connect metadata URL. You need to use the correct metadata URL for each flow in your application configuration, or token validation will fail.
Your application never touches the user's password directly. B2C manages credential verification and returns verified identity information to your app via signed tokens. This is exactly why validating those tokens correctly matters, which you will handle in Step 5.
Prerequisites you need in place
You need several things confirmed before starting the configuration steps. Missing any of these will block you partway through the setup, and backtracking wastes significant time. Go through each required item below and verify it's in place before you move to Step 1.
| Prerequisite | Details |
|---|---|
| Active Azure subscription | Billing-enabled subscription with permissions to create resources |
| Dedicated B2C tenant | A B2C tenant separate from your work or organization Azure AD |
| Admin role in B2C tenant | Global Administrator or Application Administrator role |
| Web application | An app capable of handling HTTP redirects on any framework |
| Redirect URI | A specific URL in your app that receives the authorization response |
Your Azure subscription must be linked to the B2C tenant during setup. If you work within an organization, confirm with your Azure admin that you have the right role assignments to create a B2C tenant and register applications before you proceed.
Confirm your subscription and tenant readiness
Log into the Azure portal and navigate to your subscription overview. Check that your subscription is active and not suspended or restricted. If you're creating a fresh B2C tenant, the subscription you link will be billed for the tenant's monthly active user operations, so make sure it's the correct one for your project's billing setup.
Also verify that you are not confusing Azure Active Directory with Azure AD B2C. They are separate services with different portals and different token endpoints. Your regular Azure AD handles employee sign-in for internal tools, while Azure AD B2C handles customer-facing authentication for your web and mobile applications. Creating your B2C tenant inside the wrong directory is one of the most common mistakes developers make during initial setup, and it causes permission and billing complications that are annoying to untangle later.
Once your subscription is active, your role assignments are confirmed, and you understand the distinction between Azure AD and B2C, you're ready to start building.
Step 1. Create your B2C tenant and user flow
Creating a dedicated B2C tenant is the foundational step before any azure ad b2c openid connect configuration can happen. Everything, from user flows to app registrations, lives inside this tenant, so setting it up correctly from the start saves you from rebuilding later.
Create the B2C tenant in the Azure portal
Log into the Azure portal and search for Azure AD B2C in the top search bar. Select "Create a new Azure AD B2C Tenant" from the options presented. The portal will prompt you to fill in an organization name and initial domain name, which becomes your tenant's .onmicrosoft.com address. Choose this domain name carefully because you cannot change it after creation.
Follow these steps in order to complete tenant creation:
- Select Create a resource from the portal homepage
- Search for "Azure Active Directory B2C" and select it
- Choose Create a new Azure AD B2C Tenant
- Enter your organization name and domain name
- Select your country/region (this determines data residency)
- Link the tenant to your active Azure subscription
- Select a resource group for billing association
- Click Review + Create, then Create
Once your tenant is created, switch your portal directory to the new B2C tenant before registering apps or configuring flows. Working in the wrong directory is a frequent source of permission errors that are hard to trace.
Set up a sign-up and sign-in user flow
Inside your new B2C tenant, navigate to User flows in the left menu and select "New user flow." Choose the Sign up and sign in flow type, which handles both new user registration and returning user authentication in a single policy. Microsoft recommends the "Recommended" version of this flow for all new projects since it includes the latest security defaults.

On the configuration screen, give your flow a clear, descriptive name like B2C_1_web_signup_signin. Under Identity providers, select "Email signup" to allow users to register with an email address and password. Then specify the user attributes you want to collect during registration, such as display name and email address, and the claims you want returned in the token. Click "Create" to generate the flow.
Your user flow is now ready to test using the built-in "Run user flow" feature before you wire it to your application.
Step 2. Register the web app in Azure AD B2C
With your tenant and user flow in place, you need to register your web application in Azure AD B2C so the azure ad b2c openid connect flow knows which clients are authorized to request tokens. App registration creates a trust relationship between your web app and the B2C tenant, giving your application a unique client ID and letting you specify exactly where B2C can send authentication responses.
Create the app registration
Inside your B2C tenant in the Azure portal, navigate to App registrations in the left menu and click "New registration." Fill in the registration form with the following values to get your app connected correctly:

| Field | Value |
|---|---|
| Name | A descriptive name, e.g., "MyHealthApp Web" |
| Supported account types | Accounts in any identity provider or organizational directory |
| Redirect URI | Web platform, e.g., https://yourapp.com/auth/callback |
After clicking Register, the portal generates an Application (client) ID. Copy this value immediately and store it in your project's configuration file. You will need it in the next step when you configure your app's OpenID Connect middleware.
Never commit your client ID or any client secret to a public repository. Use environment variables or a dedicated secrets manager to store these values securely across all environments.
Add a client secret
Your web app needs a client secret to exchange the authorization code for tokens on the server side. Under your new app registration, navigate to Certificates & secrets and click "New client secret." Give the secret a description, set an expiration period (12 or 24 months is standard), and click Add.
Copy the secret value shown on screen before navigating away from the page. The portal only displays this value once, so you will need to generate a new secret if you miss it. Store the value alongside your client ID in your environment configuration, and set a calendar reminder before the expiration date so you rotate credentials before your app loses the ability to authenticate.
Verify API permissions
Check the API permissions tab in your registration and confirm that openid, offline_access, and profile scopes are listed under Microsoft Graph delegated permissions. These three scopes cover the core claims your application needs from the ID token and enable refresh token issuance for session management. If any scope is missing, click "Add a permission," select Microsoft Graph, choose Delegated permissions, and add the missing scope manually.
Step 3. Configure OpenID Connect in your web app
With your app registration complete, you now need to wire up the OpenID Connect middleware inside your web application. This step translates the B2C tenant settings into runnable code that handles the redirect, token exchange, and session establishment automatically on every authentication request.
Locate your B2C metadata endpoint
Each user flow in Azure AD B2C exposes a dedicated OpenID Connect metadata URL that your middleware uses to discover signing keys, token endpoints, and supported scopes. You cannot share a single metadata URL across multiple user flows. Navigate to your B2C tenant in the Azure portal, open User flows, select your sign-up/sign-in flow, and click "Run user flow." The metadata URL appears at the top of that panel in this format:

https://<tenant>.b2clogin.com/<tenant>.onmicrosoft.com/<policy>/v2.0/.well-known/openid-configuration
Replace <tenant> with your B2C tenant name and <policy> with your user flow name, for example B2C_1_web_signup_signin. Store this URL in your application's environment configuration alongside the client ID and secret you saved in Step 2.
Add OpenID Connect middleware
The example below shows a complete ASP.NET Core configuration using the built-in OpenID Connect middleware. Add this to your Program.cs or Startup.cs file, substituting the placeholder values with your actual tenant settings:
builder.Services.AddAuthentication(options =>
{
    options.DefaultScheme = CookieAuthenticationDefaults.AuthenticationScheme;
    options.DefaultChallengeScheme = OpenIdConnectDefaults.AuthenticationScheme;
})
.AddCookie()
.AddOpenIdConnect(options =>
{
    options.Authority = "https://<tenant>.b2clogin.com/<tenant>.onmicrosoft.com/<policy>/v2.0";
    options.MetadataAddress = "<your-metadata-url>";
    options.ClientId = "<your-client-id>";
    options.ClientSecret = "<your-client-secret>";
    options.ResponseType = "code";
    options.SaveTokens = true;
    options.Scope.Add("openid");
    options.Scope.Add("offline_access");
    options.CallbackPath = "/auth/callback";
});
Set
SaveTokens = trueduring development to inspect token contents, but review whether long-term token storage in the authentication cookie fits your production security requirements.
Setting ResponseType to "code" tells B2C to use the authorization code flow, which keeps tokens off the browser and processes them server-side. The CallbackPath must exactly match the redirect URI you registered in Step 2, including the path casing, or B2C will reject the response with a redirect mismatch error.
Step 4. Exchange code for tokens and call APIs
Once B2C redirects the user back to your callback URL with an authorization code, your server needs to exchange that code for the three tokens that power your application's session and data access. The OpenID Connect middleware you configured in Step 3 handles this exchange automatically when you use the authorization code flow, but you still need to understand what happens so you can retrieve and use the tokens correctly in your downstream logic.
Exchange the authorization code
When the middleware completes the code exchange, it stores the ID token, access token, and refresh token in the authentication cookie if you set SaveTokens = true. You retrieve these stored tokens server-side using the GetTokenAsync extension method on the HttpContext. Use the code below to pull each token from the current request context:
var idToken = await HttpContext.GetTokenAsync("id_token");
var accessToken = await HttpContext.GetTokenAsync("access_token");
var refreshToken = await HttpContext.GetTokenAsync("refresh_token");
The ID token contains the user's identity claims, such as name, email, and object ID. The access token is what you attach to downstream API calls. The refresh token lets your app request a new access token silently when the current one expires, without forcing the user through the sign-in page again.
Store the refresh token securely server-side and never expose it to client-side JavaScript, since a leaked refresh token gives an attacker persistent access until you explicitly revoke it.
Call a protected API with the access token
With your access token retrieved, you attach it to outbound API requests using the Authorization header with the Bearer scheme. The example below shows a complete API call using HttpClient in ASP.NET Core, which you can adapt to any protected endpoint your application needs to reach:
var client = _httpClientFactory.CreateClient();
client.DefaultRequestHeaders.Authorization =
    new AuthenticationHeaderValue("Bearer", accessToken);

var response = await client.GetAsync("https://yourapi.example.com/patient/data");
response.EnsureSuccessStatusCode();

var content = await response.Content.ReadAsStringAsync();
For healthcare applications built on the azure ad b2c openid connect stack, this pattern extends directly to any API layer sitting in front of your FHIR resources or other protected data services. Check that your API validates the incoming token's audience claim to confirm the request originated from your registered B2C application and not an unrelated client.
Step 5. Validate tokens and handle sign-out
Token validation is not optional in an azure ad b2c openid connect implementation. Even though the middleware handles the initial token exchange, your application must independently verify that every ID token and access token it receives is properly signed, unexpired, and targeted at your specific application. Skipping this step introduces authentication bypass vulnerabilities that put your users' data at risk.
Validate the ID token signature and claims
Your B2C tenant signs every token using an RSA private key and publishes the corresponding public keys at the JWKS endpoint listed in your metadata document. The middleware fetches these keys automatically on startup, but you should confirm your code checks the following claims on every token before trusting its contents:
| Claim | Expected Value |
|---|---|
iss (issuer) |
Your B2C tenant's issuer URL from the metadata document |
aud (audience) |
Your application's client ID |
exp (expiration) |
A Unix timestamp in the future |
tfp or acr |
The user flow name, e.g., B2C_1_web_signup_signin |
Use the System.IdentityModel.Tokens.Jwt library to validate these claims explicitly. The code below shows how to configure a TokenValidationParameters object that enforces issuer, audience, and lifetime checks:
var validationParameters = new TokenValidationParameters
{
    ValidateIssuer = true,
    ValidIssuer = "<your-b2c-issuer-url>",
    ValidateAudience = true,
    ValidAudience = "<your-client-id>",
    ValidateLifetime = true,
    IssuerSigningKeys = <keys-fetched-from-jwks-endpoint>
};

var handler = new JwtSecurityTokenHandler();
handler.ValidateToken(idToken, validationParameters, out SecurityToken validatedToken);
Never disable issuer or audience validation in production, even temporarily for debugging, because an attacker can craft a valid token from a different B2C tenant and gain unauthorized access to your application.
Implement sign-out correctly
Signing out in B2C requires two distinct steps: clearing the local application session and redirecting the user to the B2C sign-out endpoint to clear the B2C session cookie. If you only clear the local cookie, the user can return to the B2C-hosted login page and sign back in without entering credentials, which breaks the expected sign-out experience entirely.
Call HttpContext.SignOutAsync for both the cookie and the OpenID Connect scheme as shown below:
await HttpContext.SignOutAsync(CookieAuthenticationDefaults.AuthenticationScheme);
await HttpContext.SignOutAsync(OpenIdConnectDefaults.AuthenticationScheme);
The OpenID Connect scheme sign-out triggers a redirect to https://<tenant>.b2clogin.com/<tenant>.onmicrosoft.com/<policy>/oauth2/v2.0/logout, which clears the B2C session and then sends the user to your registered post-logout redirect URI. Verify that this post-logout URI is registered under your app registration in the Azure portal, or the redirect will fail with an unauthorized reply URL error.
Next steps
You now have a complete azure ad b2c openid connect implementation covering tenant setup, app registration, middleware configuration, token exchange, validation, and sign-out. Each step builds directly on the previous one, so if something breaks, trace back through the sequence to find where your configuration diverges from what B2C expects.
From here, consider adding multi-factor authentication to your user flow, configuring social identity providers like Google or Apple, or setting up custom branding on the B2C-hosted login pages to match your product's design. If your application also needs to connect with EHR systems and exchange patient data via FHIR, the auth layer you built today is a solid foundation to extend.
For healthcare teams that need SMART on FHIR integration alongside their authentication setup, launch your SMART on FHIR app with SoFaaS and let the platform handle EHR connectivity while you focus on building your product rather than managing infrastructure.
The Future of Patient Logistics
Exploring the future of all things related to patient logistics, technology and how AI is going to re-shape the way we deliver care.
Thank you! Your submission has been received!
Oops! Something went wrong while submitting the form.