Azure API Management mTLS: Inbound And Outbound Setup Guide

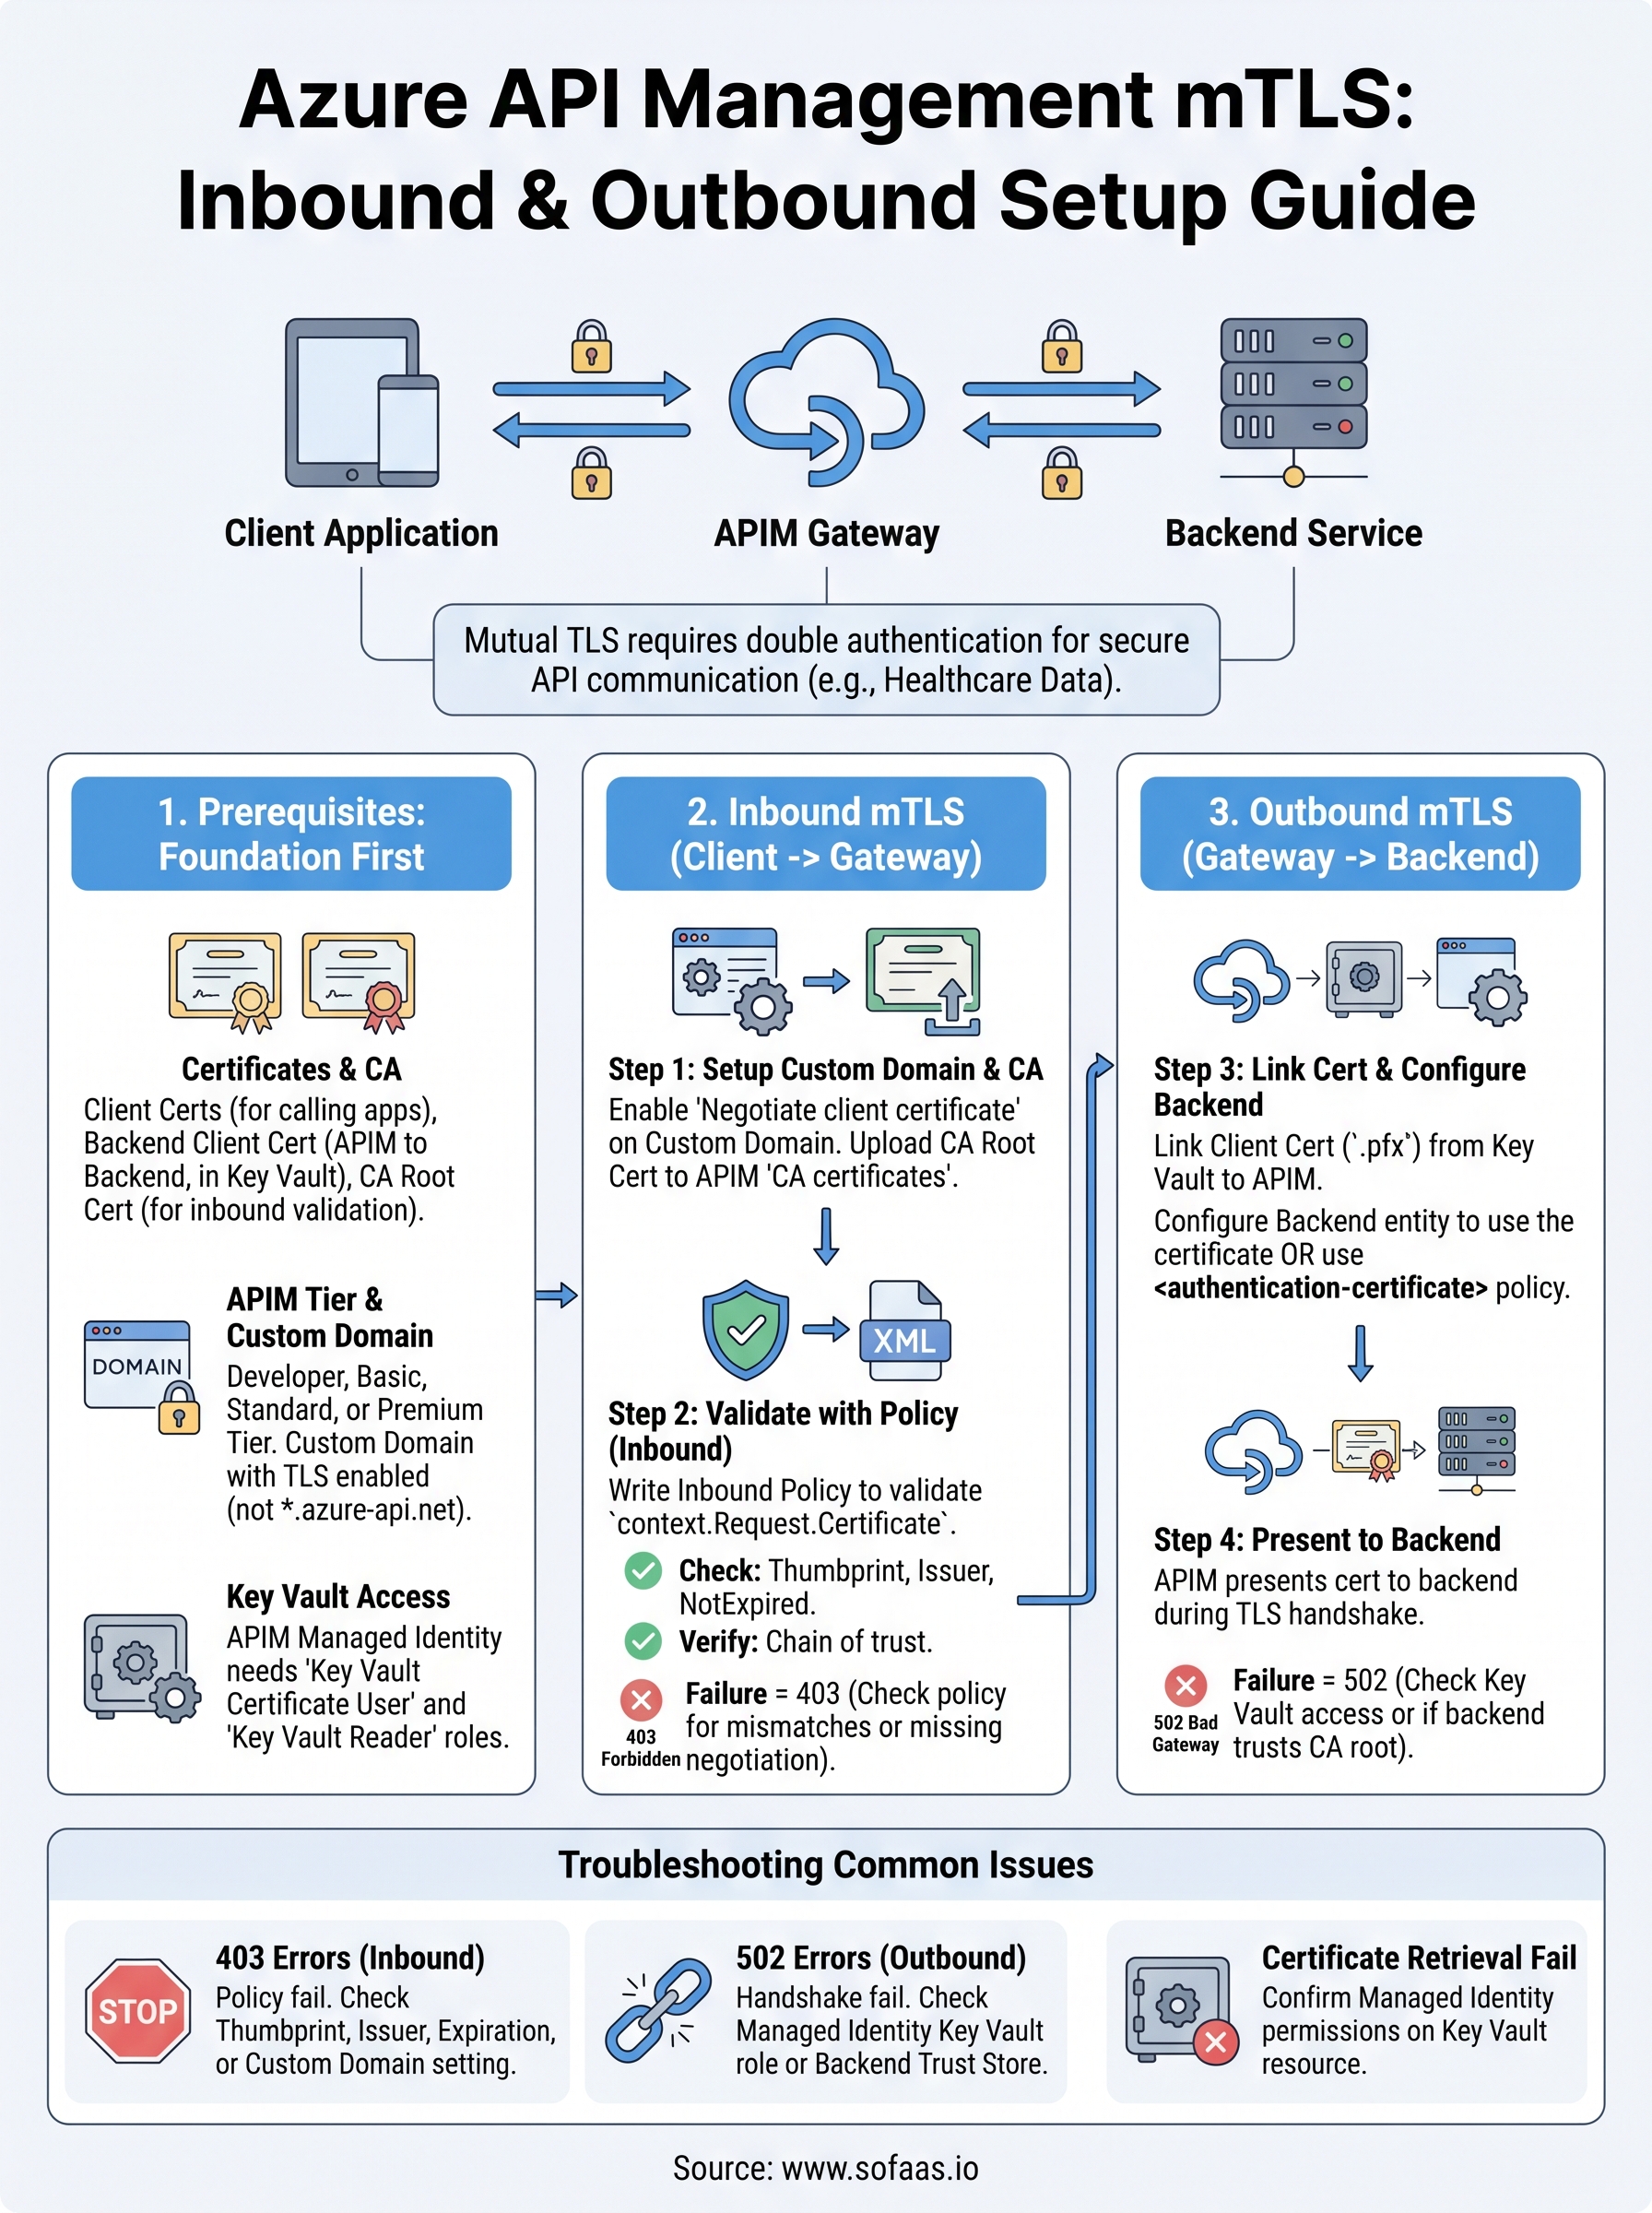
Mutual TLS adds a critical layer of security to API communication by requiring both the client and server to authenticate each other with certificates. When you're handling healthcare data, patient records, clinical workflows, EHR integrations, this isn't optional. It's a baseline expectation. Configuring Azure API Management mTLS correctly ensures that every request hitting your gateway and every call reaching your backend is cryptographically verified, reducing the risk of unauthorized access at both ends.
But getting it right involves more than toggling a setting. You need to understand how Azure handles client certificate negotiation on the inbound side, how to attach certificates for outbound backend calls, and how to write the right policies to validate thumbprints, issuers, and expiration dates. Miss a step, and your API gateway either rejects legitimate traffic or, worse, lets unverified requests through.
This guide walks you through the full setup: inbound client-to-gateway mTLS and outbound gateway-to-backend mTLS, with concrete configuration steps and policy examples. At SoFaaS, we build and manage secure healthcare integrations on infrastructure that meets HIPAA and SOC 2 Type II requirements, mTLS is one of the foundational mechanisms we rely on. This article shares the practical knowledge behind that, so you can implement the same level of transport security in your own Azure API Management environment.
What you need before you enable mTLS in APIM
Before you touch a single Azure portal setting, you need to make sure the foundational pieces are in place. Skipping the prerequisites is the most common reason mTLS configurations fail or produce unpredictable behavior. When working with azure api management mtls, the setup depends on having the right certificates, the correct APIM service tier, a custom domain with TLS configured properly, and appropriate access to Azure Key Vault. Sorting these out first saves you from debugging cryptic handshake errors mid-configuration.
Certificates and certificate authority setup
Your certificates are the backbone of the entire mTLS handshake. You need a client certificate (for the calling application to present to the APIM gateway) and a backend server certificate (for the gateway to present when it calls your backend service). Both certificates must be signed by a trusted certificate authority (CA), either your own internal CA or a public one, depending on your trust model.
If you use self-signed certificates in production, APIM will reject them by default unless you explicitly disable certificate chain validation, which creates a security gap you should not accept in any regulated environment.
For the inbound flow, you need the CA root certificate that signed your client certificates loaded into APIM so the gateway can validate incoming requests. For the outbound flow, you need the client certificate that the gateway will present to your backend, stored in Azure Key Vault and linked to your APIM instance. Collect this information before you start:
- A CA root certificate (
.ceror.pemformat) for validating inbound client certificates - A client certificate with private key (
.pfxformat) for outbound gateway-to-backend authentication - The thumbprint, subject, and issuer details for each certificate you plan to reference in policy
Azure API Management tier and custom domain requirements
Not all APIM tiers support client certificate negotiation equally. The Consumption tier does not support the custom domain configuration required to enable client certificate negotiation at the gateway level. You need at least the Developer, Basic, Standard, or Premium tier to configure full inbound mTLS. Check your current tier in the Azure portal under your APIM instance overview before you proceed.
Your APIM instance also requires a custom domain with TLS enabled. Client certificate negotiation is a property set on the custom domain configuration, not on the default gateway hostname. If you are still using the default *.azure-api.net hostname, the "Negotiate client certificate" toggle will not appear as an option, and inbound mTLS cannot be enabled. Set up your custom domain first, confirm the TLS certificate is applied, and then move forward.
Key Vault access and managed identity
APIM retrieves and uses certificates at runtime through Azure Key Vault, and it authenticates to Key Vault using a system-assigned or user-assigned managed identity. Before you upload any certificates, enable the managed identity on your APIM instance and grant it the correct role on the Key Vault where your certificates live.
| Permission required | Role to assign | Scope |
|---|---|---|
| Read certificate and secret | Key Vault Certificate User | Your Key Vault resource |
| List certificates | Key Vault Reader | Your Key Vault resource |
Without these permissions in place, APIM cannot retrieve the certificate at runtime, and your outbound backend calls will fail with a TLS handshake error that gives you little to work with for debugging. Confirm the role assignments are active before you move to the next step.
Step 1. Set up inbound mTLS for client to gateway
Inbound mTLS requires your APIM gateway to request a certificate from the calling client during the TLS handshake. This happens at the custom domain level, not the API level, which means you configure it once and it applies to all APIs on that hostname. The two tasks you need to complete are: enabling client certificate negotiation on your custom domain, and uploading the CA certificate that APIM will use to verify client certificates.
Enable client certificate negotiation on your custom domain
In the Azure portal, navigate to your APIM instance and open the "Custom domains" blade under Deployment and infrastructure. Select the gateway hostname you configured during prerequisites. You will see a checkbox labeled "Negotiate client certificate". Enable it, then save the change.
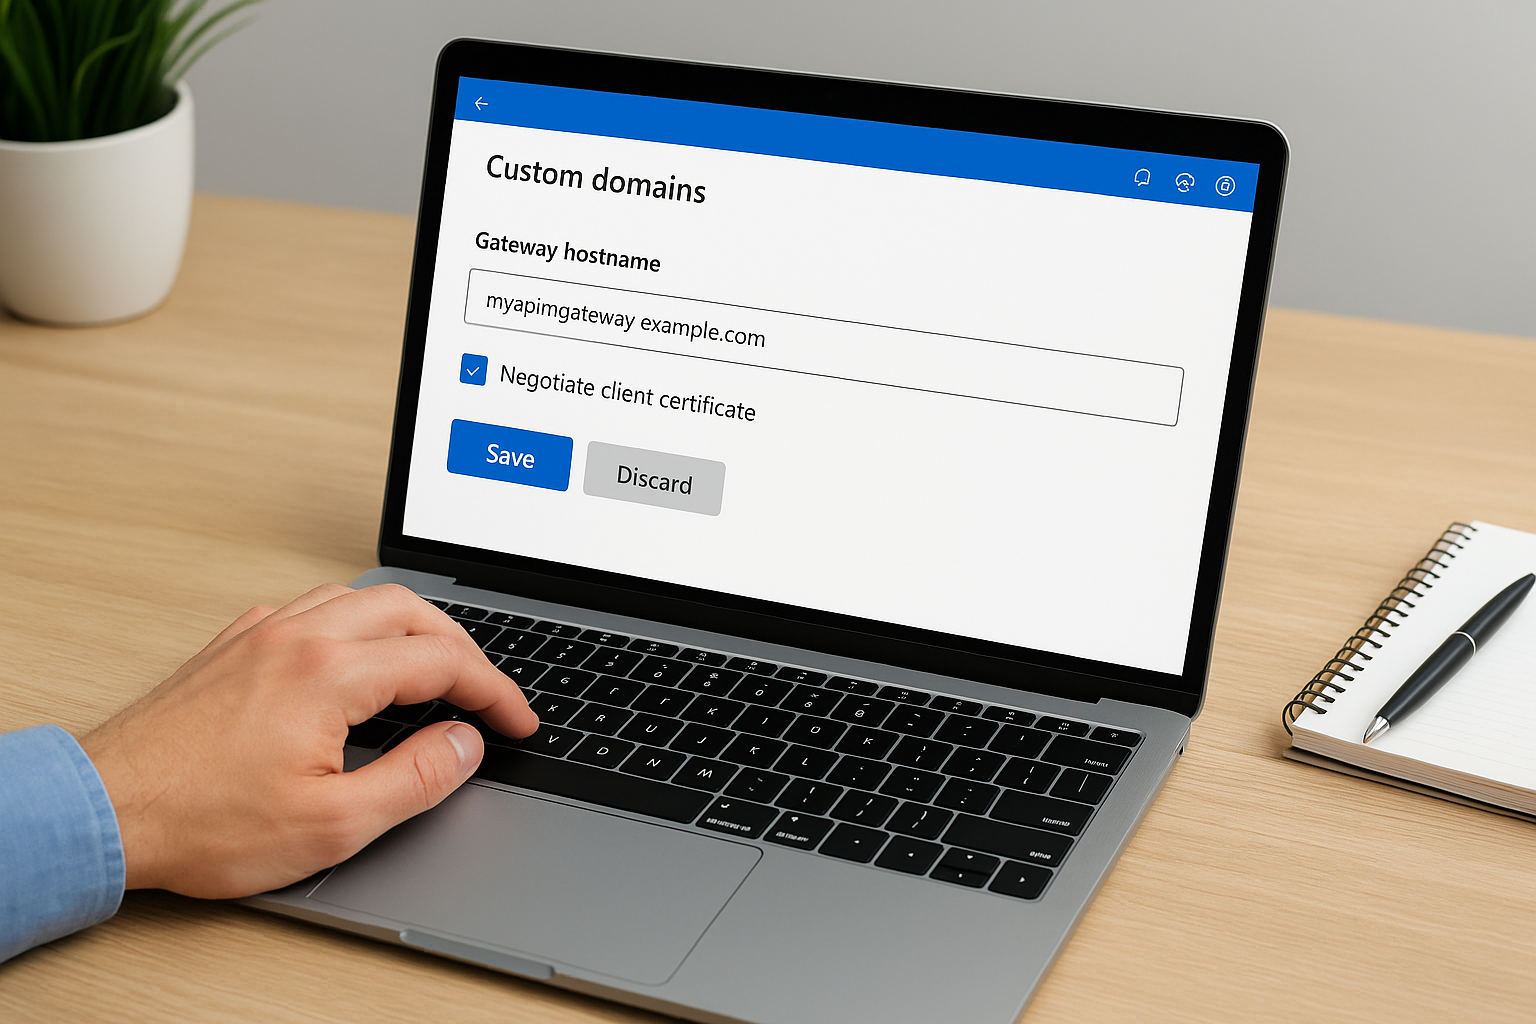
This setting forces the gateway to request a certificate from every client that connects on this hostname, regardless of whether you validate it in policy later. Make sure your clients are capable of presenting a certificate before you enable this in production.
After saving, the change propagates across the APIM gateway infrastructure. This can take several minutes depending on your tier. You can verify the setting took effect by sending a test request without a client certificate from a tool like curl and confirming the handshake fails at the TLS layer.
Upload your CA certificate to APIM
With azure api management mtls configured at the domain level, you now need to give APIM the CA root certificate so it can evaluate the chain of trust for incoming client certificates. Navigate to "Certificates" under the Security section in your APIM instance and select "CA certificates", not the regular Certificates tab.
Upload your CA root certificate in .cer or .pem format. APIM stores this and uses it when your inbound policies perform certificate chain validation. The portal upload process is straightforward:
- Click "Add" in the CA certificates section
- Enter a friendly ID (example:
client-ca-root) - Upload your
.cerfile - Click "Save"
Once uploaded, the CA certificate appears in the list with its expiration date and thumbprint displayed. Reference the ID you assigned when you write validation policies in the next step.
Step 2. Validate client certs with APIM policies
Enabling client certificate negotiation at the gateway level forces clients to present a certificate, but APIM does not automatically reject invalid certificates based on that setting alone. You need inbound policies to actually examine and validate what the client sends. In azure api management mtls configurations, the policy layer is where you enforce your trust rules, checking thumbprints, issuers, subject names, and expiration dates before the request ever reaches your API backend.
Write the inbound validation policy
Your inbound policy runs on every request and has access to the client certificate through the context.Request.Certificate object. The example below checks that the certificate is not expired, matches a known thumbprint, and was issued by your trusted CA.
<inbound>
  <base />
  <choose>
    <when condition="@(
      context.Request.Certificate == null ||
      context.Request.Certificate.NotAfter < DateTime.UtcNow ||
      context.Request.Certificate.Thumbprint != "YOUR_CERT_THUMBPRINT_HERE" ||
      context.Request.Certificate.Issuer != "CN=YourCA, O=YourOrg, C=US"
    )">
      <return-response>
        <set-status code="403" reason="Forbidden" />
        <set-body>Client certificate validation failed.</set-body>
      </return-response>
    </when>
  </choose>
</inbound>
Replace YOUR_CERT_THUMBPRINT_HERE with the actual thumbprint value shown in the CA certificates blade of your APIM portal, and update the Issuer string to match exactly what your certificate authority sets. Even a single character mismatch causes the condition to evaluate to true and returns a 403.
Never hard-code thumbprint values in a shared policy fragment that spans multiple APIs unless every API in that group trusts the exact same client certificate.
Validate the certificate chain against your uploaded CA
Beyond thumbprint matching, you should also verify the full certificate chain against the CA root you uploaded in Step 1. APIM exposes the context.Request.Certificate.Verify() method for this purpose, and adding it as a separate check prevents a stolen certificate from slipping through if chain validation alone would catch it.
<when condition="@(
  context.Request.Certificate == null ||
  !context.Request.Certificate.Verify()
)">
  <return-response>
    <set-status code="403" reason="Forbidden" />
  </return-response>
</when>
Combining thumbprint validation with chain verification gives you two independent checks that an attacker would have to defeat simultaneously. Stack both conditions in your inbound policy to cover the full surface area of certificate-based attack scenarios against your gateway.
Step 3. Set up outbound mTLS from gateway to backend
Outbound mTLS works in the opposite direction from inbound: your APIM gateway presents a client certificate to your backend service during the TLS handshake, and the backend validates it before accepting the request. This protects you from rogue or misconfigured services intercepting your backend traffic, and it confirms to your backend that requests originate from your authorized gateway instance rather than an arbitrary caller.
Upload the client certificate to Key Vault and link it to APIM
Your gateway needs access to a .pfx certificate with its private key to present during the outbound handshake. Store that certificate in Azure Key Vault rather than uploading it directly to APIM. This keeps the private key out of the portal UI and ensures your managed identity handles retrieval at runtime without exposing credentials in configuration files.

Your APIM managed identity must have the Key Vault Certificate User role assigned on the Key Vault resource before it can retrieve the certificate. Confirm this role assignment is active before you proceed.
Once the certificate is in Key Vault, link it to APIM by navigating to "Certificates" under Security in your APIM instance, then selecting the Certificates tab (not CA certificates). Click "Add", choose Key Vault as the source, select your certificate, and assign it a friendly ID such as backend-client-cert. APIM stores a reference and fetches the current version automatically when the certificate rotates.
Configure the backend entity to use the certificate
With the certificate linked, you now attach it to the backend entity that represents your downstream service. In the Azure portal, navigate to "Backends" under your APIM instance, select the backend you want to secure, and open the TLS settings. Enable "Client certificate" and select the certificate ID you assigned in the previous step.
For azure api management mtls on the outbound side, you can also apply the certificate directly in an API-level policy using the authentication-certificate element. This gives you per-API control when different backends require different certificates:
<inbound>
  <base />
  <authentication-certificate certificate-id="backend-client-cert" />
</inbound>
Place this policy in the inbound section of the API that calls your backend. APIM then attaches the certificate to every outgoing request that policy governs, completing the mutual authentication handshake between your gateway and the backend service.
Troubleshoot common mTLS issues in APIM
Even with a careful setup, azure api management mtls configurations produce errors that are difficult to diagnose because TLS handshake failures tend to surface as generic connection rejections with little detail in the response body. The three most common failure categories are 403 responses from your inbound policy, TLS handshake errors on outbound backend calls, and certificate retrieval failures from Key Vault. Knowing where to look for each one cuts your debugging time significantly.
403 errors when the certificate looks correct
You will see a 403 returned by your inbound policy even when the client is sending what appears to be the right certificate. The most frequent cause is a thumbprint string mismatch caused by whitespace, uppercase versus lowercase hex characters, or a copied value that includes invisible characters from the Azure portal. Verify the thumbprint by running the policy expression in the APIM test console and logging context.Request.Certificate.Thumbprint directly to a response header during debugging.
Remove any logging of certificate details before you move to production, since thumbprint values in response headers can assist an attacker in fingerprinting your validation logic.
A second common cause is that context.Request.Certificate returns null even though the client sent a certificate. This happens when the "Negotiate client certificate" toggle is not active on the correct custom domain hostname. Confirm you enabled the toggle on the hostname your client is actually calling, not a secondary alias.
TLS handshake failures on outbound calls
Outbound handshake failures appear in your APIM logs as 502 Bad Gateway responses with a backend connectivity error. The first thing to check is whether the managed identity has an active Key Vault Certificate User role assignment on the exact Key Vault resource where your certificate lives. A missing or delayed role assignment is responsible for the majority of outbound certificate retrieval failures.
If the role assignment is confirmed but calls still fail, check whether your backend service trusts the CA that signed the certificate your APIM gateway is presenting. Your backend's trust store must contain the root CA certificate, otherwise it will terminate the handshake even if APIM presents a valid certificate. Ask your backend team to confirm the CA root is installed, or use OpenSSL to test the handshake directly:
openssl s_client -connect your-backend-host:443 \
  -cert client.crt \
  -key client.key \
  -CAfile ca-root.pem
Review the handshake output for certificate verification errors and confirm the backend returns a "Verify return code: 0 (ok)" message before you conclude the issue is on the APIM side.
Wrap-up
Setting up azure api management mtls correctly requires you to work through four distinct layers: prerequisites, inbound gateway configuration, policy-based validation, and outbound certificate attachment. Each layer builds on the previous one, and a gap at any point produces failures that are frustrating to trace. You now have the configuration steps, policy examples, and debugging commands to implement both directions of mutual TLS with confidence.
The most important takeaway is that enabling certificate negotiation at the domain level is not enough on its own. Your inbound policies must actively validate thumbprints, issuers, and expiration dates, and your backend must trust the CA that signed the certificate your gateway presents. Keep your certificates in Azure Key Vault, rotate them before they expire, and test both directions of the handshake after every change.
If your work involves healthcare data and EHR integrations, explore how SoFaaS handles secure SMART on FHIR connectivity so you can focus on building instead of managing infrastructure.
The Future of Patient Logistics
Exploring the future of all things related to patient logistics, technology and how AI is going to re-shape the way we deliver care.
Thank you! Your submission has been received!
Oops! Something went wrong while submitting the form.