ForgeRock OpenID Connect: Setup And Integration Guide

Setting up ForgeRock OpenID Connect correctly is one of those tasks that looks straightforward on paper but gets complicated fast once you're dealing with real-world identity flows. Between configuring OAuth 2.0 providers, registering clients, mapping claims, and handling token validation, there are plenty of places where things can quietly break, especially in healthcare environments where authorization directly impacts patient data access.
At SoFaaS, we manage SMART on FHIR integrations that depend on properly configured identity layers, including OpenID Connect providers like ForgeRock. We've seen firsthand how a misconfigured OIDC setup can stall an entire EHR integration pipeline. Getting the identity piece right isn't optional, it's the foundation that everything else, from patient consent flows to secure API access, builds on.
This guide walks you through ForgeRock's OpenID Connect setup from start to finish: configuring the OAuth 2.0 provider, registering OIDC clients, setting up scopes and claims, and integrating with external applications. Whether you're connecting ForgeRock to a healthcare application or a broader enterprise system, you'll find the concrete steps and configuration details you need to get it running without guesswork.
What you need before you start
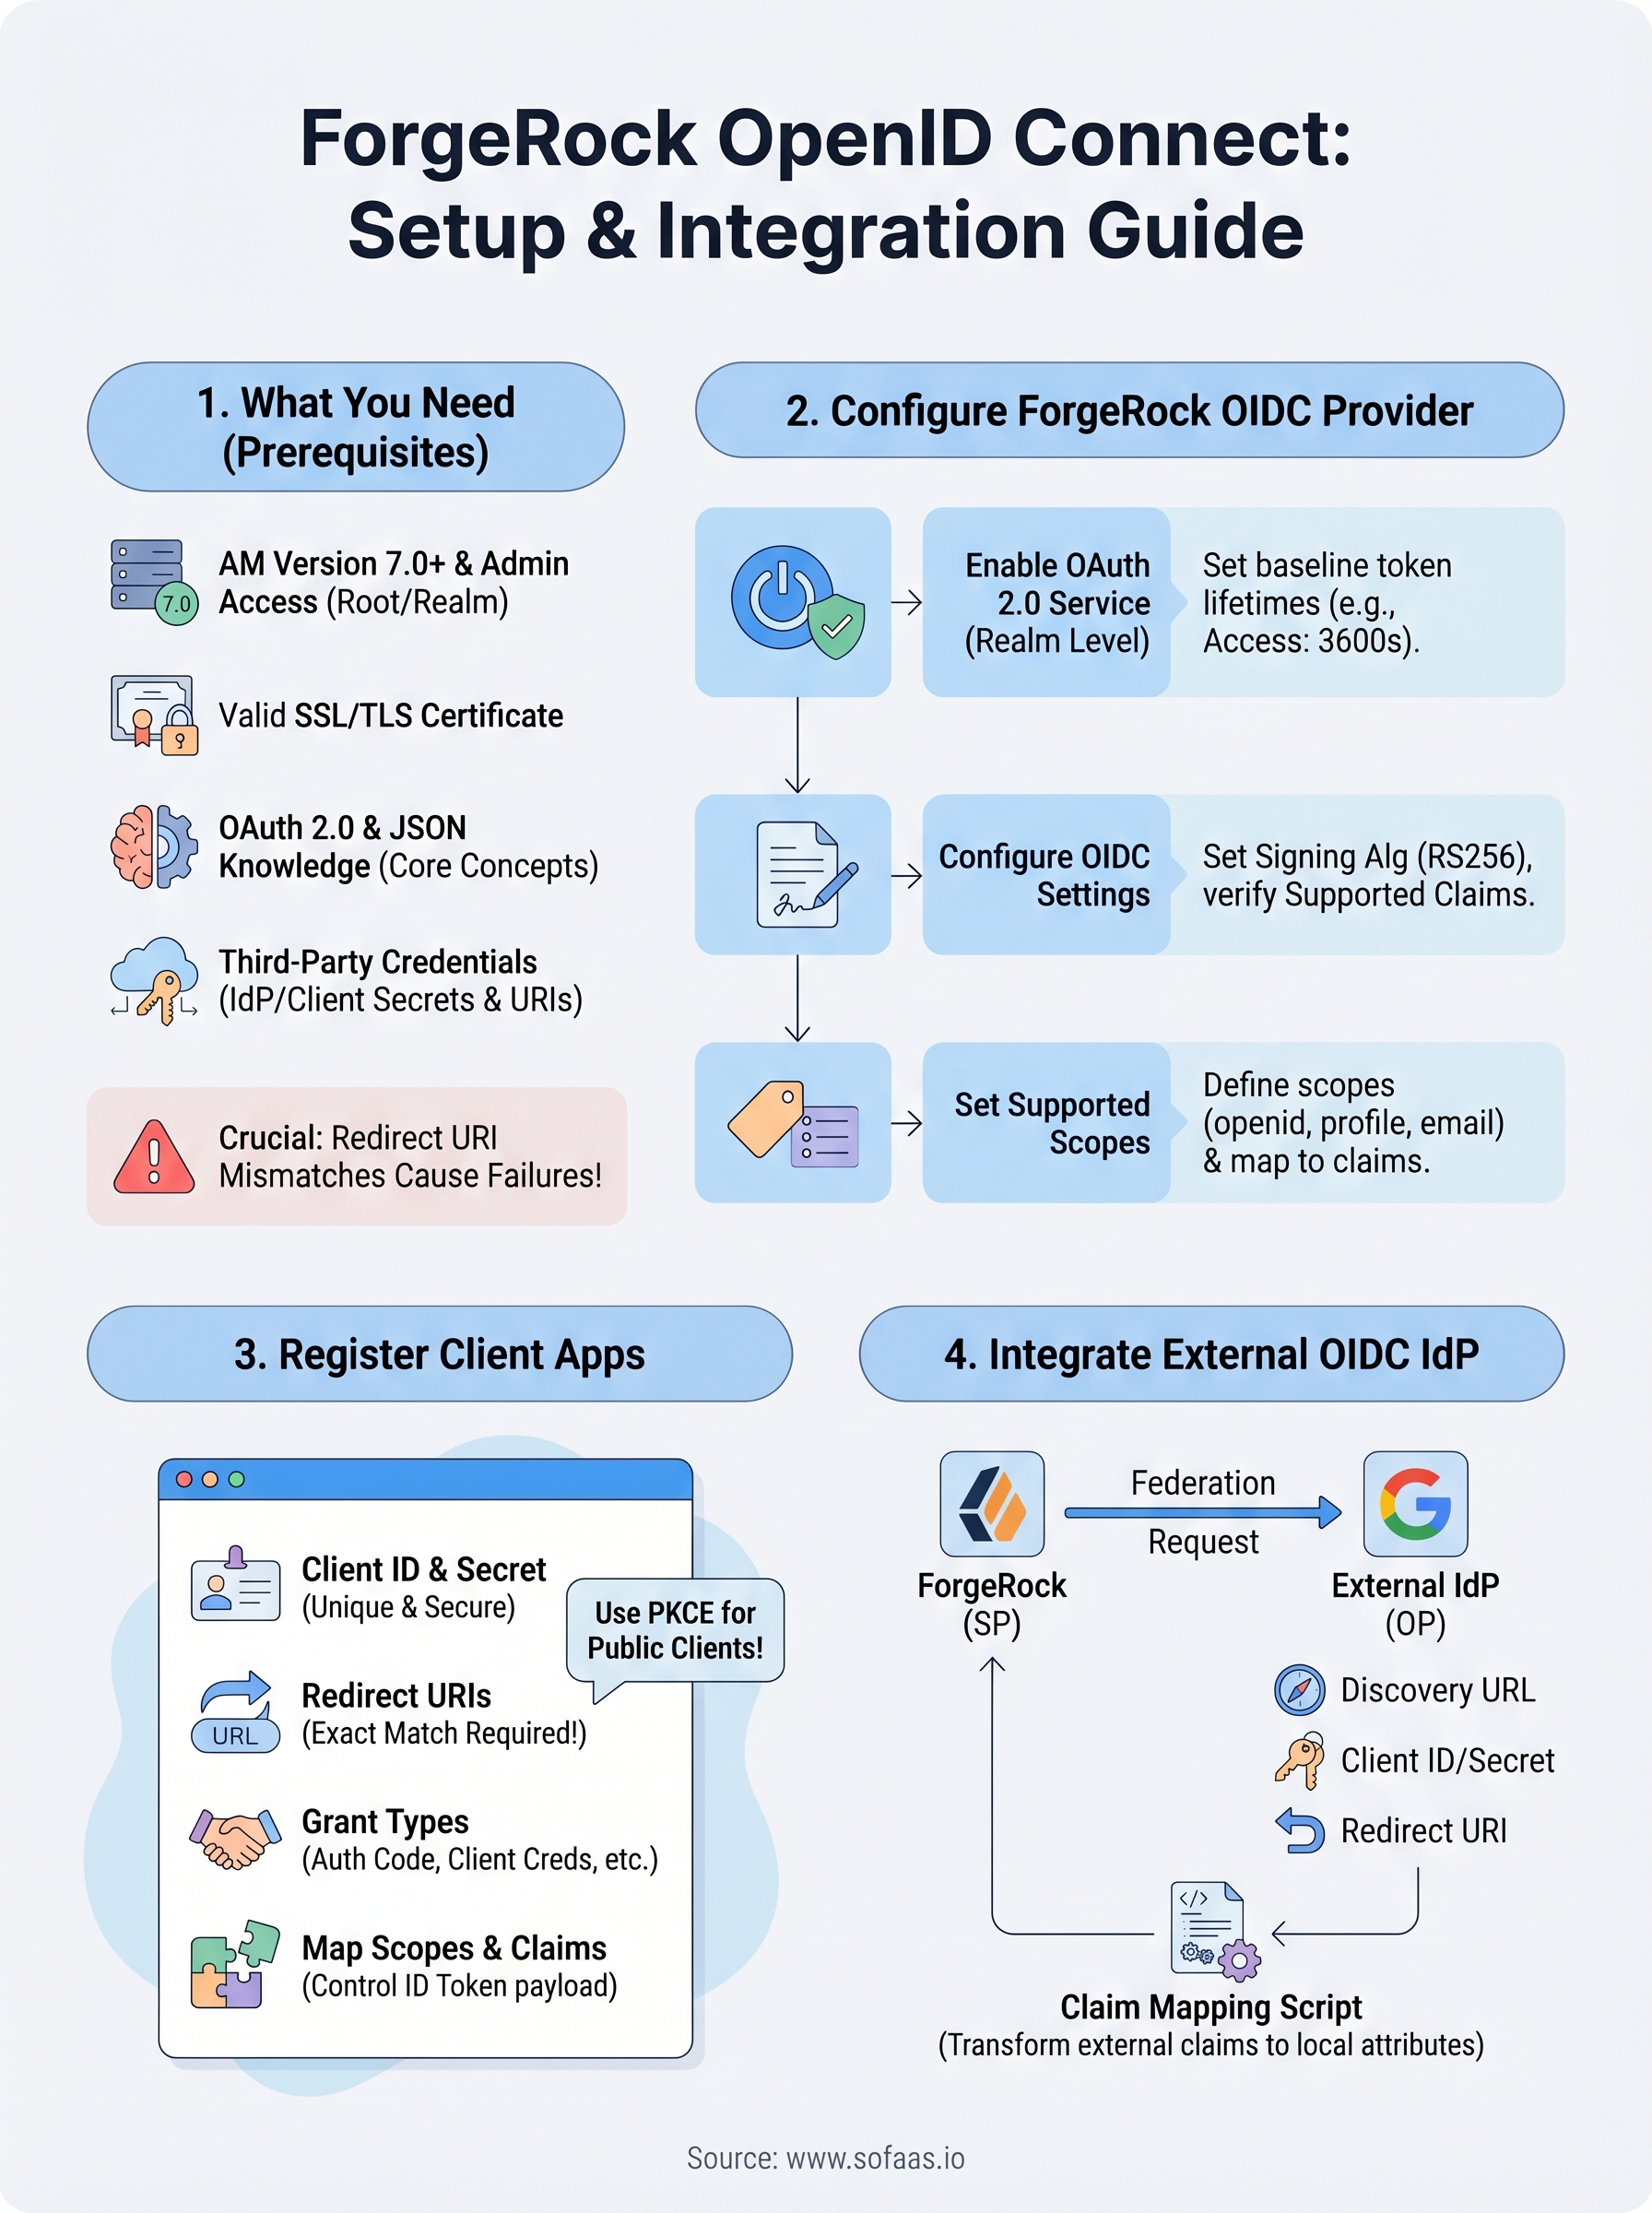
Before you touch any ForgeRock OpenID Connect configuration, confirm that your environment is ready. Skipping this step is the most common reason teams waste hours troubleshooting problems that turn out to be missing permissions, wrong software versions, or incomplete credentials. Running through the requirements below before you start saves you significant time and prevents the frustration of stopping mid-configuration to track down information you should have gathered upfront.
ForgeRock environment and access requirements
Your ForgeRock deployment needs to meet a few baseline conditions before you can configure OIDC flows. You need a running instance of ForgeRock Access Management (AM), version 7.0 or later, either on-premises or hosted in the ForgeRock Identity Cloud. Earlier versions handle OAuth 2.0 and OIDC differently enough that specific menu paths, configuration fields, and API endpoints in this guide may not match what you see in your console.
Administrative access to your AM admin UI is also required. Log in at https://your-domain/am/console and confirm you can reach the top-level Realms view without errors. If you're working within a specific realm rather than the root realm, note that realm name now since you'll reference it at multiple points throughout the configuration steps.
| Requirement | Detail |
|---|---|
| ForgeRock AM version | 7.0 or later |
| Admin UI access | Full administrative privileges |
| Target realm | Root realm or a configured custom realm |
| Network access | AM must be reachable from client apps and any external IdPs |
| SSL/TLS certificate | Valid cert on your AM instance (self-signed is acceptable for dev environments) |
Required technical knowledge
Working through this guide assumes you have a solid understanding of OAuth 2.0 core concepts, including the authorization code flow, access tokens, refresh tokens, and scopes. OpenID Connect layers identity on top of OAuth 2.0 using ID tokens and a UserInfo endpoint, so if the underlying OAuth 2.0 model is not yet familiar, review the OAuth 2.0 RFC from the IETF before moving forward. Trying to configure OIDC without that foundation leads to errors that are genuinely difficult to diagnose.
Comfort with JSON configuration payloads is also necessary since ForgeRock uses JSON throughout client registration, scope mapping, and claim configuration. If you plan to automate any steps using the AM REST API, basic proficiency with HTTP request tools like curl or Postman will help, though the AM admin UI covers all the steps in this guide without requiring command-line access.
If you're building OIDC flows for healthcare applications, your token scopes and claim mappings must align with both your OIDC configuration and your FHIR authorization requirements from day one. Retrofitting that alignment after the fact costs significantly more time than designing it correctly upfront.
Dependencies and third-party credentials
Some sections of this guide involve connecting ForgeRock to an external identity provider (IdP) or registering a client application that lives outside your ForgeRock instance. Gathering all the required values before you begin prevents unnecessary interruptions during configuration.
For external IdP integration, collect:
- The provider's discovery document URL, typically at
https://idp-domain/.well-known/openid-configuration - A client ID and client secret that the external provider issues to ForgeRock
- The exact redirect URIs you intend to register with the external provider
For client application registration within ForgeRock, gather:
- The application's redirect URI(s) exactly as the app will send them in requests
- The OAuth 2.0 grant types the application will use (authorization code, client credentials, hybrid, etc.)
- The specific scopes the application needs to request, including any custom scopes
Redirect URI mismatches are one of the most common causes of OIDC authentication failures in practice. Even a trailing slash difference between what you register and what the application sends will cause the flow to fail, so verify these values carefully before you begin configuration rather than debugging them after the fact.
Step 1. Understand ForgeRock OIDC building blocks
Before you start clicking through the ForgeRock admin console, you need a clear mental model of how ForgeRock OpenID Connect structures its identity layer. ForgeRock AM acts as the OpenID Provider (OP), the entity that authenticates users and issues identity tokens to client applications. Every configuration decision you make in the steps ahead maps back to one of these core components, so understanding them now prevents confusion later.
The OpenID Provider and OAuth 2.0 service
ForgeRock AM handles OIDC through its OAuth 2.0 Provider service, which you configure at the realm level. This service manages authorization endpoints, token endpoints, and the discovery document. When a client application initiates an OIDC flow, it sends an authorization request to the AM /authorize endpoint and receives an authorization code in return. AM then exchanges that code for an access token, refresh token, and, critically, an ID token.

The table below shows the key endpoints ForgeRock exposes for OIDC flows:
| Endpoint | Path | Purpose |
|---|---|---|
| Authorization | /oauth2/authorize |
Initiates the OIDC flow |
| Token | /oauth2/access_token |
Exchanges code for tokens |
| UserInfo | /oauth2/userinfo |
Returns claims about the authenticated user |
| Discovery | /.well-known/openid-configuration |
Publishes provider metadata |
| JWKS | /oauth2/connect/jwk_uri |
Provides public keys for token validation |
ID tokens and claims
The ID token is a signed JWT that ForgeRock issues after successful authentication. It contains claims, which are key-value pairs describing the authenticated user and the authentication event. At minimum, every ID token includes sub (subject identifier), iss (issuer), aud (audience), exp (expiration), and iat (issued at).
Your client application must validate the ID token signature using the keys published at ForgeRock's JWKS endpoint before trusting any claim values.
A minimal ForgeRock-issued ID token payload looks like this:
{
  "sub": "user123",
  "iss": "https://your-domain/am/oauth2",
  "aud": "my-client-app",
  "exp": 1745000000,
  "iat": 1744996400,
  "nonce": "abc123xyz"
}
Scopes and how ForgeRock resolves them
Scopes control what claims ForgeRock includes in the ID token and UserInfo response. The openid scope is mandatory for any OIDC request. Adding profile returns name and profile-related claims, while email returns the user's email address. ForgeRock maps these standard OIDC scopes to identity attributes configured in your realm's identity store.
Custom scopes let you expose application-specific claims beyond the standard set, which is particularly useful in healthcare scenarios where you need to surface role or credential data alongside standard identity claims.
Step 2. Configure ForgeRock as an OIDC provider
With your prerequisites confirmed and the building blocks clear, you're ready to activate and configure ForgeRock as an OpenID Connect provider. This step happens entirely within the AM admin console, and the configuration you set here controls how every downstream OIDC client and external identity provider interacts with your instance. Work through the three sub-steps below in order since each one builds on the previous.
Enable the OAuth 2.0 provider service
The OAuth 2.0 Provider service is not active in a new realm by default, so your first task is to turn it on. Navigate to Realms > [Your Realm] > Services in the AM admin console, click Add a Service, and select OAuth2 Provider from the list. Once you save, ForgeRock begins exposing the /oauth2/authorize, /oauth2/access_token, and /.well-known/openid-configuration endpoints for that realm.
Before moving to OIDC-specific settings, configure these baseline fields on the Core tab of the OAuth2 Provider service:
| Field | Recommended value |
|---|---|
| Access Token Lifetime | 3600 (seconds) |
| Refresh Token Lifetime | 86400 (seconds) |
| Authorization Code Lifetime | 120 (seconds) |
| Token Signing Algorithm | RS256 |
Configure OIDC-specific settings
With the OAuth2 Provider service active, open the OpenID Connect tab within the same service configuration page. This tab controls the settings that transform standard OAuth 2.0 into a full ForgeRock OpenID Connect implementation. Set the ID Token Signing Algorithm to RS256 to match your token signing key type, which ensures client applications can validate tokens using the public keys published at your JWKS endpoint.
Verify that your signing key pair exists under Secret Stores in your realm configuration before saving these settings, because AM will reject token issuance requests if the referenced key is missing or misconfigured.
Confirm that the Supported Claims list includes the standard claims your client applications expect to receive. You can add custom claim names and map each one to an attribute in your identity store directly within this tab, which keeps your claim configuration centralized and easy to audit.
Set the supported scopes
Open the Scope tab on the OAuth2 Provider service and verify that openid, profile, and email appear in the Supported Scopes list. For each custom scope your clients will request, add an entry here and define the claim names it exposes. ForgeRock resolves scope-to-claim mappings at runtime, so any scope a client sends that is not registered here gets silently dropped from the token response, which causes claims to go missing without a clear error on the client side.
Step 3. Register and configure OIDC client apps
With your ForgeRock OpenID Connect provider configured, your next task is registering the client applications that will participate in OIDC flows. Each client app, whether a web application, mobile app, or backend service, needs its own registration within ForgeRock AM. This registration tells AM what redirect URIs to allow, which grant types the client can use, and which scopes it can request.
Create a new OAuth 2.0/OIDC client
Navigate to Realms > [Your Realm] > Applications > OAuth 2.0 in the AM admin console, then click Add Client. ForgeRock asks for three fields immediately: a Client ID, a Client Secret, and a Redirect URI. The Client ID becomes the client_id parameter your application sends in every authorization request, so choose a value that clearly identifies the application across your environment.
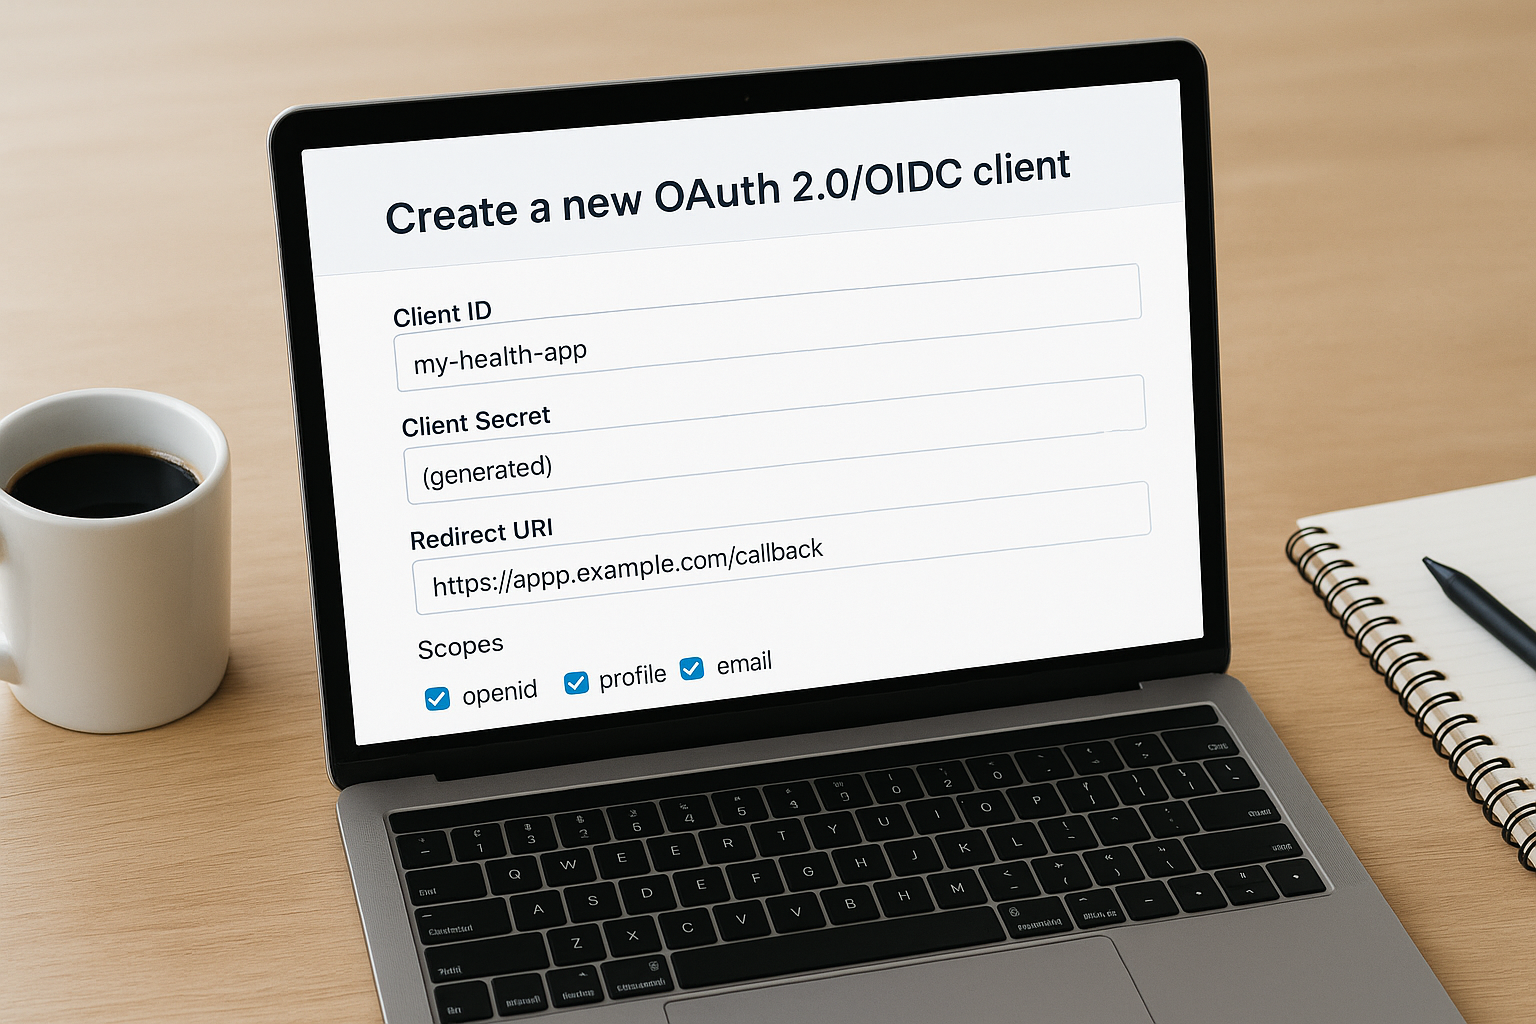
| Field | Example value | Notes |
|---|---|---|
| Client ID | my-health-app | Unique per realm |
| Client Secret | (generated) | Store securely; never expose in frontend code |
| Redirect URI | https://app.example.com/callback | Must match exactly what the app sends |
| Scopes | openid profile email | Space-separated; must exist in provider config |
Public clients such as single-page applications should use PKCE instead of a client secret to protect the authorization code exchange.
Configure redirect URIs and grant types
Open the Core tab of the newly created client and expand the Grant Types field. Select the grant types that match your application's architecture. A server-side web application typically uses Authorization Code, while a backend service authenticating without a user uses Client Credentials. Enabling grant types the application does not actually need expands your attack surface unnecessarily, so add only what the app requires.
Redirect URIs must appear in your client registration exactly as the application sends them in the redirect_uri parameter. Add every URI the application might use, including development and staging URLs if they route through this same ForgeRock instance. Even a trailing slash difference between the registered value and what the app sends will cause the authorization flow to reject the request immediately.
Map scopes and claims to the client
Switch to the OpenID Connect tab on your client configuration. Under Post Logout Redirect URI, add the URL where ForgeRock should send users after they log out. This prevents users from landing on a ForgeRock-branded default page after logout, which creates a poor experience in any production application.
On the same tab, you can control which claims appear in the ID token versus the UserInfo endpoint for this specific client. By default, ForgeRock keeps the ID token compact and places most claims in the UserInfo response. If your application needs specific claims inside the ID token payload rather than fetching them from the UserInfo endpoint separately, enable the "Always Return Claims in ID Token" toggle and list the exact claim names you require.
Step 4. Integrate ForgeRock with an external OIDC IdP
Connecting ForgeRock OpenID Connect to an external identity provider lets your users authenticate through a third-party system while ForgeRock handles token issuance and session management for your applications. This pattern is common when your organization already has an enterprise IdP, such as Microsoft Entra ID or Google Identity Platform, and you want to federate those identities into your ForgeRock realm rather than managing separate credentials. The steps below walk you through creating the connection and mapping the incoming identity data correctly.
Create a social identity provider connection
Navigate to Realms > [Your Realm] > Identity Providers in the AM admin console and click Add Identity Provider. Select OpenID Connect from the provider type list. ForgeRock will prompt you to enter the external provider's discovery document URL, which is typically https://external-idp-domain/.well-known/openid-configuration. ForgeRock fetches the document automatically and populates the authorization endpoint, token endpoint, and JWKS URI fields from its contents.
Fill in the Client ID and Client Secret that the external provider issued to ForgeRock when you registered it as a client application. Set the redirect URI in your external IdP registration to https://your-domain/am/oauth2/[realm]/redirect/[provider-name], matching the exact format ForgeRock expects. Any mismatch here will cause the federated login attempt to fail before the user even completes authentication on the external provider's page.
Register only the scopes you actually need from the external provider. Requesting broad scopes like
offline_accesswhen your flow does not require refresh tokens adds unnecessary risk to the integration.
Map incoming claims to local identity attributes
Once ForgeRock receives the ID token from the external IdP, it needs to map the incoming claims to attributes in your local identity store so it can link or provision user accounts. Open the Transformation Script field on the identity provider configuration page. This script runs after ForgeRock validates the external token and gives you control over how claim values translate to local profile fields.
A minimal claim mapping script looks like this:
var idToken = idTokenClaims;
var normalizedProfile = {};
normalizedProfile["mail"] = idToken["email"];
normalizedProfile["cn"] = idToken["name"];
normalizedProfile["uid"] = idToken["sub"];
scripted.setProfile(normalizedProfile);
Confirm that the attribute names on the right side match exactly what your identity store schema expects. If the attribute name in the script does not exist in your identity store, ForgeRock silently drops it during account linking, which results in incomplete user profiles and can break downstream authorization decisions that depend on those attributes.
Where to go from here
You now have a complete path through ForgeRock OpenID Connect configuration: enabling the OAuth 2.0 provider, registering client applications, setting scopes and claims, and federating with external identity providers. Each step builds directly on the one before it, so if something breaks in your environment, you can trace the issue back to a specific configuration point rather than guessing.
For healthcare applications, this identity layer is only part of the picture. Your OIDC tokens and scopes need to align precisely with your FHIR authorization model, and getting that alignment wrong delays EHR integrations significantly. If you're building SMART on FHIR applications and want to skip the integration complexity, launch your SMART on FHIR app with VectorCare. The platform handles OAuth flows, patient consent, and EHR connectivity so your team can focus on the application itself rather than the underlying infrastructure.
The Future of Patient Logistics
Exploring the future of all things related to patient logistics, technology and how AI is going to re-shape the way we deliver care.
Thank you! Your submission has been received!
Oops! Something went wrong while submitting the form.