OpenID Connect Claims: Scopes, Tokens, And Identity Data

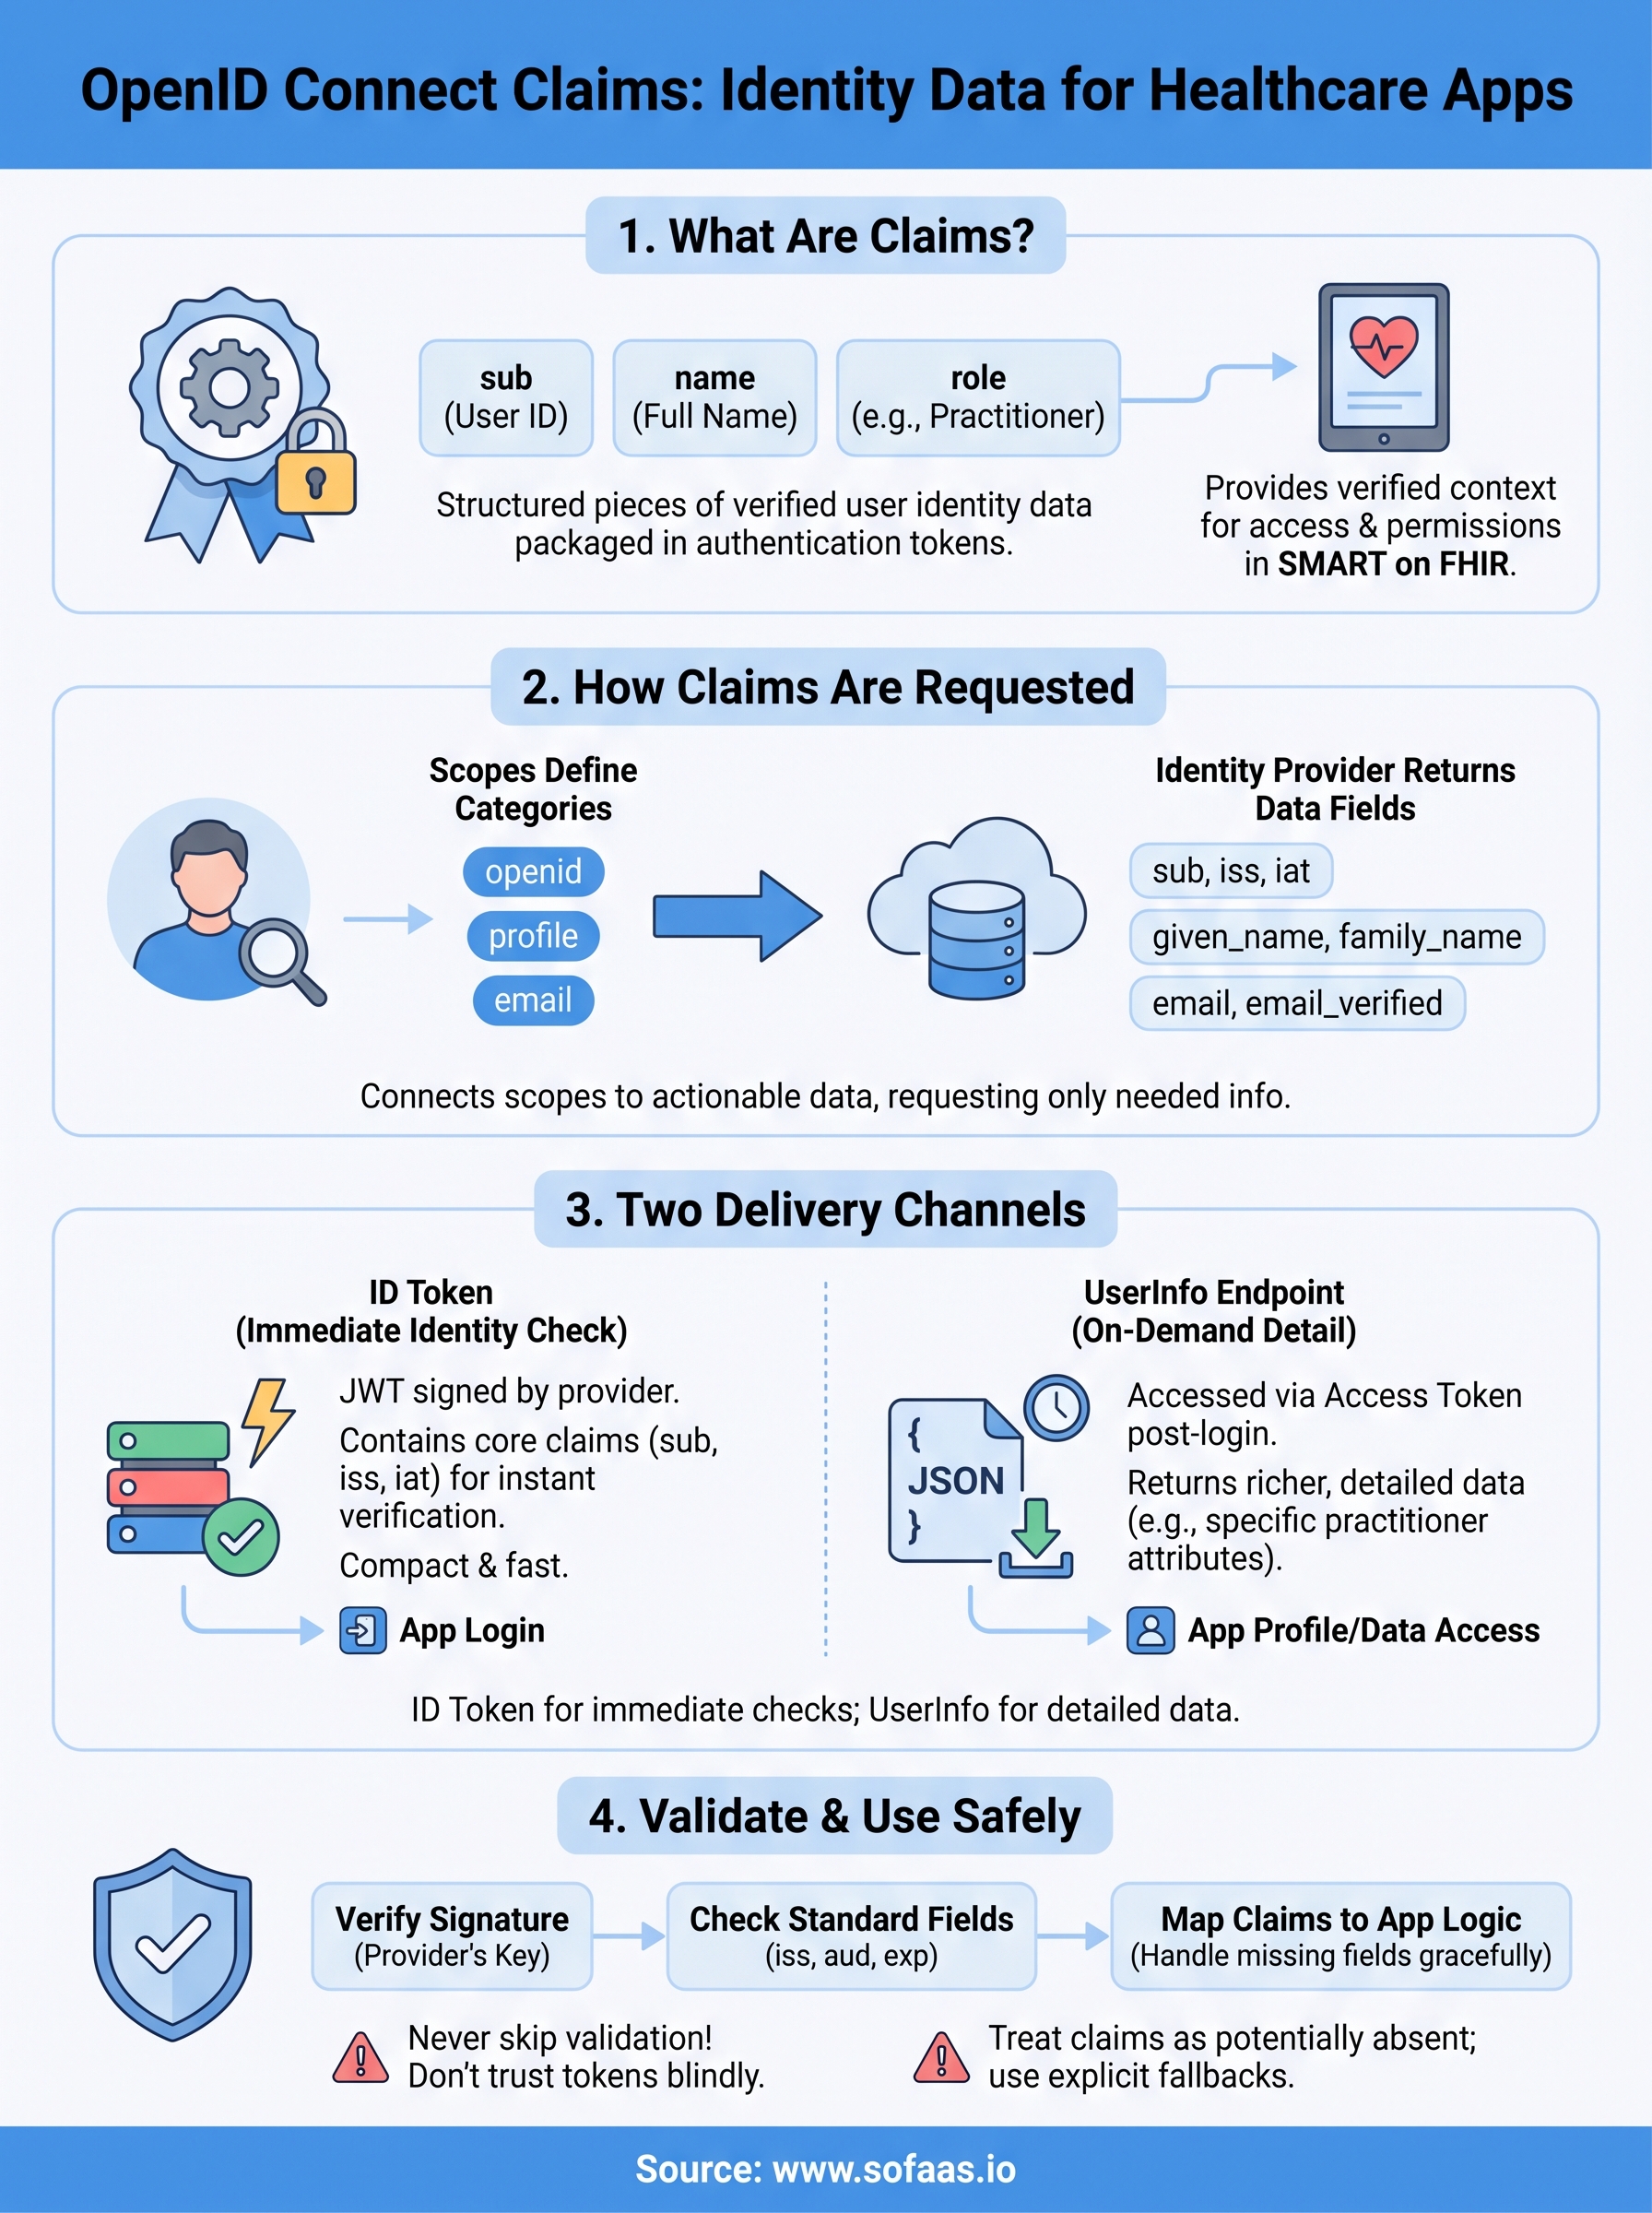
Every time a healthcare application authenticates a user through SMART on FHIR, it relies on OpenID Connect claims to answer a fundamental question: who is this person, and what information can we access about them? Claims are the structured pieces of identity data, like a user's name, email, or role, that get packaged inside tokens during authentication. They're how an identity provider communicates user attributes to your application in a standardized, machine-readable way.
Understanding how claims work matters if you're building anything that touches EHR authentication. Claims tie directly into scopes (which define what you're requesting), tokens (which carry the data), and authorization flows (which govern consent). Get this wrong, and you'll fight token parsing errors, missing user context, or broken consent flows. Get it right, and your app receives exactly the identity data it needs, nothing more, nothing less.
This article breaks down what OIDC claims are, how they relate to scopes and tokens, and how to request them properly. At SoFaaS, we handle OAuth and authorization management as part of our managed SMART on FHIR platform, so we've seen firsthand how claim misconfiguration slows down healthcare integrations. Here's what you need to know.
Why OpenID Connect claims matter
When you build a healthcare application that authenticates users through an identity provider, you don't just need to know that authentication succeeded. You need to know who authenticated, what role they hold, and what data they're authorized to access. OpenID Connect claims are the mechanism that delivers that information in a structured, verifiable format. Without claims, your application receives a token that confirms identity but tells you almost nothing useful about the person behind it.
Claims give your app verified identity context
Standard OIDC claims like sub, email, and profile are defined in the OpenID Connect Core specification. Each claim carries a specific piece of verified user information that your application reads after the token is issued. In healthcare contexts, additional claims often encode things like practitioner identifiers, patient record references, or organizational affiliations, information that directly determines what a user can see or do inside your application.
A missing or malformed claim won't just break a UI element; it can silently grant incorrect access levels or block legitimate users from the data they need.
Your application logic almost always depends on at least some claims to function correctly. Role-based access control, provider lookup, patient matching, and audit logging all rely on claim data being present, accurate, and correctly mapped. If you've ever debugged an authentication issue where a user could log in but couldn't load any records, there's a good chance a claim was missing or misread.
Claims connect scopes to actionable data
Scopes and claims work together, but they serve different roles. When you request a scope like openid or profile, you're telling the identity provider what category of information your application wants. The claims are the actual data fields returned in response to that request. Requesting the profile scope, for example, typically returns claims like given_name, family_name, and birthdate, depending on the provider's configuration.

Understanding this relationship helps you request only what you need, which matters for HIPAA compliance where minimum necessary access is a core principle. Over-requesting scopes leads to bloated tokens, broader consent dialogs, and larger attack surfaces, all problems you can avoid by mapping your claim requirements before you write a single line of authorization code.
How claims work in tokens and UserInfo
OpenID Connect delivers claims through two distinct channels: the ID token and the UserInfo endpoint. Understanding which channel carries which data helps you parse responses correctly and avoid silent failures when expected fields don't appear where you look for them.

Claims in the ID token
The ID token is a JSON Web Token (JWT) that the identity provider signs and returns directly in the authorization response. It always contains a core set of openid connect claims, including sub (the unique subject identifier), iss (the issuer), and iat (issued-at timestamp). Depending on the scopes you requested, the provider may also include profile claims like name or email directly inside this token. Your application can decode and read these claims without making a second network call, which makes the ID token useful for immediate identity checks at login.
Only include claim data in the ID token that your application genuinely needs at the moment of authentication, since token size directly impacts performance and security.
Claims from the UserInfo endpoint
Your application accesses the UserInfo endpoint as a protected resource by calling it after authentication completes, using the access token as a credential. It returns a JSON object containing additional or more detailed claims that the identity provider chose not to embed in the ID token. This split design keeps tokens compact while still making richer user data available on demand. In healthcare integrations, practitioner-specific attributes often come from this endpoint rather than the token itself, so you need to query it explicitly when your application depends on role or affiliation data.
How to request the right claims
Requesting openid connect claims starts with understanding that you control what the identity provider returns. You don't get claims automatically beyond the baseline openid scope. Every additional claim requires you to explicitly declare the scope or use the claims request parameter in your authorization request. Getting this right from the start saves you from debugging empty fields later in your integration.
Use scopes to declare what you need
Scopes are your first tool for claim selection. You add them to the authorization request as a space-separated list in the scope parameter. Each standard scope maps to a defined set of claims, so knowing those mappings helps you request exactly what your application depends on without asking for more than necessary.
| Scope | Common claims returned |
|---|---|
openid |
sub, iss, iat, exp |
profile |
name, given_name, family_name, birthdate |
email |
email, email_verified |
address |
address |
phone |
phone_number, phone_number_verified |
Requesting broad scopes to "cover all cases" expands your consent dialog and your attack surface at the same time. Request only the scopes your application actively uses.
Use the claims parameter for precision
When scopes don't give you enough control, the claims request parameter lets you specify individual claims by name and mark them as either required (essential: true) or optional. You include this as a JSON object in the authorization request, targeting either the ID token or the UserInfo endpoint. This approach is especially useful in healthcare integrations where you need specific practitioner or patient identifiers that fall outside standard scope definitions and can't be reliably inferred from scope alone.
How to validate and use claims safely
Receiving openid connect claims from a token is only half the work. Before your application acts on any claim data, you need to verify that the token is legitimate and that the claims inside it are intact. Skipping validation steps is one of the fastest ways to introduce a security vulnerability into a healthcare integration, where the consequences of trusting forged or tampered identity data can be serious.
Verify the token signature and standard fields
Your first step with any ID token is verifying the signature against the identity provider's public key, which you retrieve from the provider's JWKS endpoint (typically published in the OpenID Connect discovery document). This confirms the token hasn't been altered since it was issued. After signature verification, check the standard registered claims: confirm iss matches the expected issuer, aud matches your client ID, and exp hasn't passed. These three checks together confirm the token is valid, intended for your application, and still within its active window.
Never skip expiration and audience checks, even in development environments, since habits built during testing carry directly into production code.
Map claims to your application logic carefully
Once you've confirmed the token is valid, you need to map each claim to the specific function it serves in your application, whether that's identifying a user, loading role permissions, or linking a practitioner record. Treat every claim as potentially absent, since providers don't always return every requested claim on every authentication. Your code should handle missing claims gracefully with explicit fallbacks rather than assuming fields will always be populated.
Common pitfalls and best practices
Even when you understand how openid connect claims work in theory, production integrations surface problems that documentation rarely covers. Most claim-related failures follow predictable patterns, and knowing them in advance lets you avoid the debugging cycles that consistently slow down healthcare application deployments.
Mistakes that break integrations
The most frequent mistake is assuming claim names are consistent across every provider. Epic, Cerner, and other EHR identity providers sometimes use custom claim names that don't match standard OIDC field names, so a field you expect as given_name might arrive under a vendor-specific key instead. A second common problem is trusting claims without completing token validation first, which leaves your application open to accepting forged or replayed identity data whenever your verification logic has gaps. Both mistakes tend to cause failures that are hard to reproduce because they depend on which provider your user authenticated against.
Never cache claims from one session and reuse them in another, since claims reflect the state of an identity at a specific point in time and may change between authentications.
Practices that keep claim handling reliable
Building reliable claim handling starts with treating your claim-to-application-logic mapping as a deliberate design step, not something you figure out during integration testing. Document exactly which claims your application depends on, where it reads them from (ID token or UserInfo endpoint), and what behavior it falls back to when any of them are absent. You should also test your full authorization flow separately against each EHR system you integrate with, since claim availability and field naming vary enough between providers that a flow working perfectly against one may silently fail against another.
What to do next
You now have a working picture of how openid connect claims flow through tokens, how scopes control what you receive, and how to validate and map claim data safely inside your application. The practical next step is to audit your current authorization flow against each EHR you integrate with, confirm which claims you're requesting versus which ones your application actually uses, and close any gaps in your token validation logic before they reach production.
If you're building a SMART on FHIR integration and want to skip the complexity of managing OAuth flows, claim mappings, and EHR-specific configuration differences yourself, a managed platform handles that work for you. SoFaaS abstracts the authorization layer so your team focuses on building features instead of debugging identity infrastructure. Launch your SMART on FHIR app in a few steps and see how quickly a working integration comes together.
The Future of Patient Logistics
Exploring the future of all things related to patient logistics, technology and how AI is going to re-shape the way we deliver care.
Thank you! Your submission has been received!
Oops! Something went wrong while submitting the form.